
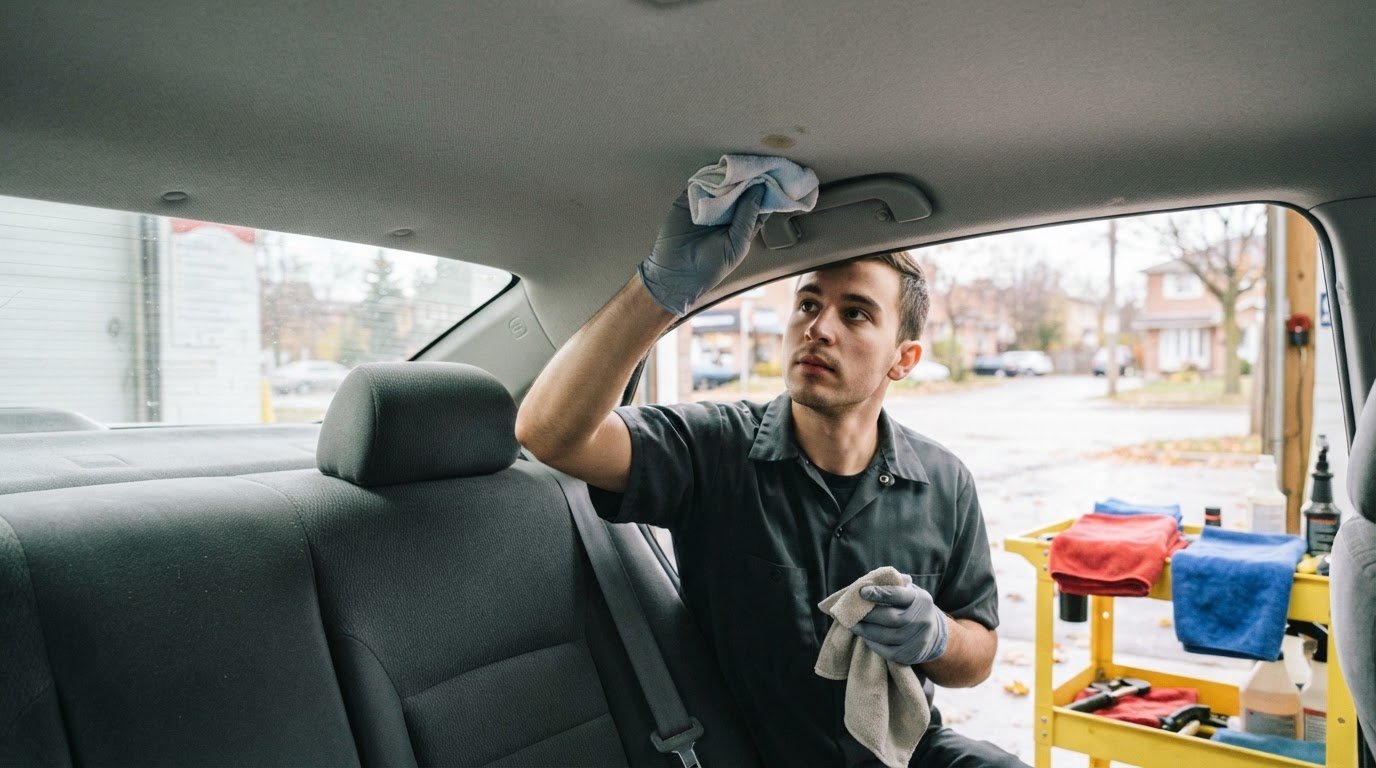
The best way to clean a car headliner without causing sag is to use as little moisture and pressure as possible. Vacuum first with low suction and a soft-bristled attachment, then work in small sections with a lightly damp cloth or sponge. Wring out about 90% of the water, apply cleaner to the cloth rather than spraying the fabric, and blot each section dry right away.
A clean headliner can make the whole cabin feel fresher, but soaking or scrubbing it may loosen the material and worsen sagging. This guide explains how to identify dust, stains, odours, and discolouration, then clean gently without driving moisture into the backing. You’ll also learn how to handle stubborn marks, dry the fabric carefully, and respond if the headliner is already sagging. Start with a light touch: small, controlled steps help remove surface dirt while protecting the fabric’s bond to the roof.
Key Takeaways
- Look for dust, stains, odours, discolouration, or flattened fabric to spot areas that may need attention.
- Vacuum gently with low suction and a soft-bristled attachment before using any cleaner.
- Use a lightly damp cloth, work in small sections, and blot each area dry to limit moisture reaching the backing.
- If the headliner is already sagging, avoid cleaning it; added moisture can worsen the separation.
- For broader vehicle cleaning, Nanak Car Wash’s Car Detailing Packages are a practical next step.
Avoiding cleaning already-sagging sections
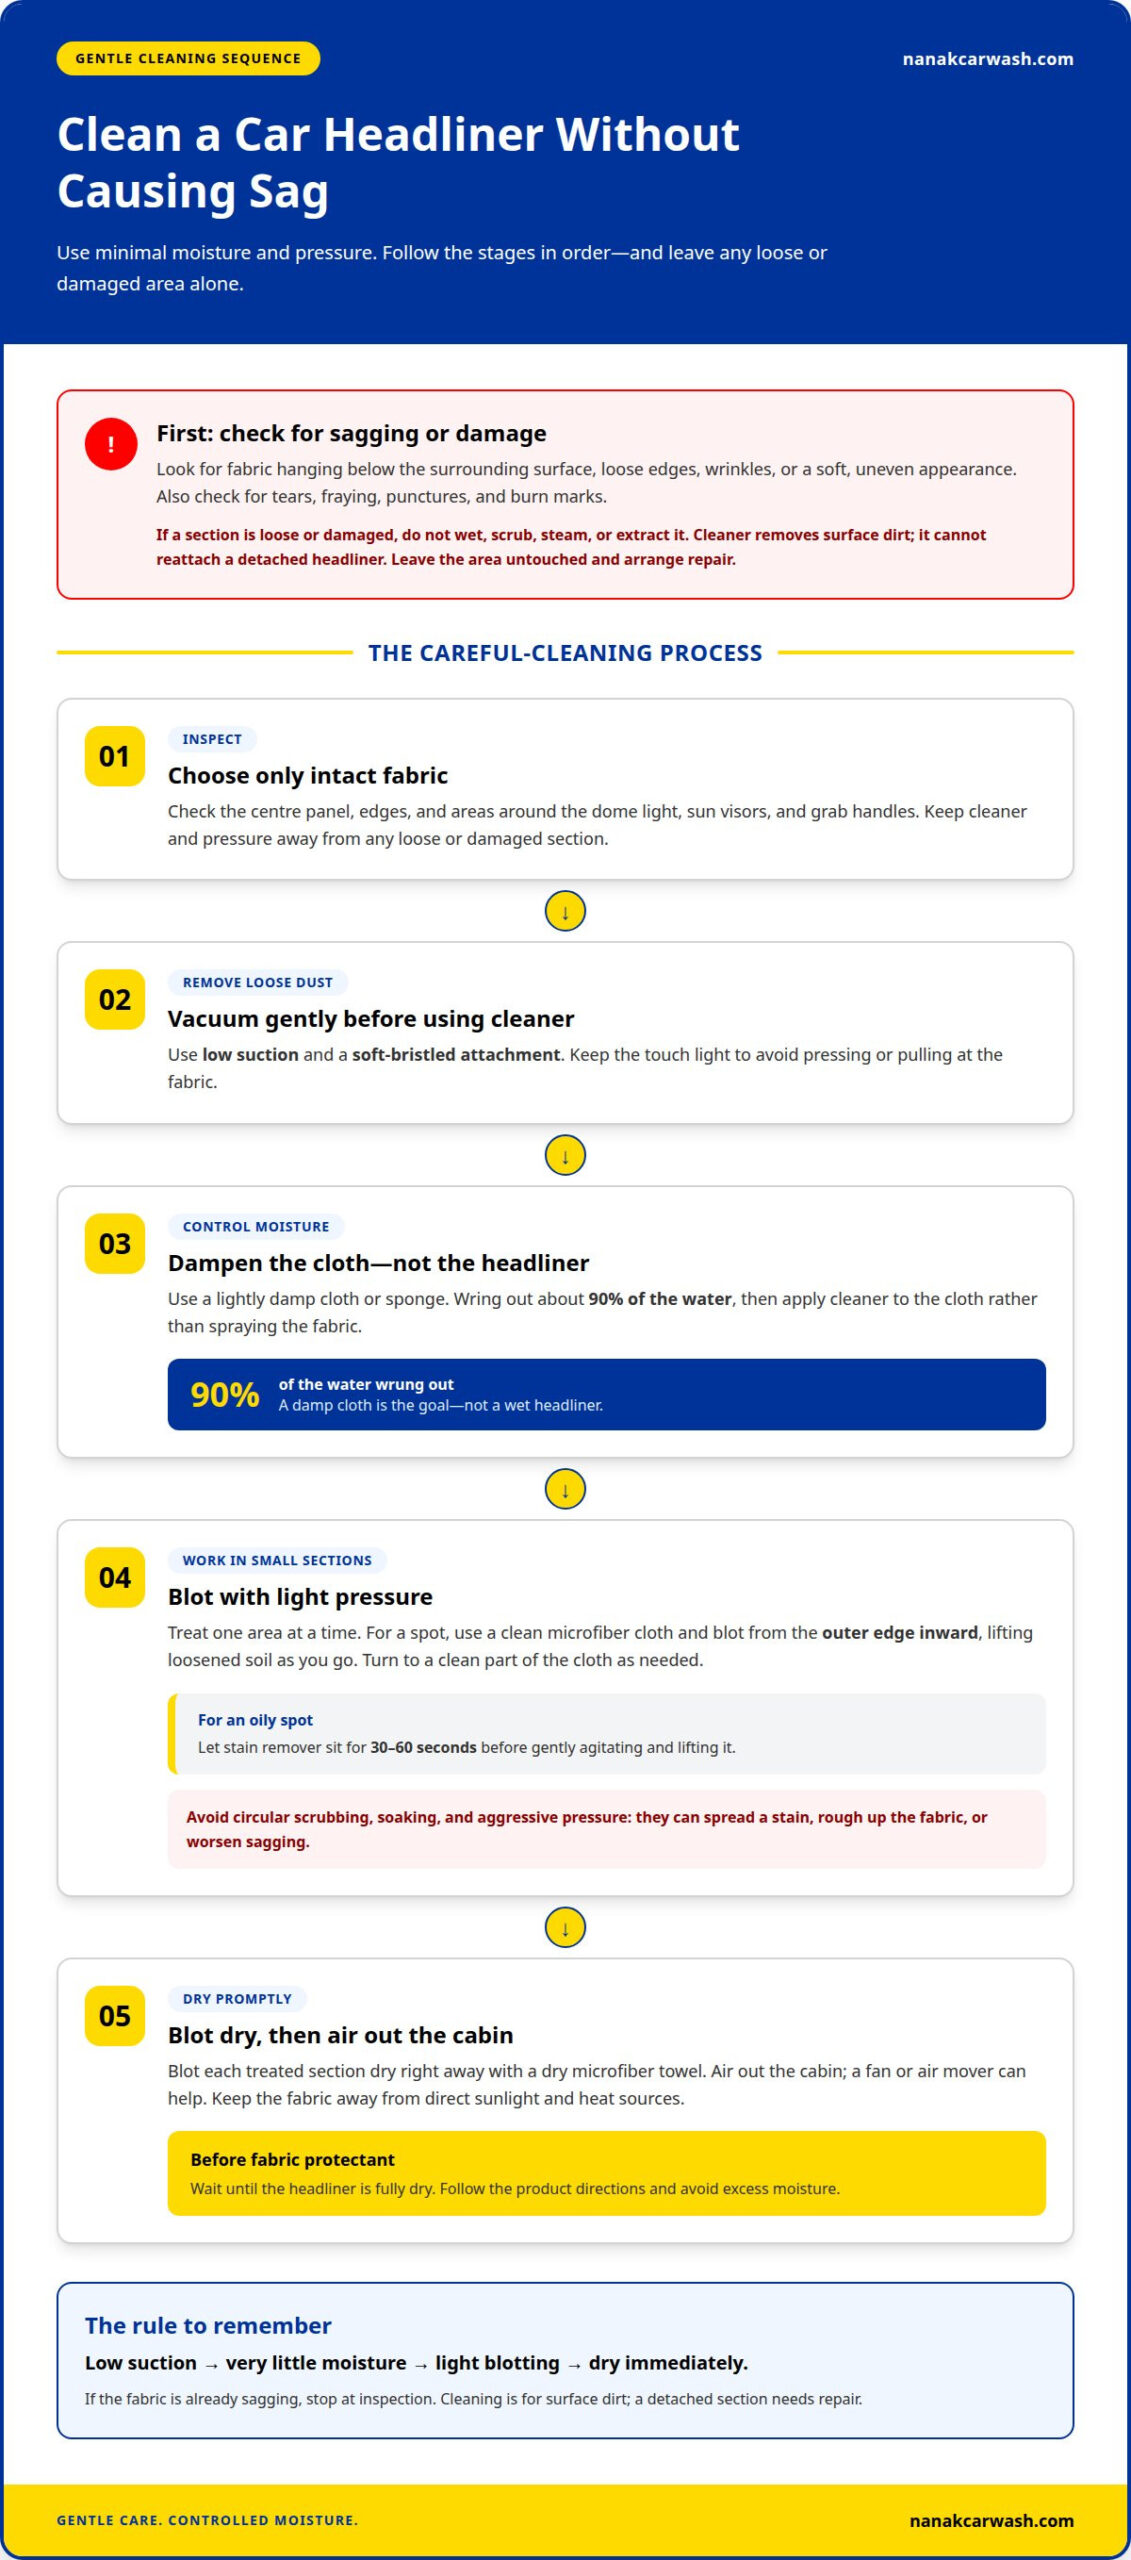
- Inspect the headliner before vacuuming or applying cleaner. Check the centre panel, edges, and areas around the dome light, sun visors, and grab handles. Look for fabric hanging below the surrounding surface, loose edges, wrinkles, or a soft, uneven appearance. A slight droop can be easy to miss until moisture or pressure makes it more noticeable.
- Note any damaged areas and keep cleaner away from them. If a section is already sagging, don’t wet, scrub, steam, or extract it. Added moisture can speed up separation between the fabric and its backing. Even careful spot cleaning may add enough dampness to worsen a loose section, so leave it untouched while cleaning intact fabric elsewhere.
- Separate cleaning from repair. Cleaner can address surface dirt, but it cannot reattach a detached headliner. Restoring a sagging section requires professional adhesive reapplication. Headliner pins or heat and pressure from a steamer and foam roller are sometimes used to address minor sagging, but these are repair approaches, not routine cleaning steps. Steam can add moisture, so don’t use it casually on a loose panel.
- Treat tears and burn marks as damage, not dirt. Check whether the fabric is split, frayed, punctured, or darkened by heat. Don’t pull at a tear or press a wet cloth into a burn mark. Cleaning won’t replace missing fibres or close a hole, and rubbing may extend the damage. Keep liquid and brush pressure away from damaged edges.
- Decide what to clean only after inspecting the headliner. If the fabric lies flat and has no visible tears, treat a separate stain gently, testing your method in a hidden spot first. For example, clean an intact area away from a drooping edge rather than wiping across both. If sagging or damage extends through the section, stop and arrange repair before attempting more cleaning.
Use the inspection to set clear limits for your cleaning plan. Once you find a loose or drooping area, exclude it from every cleaning step, including a final wipe to remove residue. Work only on intact fabric, without crossing, pressing against, or pulling on the affected section. If the damage is broad or its edges are unclear, pause rather than guessing where it’s safe to clean. This keeps the task focused on surface dirt instead of treating a structural problem like a stain.
Cleaning products are not a fix for a sagging headliner, so leave the loose area alone and arrange a repair. Don’t use cleaner, brushing, or moisture to try to flatten the fabric, and don’t mistake a temporary improvement for a repair. If you’re unsure whether an area is stained or starting to separate, leave it alone and have it assessed before cleaning nearby. Clean only where the fabric is intact and you can keep your method separate from the sagging section. This protects the remaining sound material and directs the loose area toward repair, not more cleaning.
Signs of dust, stains, odours, discoloration, and matted fabric
- Check the headliner in daylight before choosing a cleaning method. Dust often appears as a dull film, while fingerprints and food splashes leave defined marks. Yellow or grey patches may indicate smoke or other discolouration. Matted fabric looks flattened, especially where hands have touched it. Note each mark’s location and appearance so you can compare it after cleaning.
How much cleaner should you apply to a car headliner? Use just enough to dampen the cleaning cloth, never enough to wet the fabric. Don’t spray cleaner directly onto the headliner.
- Spot-clean one mark at a time with a clean microfiber cloth. Blot from the stain’s outer edge inward, lifting loosened soil as you go. Avoid circular scrubbing, which can spread a stain or rough up the fabric. Use light pressure, then turn the cloth to a clean section. For an oily spot, let stain remover sit for 30-60 seconds before gently agitating and lifting it.
- Dry the treated spot promptly. How should you dry a car headliner after spot cleaning? Blot it with a dry microfiber towel, then air out the cabin; a fan or air mover can help. Keep the fabric away from direct sunlight and heat sources, which can damage it. Wait until it’s fully dry before applying fabric protectant.
- Treat smoke marks and smells according to what you see. Light-to-moderate cigarette smoke discolouration may respond to fabric cleaner and targeted odour treatment. Heavy, long-term smoke saturation may need professional extraction. For organic odours, choose an odour eliminator designed for automotive fabric. Avoid bleach and harsh solvents, which can change the fabric’s colour or texture. For suede or Alcantara, use a cleaner labelled safe for that material and test it in a hidden area first.
- Protect clean, dry fabric with careful follow-up. Apply fabric protectant only after the headliner has dried completely, following the product directions and avoiding excess moisture. Don’t use protectant to disguise a stain: remove soil first and let the surface dry. Regular interior cleaning can help prevent dust and marks from building up. One detailing guide recommends cleaning the headliner every three to four months as part of regular interior detailing.
Assess the mark and the surrounding fabric together, then focus on what you can see. When spot-treating a car headliner stain, blot from the outer edge inward with a clean microfiber cloth; don’t scrub in circles. This helps lift the mark without spreading it or roughing up the material. Use a controlled touch and check the area before moving on to another mark. If the fabric looks matted, don’t treat the flattened appearance as a separate stain unless you can see soil. Base your cleaning decision on the condition of the surface.
For smoke-related changes, distinguish lighter discolouration from more extensive saturation before choosing a treatment. Light-to-moderate cigarette smoke discolouration on a car headliner may respond to fabric cleaner and targeted odour treatment, while heavy, long-term smoke saturation may require professional extraction. Consider the colour change and odour together, and assess the result only after the treated fabric has dried. Focus treatment on the affected area rather than trying to conceal a remaining mark.
Vacuuming with low suction and a soft-bristled attachment
- Use a vacuum with an adjustable low-suction setting and a soft-bristled brush attachment. Keep a clean microfiber cloth nearby for loose dust that needs a gentle wipe. These tools remove dry debris before you apply cleaner. Avoid stiff brushes and hard nozzle edges, which can catch or press into the headliner.
- Set the vacuum to low suction before bringing the attachment near the roof. A car headliner is fabric over foam, so strong suction can pull at the material. Test the setting on a small, flat area first. If the fabric lifts, shifts, or catches against the brush, stop and reduce the suction before continuing.
- Hold the soft brush so its bristles rest lightly against the fabric. Guide it in short, controlled passes over one small area at a time. Don’t push the attachment into the roof or drag it quickly across seams. For example, clean around a dome light with the brush edge, keeping the nozzle clear of the fixture.
- Work around roof fittings without tugging the fabric. Move the sun visors only if they shift easily, and keep the vacuum away from wiring, lights, and trim gaps. Loosen dust near a seam with the brush tip, but don’t force the bristles beneath the fabric. If an edge looks loose, leave it alone and vacuum nearby flat sections.
- Check the brush as you work. Hair or grit caught in the bristles can scratch the fabric or transfer dirt across the headliner. Turn off the vacuum before removing debris from the attachment. Then continue with clean bristles, using minimal pressure. Stop if the fabric begins to ripple, snag, or lift.
- Finish vacuuming before applying cleaner. Vacuuming first removes particles that could smear when dampened. If dust remains beside a seam, use a clean microfiber cloth lightly rather than pressing harder with the vacuum. Keep the cloth dry at this stage; moisture belongs in the later, controlled cleaning step.
- Choose tools that suit the surface. What tools should you use to clean a car headliner? Use a low-suction vacuum with a soft-bristled brush, along with a clean microfiber cloth or soft-bristle brush for gentle handling. Keep hard attachments, stiff brushes, and forceful pressure away from the fabric.
Why oversaturation and aggressive scrubbing can cause sagging
Can steam cleaning damage a car headliner? Yes. Consumer steam cleaners can drive moisture through the fabric and foam to the adhesive, contributing to sagging. Use a dry or minimally damp method instead, especially around loose edges and roof fittings.
- Keep the headliner’s construction in mind while cleaning. Visible fabric covers foam backing, which is attached with heat-sensitive adhesive to a rigid hardboard panel. Water that passes through the fabric can reach this bond. Keep moisture on the surface instead of pushing it into the foam.
- Limit pressure as well as liquid. Hard scrubbing can stretch or loosen the fabric, even if the cloth is only slightly damp. Use a soft-bristle brush or microfiber cloth with gentle strokes. If the fabric shifts under your hand, stop rather than trying to flatten it with repeated rubbing.
- Avoid consumer steam cleaners on the headliner. Steam combines heat and moisture, and moisture may reach the adhesive layer. Because the adhesive is heat-sensitive, a steamer can affect the bond as well as dampen the foam. Don’t direct steam at seams, roof lights, or areas showing looseness.
- Use an extractor cautiously on heavily soiled fabric. Strong suction can pull at the headliner, while excess water can penetrate its backing. If extraction is needed, use minimal heat and pressure, and test a hidden spot first. Stop if the fabric lifts, ripples, or changes shape.
- Blot after cleaning instead of scrubbing to remove moisture. Press a dry towel lightly against the treated surface, then lift it straight away. Use a fresh, dry part of the towel for the next pass. This absorbs surface dampness without dragging the fabric or forcing liquid deeper.
- Deodorize with a product made for automotive fabric, not a heavy spray. Apply it sparingly according to its directions, and avoid soaking an area to cover an odour. For an organic smell, an automotive-fabric odour eliminator can target the source without aggressive scrubbing.
- After damp cleaning, dry the cabin with airflow. Open the doors in a sheltered spot or use a fan to move air through the vehicle. Avoid direct sunlight and added heat, which can damage headliner material. Don’t apply fabric protectant until the surface is fully dry.
Cleaning the full headliner with a damp sponge or towel
- The best way to clean a car headliner without causing sag is to control moisture at every step. Start with a clean microfiber cloth, sponge, or soft-bristle upholstery brush. Apply cleaner to the cloth, never directly overhead onto the fabric. Test the method on a hidden area first, then let it dry before treating the visible headliner.
- Prepare a damp sponge or towel, not a wet one. Wring approximately 90% of the water from it before cleaning. Check that it doesn’t drip or leave a wet mark on your hand. This helps keep liquid near the surface instead of soaking into the foam backing. Follow the cleaner’s directions, and use only enough product to dampen the cloth.
- Divide the headliner into small sections, such as the area above one seat. Wipe slowly with light pressure and short, even strokes. Don’t scrub back and forth or press hard to lift a stubborn mark. As soil transfers, turn the microfiber cloth to a clean section. With a soft upholstery brush, use gentle strokes and avoid catching seams or edges.
- Blot each section immediately with a dry microfiber towel. Press lightly, lift the towel, and use a dry area for the next pass. This absorbs surface moisture before it can travel deeper. Check the fabric before moving on. If it looks wet, stop cleaning and blot again instead of adding more product.
- Continue across the headliner one section at a time. Rinse a soiled sponge and wring it thoroughly before using it again. A dirty sponge can transfer grime to clean fabric. Keep damp tools away from loose seams, lights, and fittings, where moisture can collect. Stop if the fabric starts to lift or shift.
- Finish by airing out the cabin. Open the vehicle doors in a sheltered area or use a fan to move air through the interior. Avoid direct sunlight and heat sources. Wait until the headliner is fully dry before applying protectant. This makes the best way to clean a car headliner without causing sag practical: control moisture, use a gentle touch, and dry each section promptly.
- If a broader interior refresh is also on your list, explore interior detailing options.
Nanak Car Wash: Car Detailing Packages
Nanak Car Wash offers Car Detailing Packages for drivers who want broader vehicle cleaning beyond a careful headliner touch-up. Choose this next step when dust, odours, or stains affect more of the cabin, or when you’d rather have the vehicle’s overall cleanliness handled together. A Full-Service Car Wash or Express Car Wash may suit a general wash, while the Unlimited Wash Club is an option for frequent washes. For a headliner that’s already sagging, cleaning isn’t a substitute for repair; avoid adding moisture to the loose area. Match the service to the cleaning your vehicle needs. For details, visit nanakcarwash.com.
Choose a practical next step for your vehicle
Keep the best way to clean a car headliner without causing sag in mind as you plan the rest of your vehicle’s care. A careful home clean may suit a small surface mark, while a broader cabin refresh can help when dirt or odours extend beyond the headliner. Choose the level of cleaning that suits your vehicle, and leave already-sagging fabric out of any wet-cleaning attempt.
Nanak Car Wash offers Car Detailing Packages, along with Full-Service Car Wash and Express Car Wash options. These give you choices for more than a single interior spot, whether you’re looking for detailing or a general vehicle wash. For the next step, contact Nanak Car Wash and find the option that suits your cleaning needs. A clean, comfortable cabin starts with a sensible plan, and you can take that step at your own pace.
Frequently Asked Questions
What is the safest way to clean a car headliner without making it sag?
Use a gentle, low-moisture method and stop if the fabric shifts or feels loose. First inspect the headliner, then remove dry dust before treating only the areas that need attention. For example, if a mark sits beside a dome light, keep your cloth away from the fixture and work only on the flat fabric. If the headliner is already drooping, leave it dry and arrange repair instead.
Which cleaners are safe for automotive headliner fabric and adhesive?
Choose a cleaner labelled for automotive fabric, and test it on a hidden area before using it more broadly. No cleaner is universally safe for every fabric or adhesive. Read the product label, especially for delicate materials such as suede or Alcantara, and avoid bleach or harsh solvents. If the test area changes colour, texture, or appearance after drying, don’t use that cleaner elsewhere on the headliner.
How do I remove stains from a car headliner without soaking it?
Apply a small amount of cleaner to a cloth, then treat the stain with light, controlled contact. Don’t pour liquid onto the headliner. For a coffee spot, work only on the marked fabric and use a clean part of the cloth as soil transfers. Let the area dry before judging the result, since a damp patch can look different from the surrounding fabric.
What cleaning methods can loosen headliner adhesive or cause sagging?
Soaking, consumer steam cleaning, forceful scrubbing, and aggressive extractor suction can all stress the headliner or its adhesive. Spraying overhead also makes it harder to control where liquid lands, particularly around seams and roof fittings. Stop if the fabric begins to ripple, lift, or hang lower during cleaning. Avoid using heat to speed up drying, since it can damage headliner material.




 6600 Finch Ave W, Etobicoke, ON M9V 3Z6

 647-703-8515
 MON – SUN 8 AM to 7 PM