
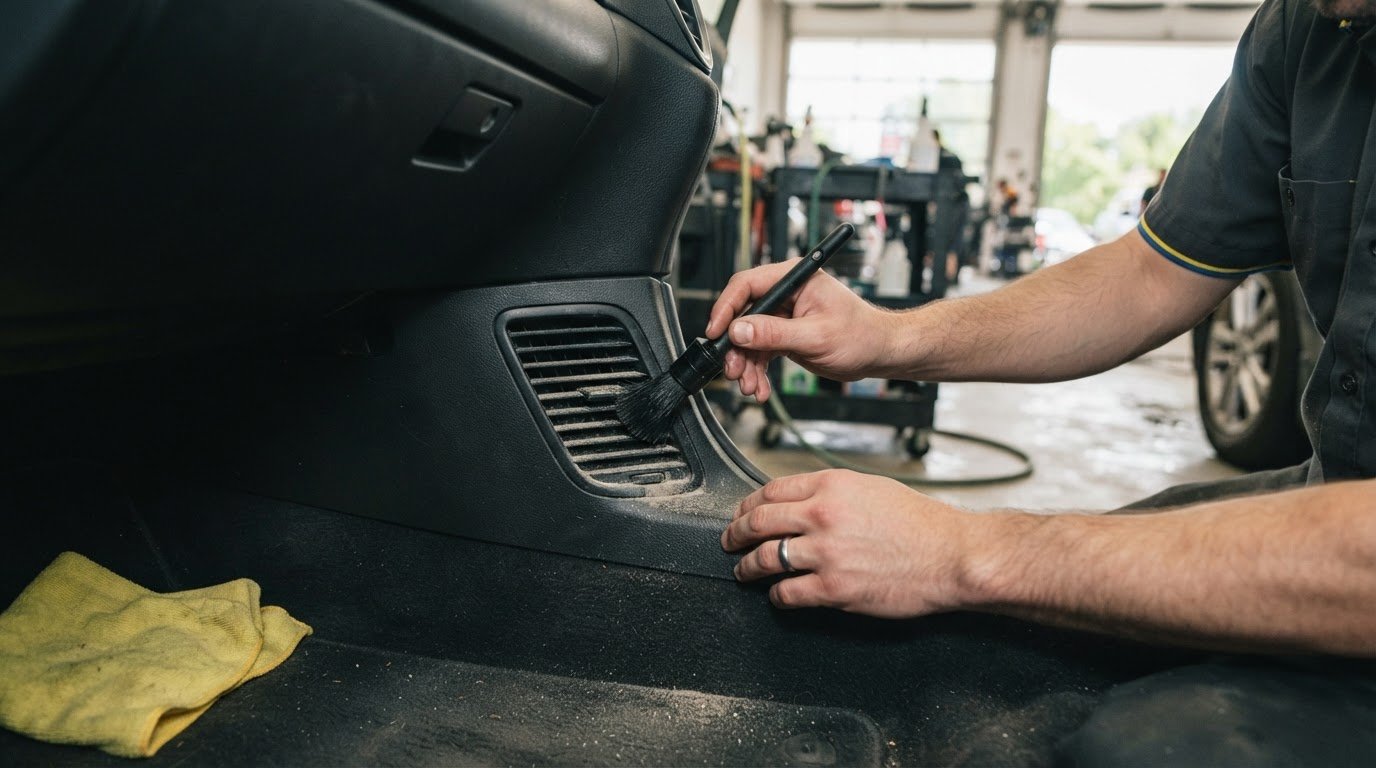
Construction dust can linger in vents after the dashboard looks clean. For removing construction dust from a car ventilation system, vacuum loose debris from each vent, then use a lightly dampened detailing brush to clean the louvers without spraying cleaner into the openings. Fully clean the vents every one to three months, and give them a quick dry-brush pass during each car wash to keep surface dust from building up.
It’s easy to focus on the dashboard and overlook the defrost and floor vents, where dust, grit and fibres can collect. Careful cleaning removes visible debris, but a musty smell that persists after cleaning the vent surfaces may indicate buildup deeper in the HVAC system or a cabin filter that needs replacing. This guide covers cleaning dashboard, defrost and floor vents without pushing dust or liquid farther inside, along with ways to keep them tidier between details. It also explains what vent dust and odours can signal, so you can choose a suitable next step.
Key Takeaways
- Apply interior cleaner to a brush, not directly into a vent, to help keep liquid out of the HVAC ducting.
- Use a quick dry-brush pass during each car wash to clear surface dust before it builds up.
- Clean dashboard, defrost and floor vents with a vacuum and brush, adjusting your approach to the debris in each area.
- Look beyond visible vent surfaces if a musty smell persists; deeper HVAC buildup or the cabin filter may be involved.
- Learn when routine detailing can help keep dust and debris under control inside your car.
Applying cleaner to a brush rather than into vents
For Canadian drivers, the practical distinction is between cleaning reachable surfaces and getting paid HVAC repair. This method is for vent surfaces you can reach; requirements for repair services depend on the province or territory.
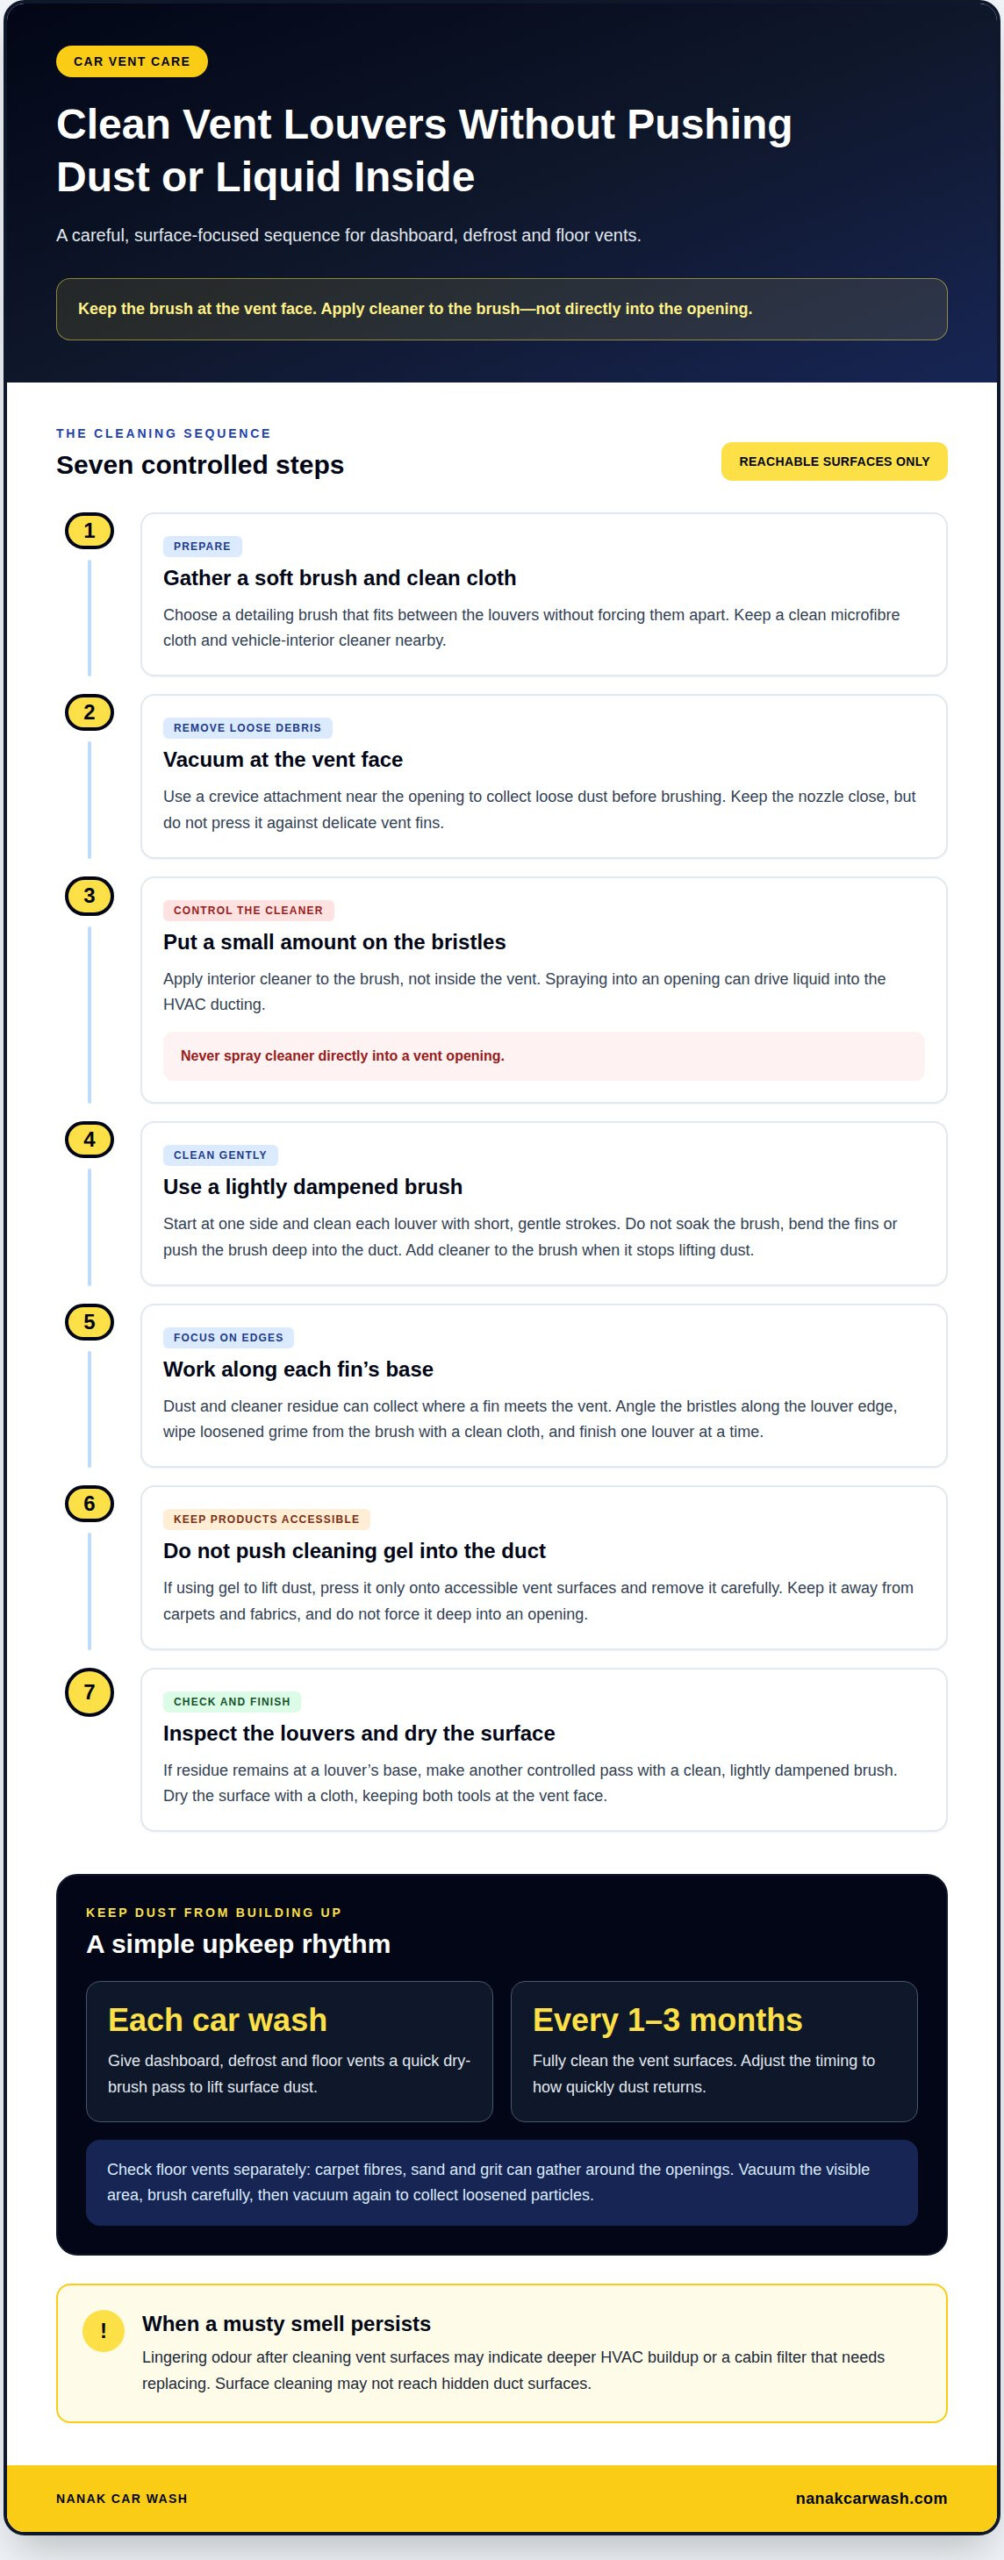
- Choose a soft detailing brush that fits between the vent louvers without forcing them apart. Keep a clean microfibre cloth and vehicle-interior cleaner handy. Construction dust can settle along narrow edges, so a small brush gives you more control than pushing a cloth into the opening.
- First, vacuum loose debris with a crevice attachment held near the vent face. This reduces the amount of dust the brush might smear across the louvers. Keep the nozzle close enough to collect debris, but don’t press it against delicate vent fins.
- Apply a small amount of interior cleaner to the brush bristles, not inside the vent. Spraying directly into an opening can drive liquid into the HVAC ducting. A brush helps you control where the cleaner goes and how much reaches each louver.
- Use a lightly dampened brush, not a soaked one. Start at one side of the vent and clean each louver with short, gentle strokes. Don’t bend the fins or push the brush deep into the duct. Add cleaner to the brush when it stops lifting dust.
- Pay special attention to the base of each fin, where dust and cleaner residue can collect. Angle the bristles along the louver edge, then wipe loosened grime from the brush with a clean cloth. Clean one louver at a time rather than quickly scrubbing the whole vent.
- Keep cleaning gel away from carpets and fabrics. If you use it to lift dust or debris near an opening, press it only onto accessible vent surfaces, then remove it carefully. Don’t force gel deep into the duct, where it may be difficult to retrieve.
- Inspect the vent after brushing. If residue remains at a louver’s base, make another controlled pass with a clean, lightly dampened brush, then dry the surface with a cloth. Keep the brush and cloth at the vent face. Don’t pour or spray cleaner into the opening to save time.
Cleaning reachable vent surfaces is different from paid HVAC repair. Requirements for repair services depend on the province or territory.
Between-detail vent maintenance
- Make a quick vent check part of each car wash. Look at the dashboard vents, windshield defrost outlets and floor vents. A dry-brush pass can lift surface dust before it settles into edges and corners. Use a clean, soft brush and work gently to keep the louvers in place.
- Plan a deeper clean every one to three months, adjusting the timing to how quickly dust returns. For instance, a car driven near construction work may need attention sooner than one kept away from dusty roads. Check the vent faces regularly and adapt your routine to what you see.
- Keep a small vent-cleaning kit with your car-care supplies: a soft detailing brush, a microfibre cloth and a vacuum crevice attachment. Store the brush in a clean container so it doesn’t collect grit between uses. A dusty brush can transfer debris back onto the dashboard vents.
- Use a car wash as a reminder to check the vents, not as a reason to spray cleaner into them. If the vent faces have only a light layer of dust, brush them dry. For residue that needs more attention, apply interior cleaner to the brush and clean the accessible louver surfaces with controlled strokes.
- Check floor vents separately during routine upkeep. Carpet fibres, sand and grit can gather around the openings, especially after shoes track debris into the cabin. Vacuum the visible area, carefully brush the opening, then vacuum again to collect loosened particles.
- After dusty travel or carrying construction materials, inspect nearby dashboard surfaces and vent faces. Wipe loose dust from surrounding plastic with a clean microfibre cloth. This helps prevent debris around the outlet from being swept back toward the vent during later cleaning.
- Keep cleaning gel away from carpets and fabric seats. If you use gel on accessible vent surfaces, press and lift it carefully rather than pushing it deep into an opening. Store it separately from cloths to avoid transferring sticky residue during your next cleaning pass.
- When regular upkeep isn’t enough to refresh the cabin, professional interior cleaning can be a practical next step. A car detailing service can complement your between-detail routine while you continue quick vent checks at each wash.
Treat the cleaner’s application point as part of the cleaning method: apply it to the brush, not to the vent itself. Interior cleaner should be applied to a brush rather than sprayed directly into a car vent to avoid driving liquid into the HVAC ducting. Keep the brush outside the opening as you work on reachable surfaces, using the cleaner carried by its bristles. If more cleaner is needed, add it to the brush away from the vent before continuing. Direct the brush only toward the surfaces you can access, and avoid aiming a spray into the opening at any stage. This keeps the cleaning step focused on accessible vent surfaces rather than sending liquid toward the ducting. When the pass is complete, set the cleaner aside and continue with a dry brush or cloth if needed.
Cleaning dashboard, defrost and floor vents
Clean reachable vent surfaces with a vacuum, a soft brush and careful strokes. You don’t need to remove the dashboard to clean visible vents, but hidden duct surfaces may remain out of reach.
-
Remove Dust From Vents and Ducts Safely
Start by vacuuming loose debris from the vent face with a crevice attachment. Keep the nozzle at the opening, then gently brush accessible louvers. To remove construction dust from a car ventilation system, work only on reachable surfaces and don’t force tools deep into the ducts. This helps collect debris without pushing it farther inside.
-
Choose a Dust Removal Method
Use a shop vacuum with a crevice attachment to collect loose dust at the vent opening. Compressed air can send particles farther into the duct rather than capture them, so use suction for visible debris. Keep the nozzle close without pressing it against or scraping the louvers.
- Clean dashboard and defrost vents one area at a time. Vacuum visible dust, then brush along the louvers and their edges. For a narrow windshield defrost outlet, choose a soft brush that reaches the opening without bending its fins. Wipe loosened dust from nearby dashboard plastic with a clean microfibre cloth.
- Clean floor vents by vacuuming, brushing, then vacuuming again. Carpet fibres, sand and grit can collect around these outlets. Brushing loosens debris that the first pass may miss, and the second vacuum pass collects it. Keep the nozzle near the opening to avoid spreading particles across nearby carpet.
- Clean the vents thoroughly every one to three months. Between deeper cleans, use a quick dry-brush pass during each car wash to lift surface dust. Regularly checking the vent faces and responding to visible buildup makes construction-dust removal easier to maintain.
- Apply interior protectant only to clean, dry vent housings and nearby dashboard plastic. It leaves a UV-protective layer on those surfaces. Keep the product out of the duct. Use cleaning gel only on accessible openings, pressing and lifting it gently to collect dust, pet hair or debris.
- Keep cleaning gel away from carpets and fabrics, and don’t push it deep into a vent. If dust remains around a louver’s base, make another careful brush pass and collect the loosened debris. This cleans reachable vent surfaces without removing the dashboard, though hidden ducts remain out of reach.
Common sources of dust and debris in vents
- Consider where the car has been parked and driven. Construction dust can settle on the exterior, enter through open doors or windows, and travel inside on clothing and shoes. For example, a vehicle parked beside renovation work can collect dust around its windows and dashboard before you clean the vents.
- Keep the windows closed near visible dust and construction activity. Before opening a door, brush loose grit from clothing or footwear so it doesn’t fall onto the floor. These simple habits reduce cabin debris that could later be stirred toward the floor vents.
- Consider the cabin air filter when dust keeps returning. The filter catches particles entering the HVAC system, while debris can also collect on cabin surfaces and vent openings. A dirty filter doesn’t explain every dusty vent, so consider both the filter and visible interior buildup.
- If construction dust has contaminated the cabin filter, replace it according to the vehicle owner’s manual. Filter access and removal can vary, so take care when removing or replacing it. Remove the old filter carefully, note its airflow direction, and install the replacement in the same orientation.
- Inspect the old filter before discarding it. Dust across its surface shows that it has captured debris, while a torn or misshapen filter may not sit properly in its housing. Keep the removed filter away from seats and carpets, then close the housing securely after fitting the replacement.
- Reduce dust exposure when the vehicle is parked near construction. Choose a spot farther from active work when possible, and keep the windows and doors shut. Avoid parking beside piles of loose material, where activity can stir dust onto the car.
- Clear debris from shoes, work clothes and items before placing them in the cabin. A dusty tool bag on the passenger footwell, for example, can leave particles near a floor vent. Store dusty equipment separately from clean interior surfaces, and remove loose grit from footwear before getting in.
- Track when dust returns after cleaning. If dashboard vents collect fresh particles soon after a drive near roadwork, outside exposure may be a factor. If dust appears after carrying supplies or passengers, check floor mats and nearby surfaces for debris that could be stirred toward the vents.
How dirty vents affect cabin air and odours
- Notice whether dust returns soon after cleaning. Construction debris can collect on vent surfaces and move into the cabin when air flows through the system. Dust on a dashboard outlet after a drive, for example, may come from cabin surfaces or deeper HVAC buildup. Track where and when it reappears.
- Clean visible vent surfaces, then notice whether any smell remains. A persistent musty smell after cleaning visible car vent surfaces may indicate buildup deeper inside the HVAC system. The smell is a useful clue, but it doesn’t identify the exact source on its own.
- Consider the cabin filter if an odour seems to come from inside the HVAC ducting. A filter replacement may be needed. Follow the vehicle owner’s manual for access and replacement, as the filter location and procedure vary between vehicles.
- Compare the odour with the fan off and on. If a smell becomes noticeable as air starts moving, note which vents release it and whether it changes with the airflow settings. These observations can help distinguish a smell around one vent from one that occurs across the cabin.
- Don’t treat dust alone as proof of blower motor or evaporator damage. A dusty vent can’t show whether either component is damaged. Note unusual blower noise or changes in airflow for inspection, including when they occur, such as after switching on the fan.
- Keep your notes specific. Record whether the smell is musty, when it appears, which outlets are affected, and whether cleaning the visible surfaces changed it. For example, note if the odour remains after the dashboard vents look clean. This can make the next troubleshooting step more focused.
- Arrange a professional assessment when a persistent musty smell remains after surface cleaning, or when the blower sounds unusual. A full interior clean can address dust on cabin surfaces, while an odour from deeper in the HVAC system may call for attention beyond visible vents. Refresh your car’s interior with a professional clean as part of your cabin care routine.
Floor vents can collect carpet fibres, sand and grit, so include them when checking for visible debris. Vacuum, brush, then vacuum again. Look closely at and around the opening rather than relying on a single pass. If debris remains visible, note it separately from any change in odour. After cleaning, compare the smell with what you noticed beforehand, including whether it appears when air starts moving. Record whether it seems limited to one outlet or noticeable across the cabin. This gives you a clearer account of what changed without treating visible grit or fibres as proof of an HVAC fault. If the musty smell persists, share these observations with the professional assessing the cabin air system.
Nanak Car Wash
Nanak Car Wash offers Car Detailing Packages for drivers who want a more thorough interior clean after construction dust settles in the cabin. Consider a detail when dust remains on interior surfaces despite routine upkeep, or when you’d like professional cleaning as part of your cabin-care routine.
For regular exterior cleaning, choose a Full-Service Car Wash or Express Car Wash. The Unlimited Wash Club is another option if you wash frequently. These services help keep your vehicle clean, while a musty odour that persists after vent-surface cleaning may point to buildup deeper in the HVAC system, beyond routine interior detailing.
Contact Nanak Car Wash to discuss the cleaning option that suits your vehicle.
Keep your cabin care routine moving
Make vent care part of your regular vehicle upkeep, not just a response to visible dust. A consistent approach to removing construction dust from your car ventilation system helps you catch new debris before it becomes part of a larger cabin-cleaning job. After dusty travel or nearby construction, check what has settled inside and choose the next cleaning step accordingly.
For a more thorough interior clean, Nanak Car Wash offers Car Detailing Packages. Full-Service Car Wash and Express Car Wash are available for ongoing vehicle cleaning. Choose the option that suits your car’s needs now, then maintain it between visits.
Contact Nanak Car Wash today to discuss your vehicle’s cleaning needs. A cleaner cabin starts with a simple next step.
Frequently Asked Questions
How does construction dust get into a car ventilation system?
Construction dust can enter the cabin through open windows and doors or through the HVAC air intake. Dust on shoes, clothing, tools and materials can also settle inside, then move around as air circulates. For example, parking near renovation work with a window slightly open can expose the cabin to airborne particles. The cabin air filter catches some incoming debris, but dust can also settle directly on interior surfaces.
When should a professional detailer or mechanic clean a dusty car ventilation system?
Choose professional interior detailing when dust remains on cabin surfaces or keeps spreading from items carried inside. A mechanic’s assessment is appropriate if a musty smell persists after cleaning the visible vent surfaces, the blower makes unusual noise, or airflow noticeably changes. These signs call for attention beyond routine surface cleaning. Note when the smell or noise occurs, such as when the fan starts or a particular setting is selected.
What are the risks of running a car HVAC system with construction dust inside?
Running the fan can move settled dust from vents or cabin surfaces back into the vehicle, leaving fresh particles on the dashboard or elsewhere. Dust may also contribute to a stale or musty smell, especially if debris is deeper in the HVAC system. Visible dust alone doesn’t prove a component is damaged. If the blower sounds unusual or airflow changes, note the symptoms rather than brushing debris farther into the openings.



 6600 Finch Ave W, Etobicoke, ON M9V 3Z6

 647-703-8515
 MON – SUN 8 AM to 7 PM