

Your car looked fine in January, then March thaw hit and now the floor mats are packed with grey slush, the doors are speckled with salt, and the wheels look like they came back from a mine site. That's the core GTA problem with at home car detailing. It's not just about shine, it's about keeping winter grime from living in your carpets, seams, and underbody long enough to start corrosion.
In Ontario, that matters more than a glossy finish. Environment Canada notes that southern Ontario gets repeated freeze-thaw cycles, snow, and road salt use, and that's why detailers around the GTA spend so much time on interior vacuuming, salt removal, underbody rinses, and rust-protection add-ons. The practical mindset here is simple, clean the parts that fail first, then worry about the mirror finish.
The good news is that a driveway detail can do a lot if you use the right sequence and don't cut corners. The bad news is that the cheap, sloppy version can make a mess of your garage, your driveway, and your paint. If you're doing this on a Saturday morning, you want a plan, not a pile of bottles.
Table of Contents
- What You Need Before You Start
- Washing and Decontaminating the Exterior
- Cleaning and Conditioning the Interior
- Wheels, Underbody, and the Rust Zones Most DIYers Miss
- Seasonal Timing for Ontario Drivers
- When a Professional Service Is the Better Choice
- Your Repeatable At-Home Detailing Routine
What You Need Before You Start
A proper driveway detail starts before any water hits the paint. If you're standing in a GTA driveway after a March thaw, you need to think about where the dirt is going, how fast the panels will dry, and whether you're set up to keep grit away from clean surfaces. That means shade if you can get it, cool panels if you can't, and a space where you're not fighting freezing temperatures or a sloped driveway that sends dirty runoff somewhere inconvenient.

The core kit
You do not need a showroom full of gadgets, but you do need the basics. A two-bucket wash setup with grit guards keeps dirty wash water from recirculating onto the paint. Pair that with pH-neutral soap, a wash mitt, a stack of microfibre towels, a wet-dry vacuum, an ammonia-free glass cleaner, an interior all-purpose cleaner, a soft-bristle brush, leather cleaner and conditioner, tyre and trim dressing, a clay bar or clay mitt, and a wax or sealant.
If you already own a pressure washer, a foam cannon is worth the money because it helps soften loose grime before contact washing. A leaf blower can help move water, but it isn't the same thing as a dedicated car dryer, which is built to push water off panels more evenly and reduce towel contact. For paint correction, a mild compound or polish belongs in the kit, but only if the finish needs it.
The space matters as much as the product
Winter details in Ontario are hard on equipment and harder on people. Water temperature matters because cold water, cold panels, and freezing air make rinsing and drying clumsy. If you've got a garage or carport, use it for prep, drying, and interior work when the temperature drops below freezing.
Practical rule: if you can't keep the soap from drying on the panel, you're working too slowly or in the wrong spot.
Print a checklist before you start so you don't discover halfway through that you're missing microfibre towels, glass cleaner, or a clean bucket. A simple Saturday goes bad fast when you have to keep running into the house for one more thing. The better your prep, the less likely you are to drag winter grit back across a clean hood.
Washing and Decontaminating the Exterior
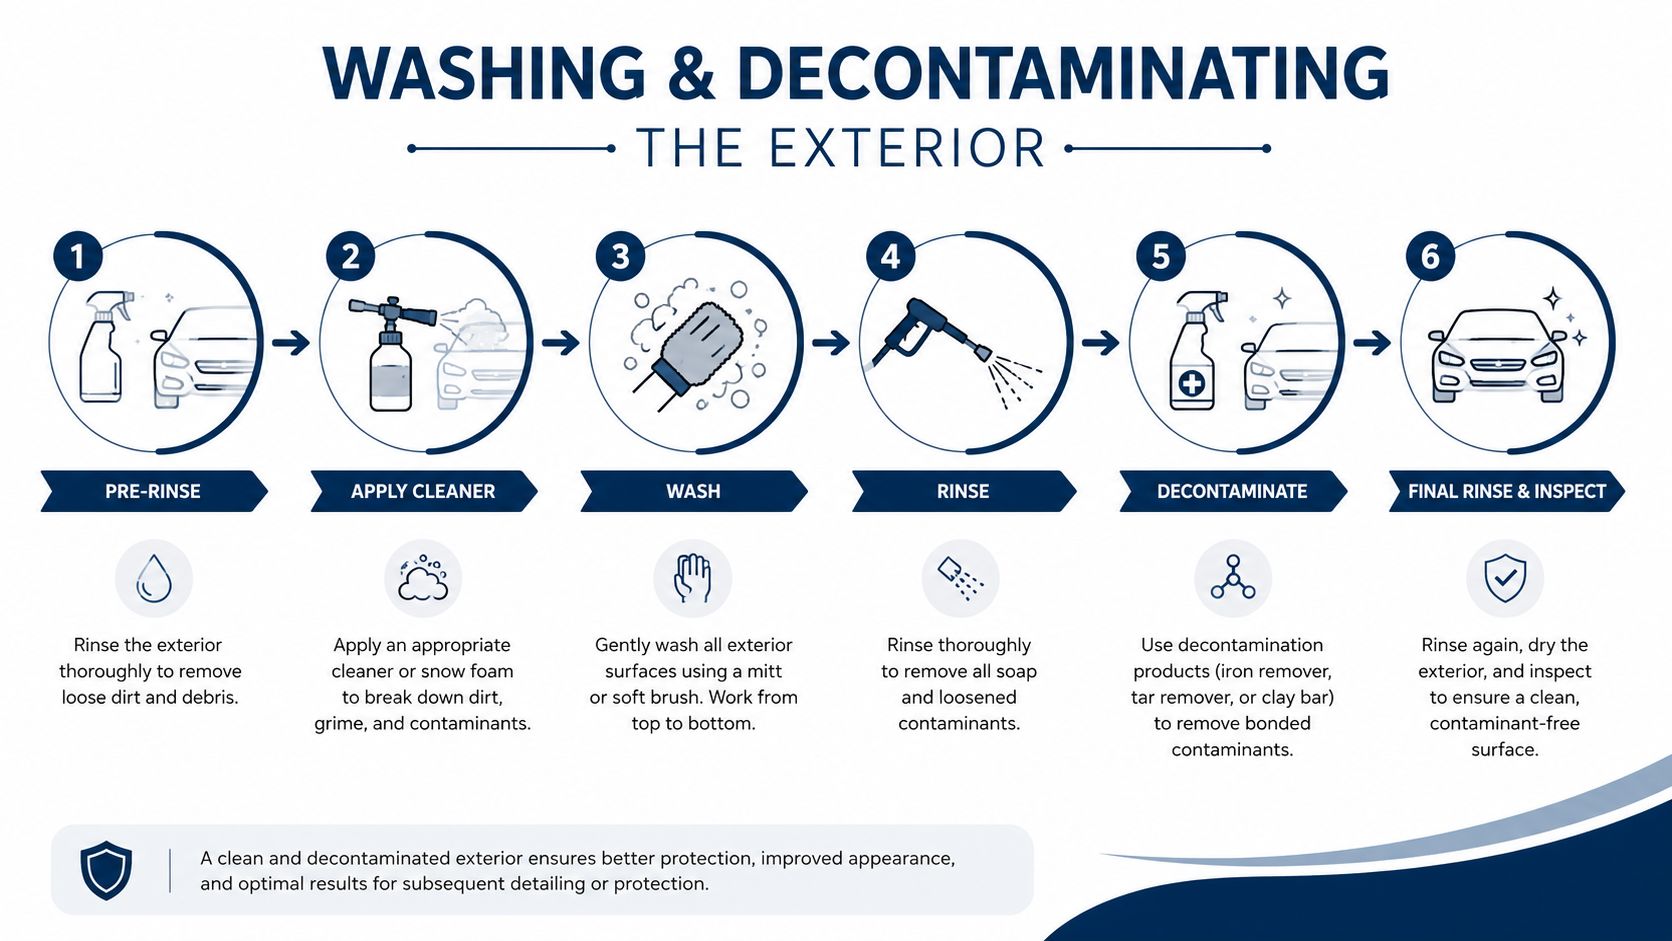
The biggest mistake home detailers make is starting at the top with a wash mitt and a bucket full of dirty water. In Ontario, the lower panels, wheel arches, and rear bumper carry the worst road film, so that's where the grime has to come off first. A practical at-home workflow starts with wheels and wheel wells, then a pre-rinse, then a two-bucket hand wash from the roof downward, and that order matters because it keeps abrasive grit off the paint as long as possible, as outlined in professional detailing guidance.
Wash in the right order
Start with a dedicated wheel bucket and a wheel brush, because brake dust and winter grime belong nowhere near your paint mitt. Then rinse the whole vehicle to knock off loose salt and grit. If you have a foam cannon, let the snow foam dwell for a few minutes, then rinse again before touching the panels.
Use straight-line motions with the mitt, not circles. Straight passes are easier to control, and they reduce the chance of grinding tiny contaminants into dark paint in a visible swirl pattern. After each panel, rinse the mitt in the clean bucket against the grit guard, then reload it with soap before you move on.
Lower panels are the danger zone. If you wash them last without rinsing your mitt properly, you're just dragging winter crud back up the side of the car.
Decontaminate, then protect
Washing removes loose dirt, but it doesn't pull out embedded fallout, tiny bonded particles, or the stubborn grit that sticks after salt season. That's where a clay bar or clay mitt with proper lubricant earns its place. Work the panel gently, keep the surface wet, and stop as soon as the paint feels smooth.
Dry with a plush waffle-weave towel or a car dryer. Do not leave puddles on the mirrors, emblems, or window edges if you can help it, because that's where water spots show up first. Once the car is dry, inspect the finish in daylight. Most daily drivers do not need a machine polish every month, but a hand-applied paint sealant is realistic in a home driveway when you want protection without turning the job into a full correction session.
Cleaning and Conditioning the Interior
Salt season turns a cabin into a trap. The mats hold slush, the carpet grabs grit, the vents carry damp odour, and the seats end up with whatever came in on boots, gloves, and coffee lids. If you want the interior to feel clean, start by getting the loose mess out of the car completely, not by spraying fragrance over it.
Strip, vacuum, then treat stains
Pull out the floor mats and shake them outside first. Then vacuum the seats, carpets, trunk, console gaps, and seat rails with a crevice tool, because the crumbs and salt crystals hide where the hose can't see them. If the fabric has a stain, use an interior cleaner, agitate it with a soft-bristle brush, then blot with a damp cloth or microfibre before air-drying. That technique reduces residue and avoids over-wetting the fabric, which is the mistake that leaves many DIY jobs looking worse a day later, according to Apex Auto Pros' at-home detailing guide.
Glass, leather, and odours
Use an ammonia-free glass cleaner on the inside glass, then wipe with a dedicated waffle-weave glass towel. A cheap paper towel or a dusty rag leaves haze, and glare at night is usually a residue problem, not a product problem. For leather, use a dedicated leather cleaner, then a water-based conditioner. Household oils belong nowhere near seats.
Odours need source removal, not perfume. Baking soda can help with lingering carpet smells if it's left to dwell before vacuuming, and the vents should be cleaned rather than masked. For a deeper walkthrough of cabin restoration, this complete vehicle interior refresh tutorial is a useful reference point when you're trying to reset a messy family car or a rideshare interior.
A realistic Saturday block looks like this, not because timing is glamorous, but because it keeps you moving:
- Loose items and mats: 10 to 15 minutes
- Vacuuming: 20 to 30 minutes
- Fabric spot cleaning: 15 to 25 minutes
- Glass and trim wipe-down: 10 to 15 minutes
- Leather care and odour treatment: 15 to 20 minutes
If the cabin still smells wet after all that, something is still holding moisture. Stop adding product and find the source.
Wheels, Underbody, and the Rust Zones Most DIYers Miss
A shiny hood can fool people into thinking the car is protected. In Ontario, it isn't. Rust starts in the places you don't admire, the wheel wells, underbody seams, lower door edges, grille openings, and the spots where salt sits after slush gets packed into crevices. That's why the most valuable minutes of at home car detailing are often spent under the car, not on the clearcoat.
What to rinse and why
Wheel wells collect the ugly stuff first because they catch slush, sand, and road salt every time you drive. The front grille and lower bumper trap grime too, especially after highway spray. Lower door seams and the rocker panels are where contamination lingers long enough to start problems if you ignore them.
A driveway-friendly underbody rinse can be done with a pressure washer set to a safe angle or with a dedicated underbody nozzle. The goal is to flush loose salt and debris out of the channels, not to blast every surface like you're stripping paint. That rinse is maintenance, not rust proofing. It helps, but it doesn't replace a professional treatment when protection is the priority.
Finish the parts nobody applauds
Tyre dressing and trim dressing should look clean, not greasy. Use a light hand, apply it evenly, and wipe off any excess before it attracts dust. The same rule applies to black plastic near the wheel arches. Heavy dressing makes the car look freshly sprayed, which is exactly what you don't want.
The other hidden win is the underbody rinse after snowstorms, especially on SUVs, vans, and pickups. Those vehicles carry more slush into more seams, and they benefit more from a careful wash than a quick hose-off. In the GTA, the car that looks clean isn't always the one that's being protected properly. The car that got the underside rinsed and the seams cleared is the one that's more likely to stay quiet through the season.
Seasonal Timing for Ontario Drivers
Ontario weather doesn't just change how a car looks. It changes how often you need to clean it and what kind of dirt matters most. A sensible routine follows the salt, slush, dust, and pollen, not a generic calendar someone wrote for a warm-climate garage.
Use the season to set the job
In winter, the focus is simple, get the salt off before it sits. That means regular washes during active salt use, with extra attention to the underbody, door jambs, and floor mats after storms. In spring, the job changes. You're recovering from winter contamination, so clay, sealant, and a deep interior clean make more sense than a quick wash that only brightens the surface.
Summer is easier. Dust and insects still show up, but the cabin usually stays drier, so maintenance can be lighter. Fall is the prep window, when you want to inspect for rust protection, refresh wax or sealant, and make sure the winter gear in the cabin isn't already adding moisture.
When a driveway wash becomes the wrong choice
There's also the runoff question. Environment and Climate Change Canada notes that household vehicle washing can send detergents and sediment into storm drains that lead to local waterways, and Ontario municipal stormwater guidance reminds drivers that storm drains aren't treated like sanitary sewers. That means the “cheapest” driveway wash can be the wrong choice if your lot drains badly or the runoff is carrying a lot of winter residue.
| Season | Wash frequency | Main focus | DIY or pro |
|---|---|---|---|
| Winter | Regular during salt use, plus after major storms | Salt removal, underbody rinse, mats, seams | Mostly DIY, pro for deeper protection |
| Spring | Recovery clean after freeze-thaw ends | Clay, sealant, interior reset | DIY if the car is in decent shape |
| Summer | Light maintenance between longer drives | Dust, bugs, quick wipe-downs | DIY |
| Fall | Prep before the first freeze | Rust protection, sealant, wipers | DIY and pro together works well |
A self-contained wash site makes more sense when your driveway drains directly to a place you don't want detergent and grit heading. That's especially true after long winter stretches, when the car is carrying more residue than a standard hose-down can manage.
When a Professional Service Is the Better Choice
DIY is useful, but it has limits. A home setup usually doesn't include an extractor, a proper polish system, steam cleaning, or an underbody rig, and those tools matter when the car needs deeper recovery. If the interior has stubborn salt staining, the paint needs correction, or the underbody needs more than a rinse, a shop can do the job faster and more thoroughly.
The jobs that belong in a shop
A careful DIYer can spend 3 to 5 hours on a full interior and exterior detail, and that's before polishing gets involved. Once you add correction work, the time stretches, and the result still depends on whether you've got the right tools and the patience to use them well. Professional detailing is a better fit when you want a periodic deep clean and then plan to maintain it yourself between visits.
Rust proofing is a different category altogether. It's not just a wash, and it's not just an aesthetic service. It needs shop conditions because the product has to reach internal panels through existing or drilled access points, which is not something you can fake with a driveway sprayer.
What to ask for locally
If you're booking in the GTA, ask whether the service includes interior shampooing, vent and crevice cleaning, underbody rinse capability, and rust protection. That's the kind of language that tells you whether the shop understands Ontario use, or whether it's just selling a shine package with winter words attached. Nanak Car Wash is one local option that offers full-service detailing and rust proofing alongside wash services, which can be convenient if you want wash and protection handled in one place.
A good shop doesn't replace your Saturday routine. It resets the car so your Saturday routine stays manageable.
The right mix is usually not either-or. It's a deeper professional visit when the car needs it, then consistent home upkeep so the next visit doesn't start from zero.
Your Repeatable At-Home Detailing Routine
The easiest routine is the one you can repeat without negotiating with yourself every weekend. For a GTA driver, that means a short maintenance wash, a monthly reset, and a seasonal deep clean that targets the parts winter and road grime attack hardest.
Keep the rhythm simple
A 60-minute quick detail every two weeks is enough to stay ahead of dirt, especially during salt season. Use that time on the wheels, touch points, glass, mats, and a fast exterior rinse or wash. A 3-hour full detail once a month gives you room for the proper exterior sequence, interior vacuuming, spot cleaning, and protectant touch-ups.
Once a season, go deeper. That's when the underbody rinse, fabric shampoo, sealant refresh, and cabin reset earn their place. If you skip that seasonal work, the car starts needing rescue instead of maintenance.
Fix the common problems before they spread
Water spots after sun exposure usually mean the panels dried too fast or the car was washed in the wrong spot. Glass streaks usually mean the towel is dirty, the cleaner is overused, or the windshield was wiped before the residue had been broken down. That weird sweet smell from the vents usually points to moisture and trapped grime, not a need for more fragrance.
If you remember only one thing, remember this. Salt on the car should come off quickly, stains on the carpet should be treated quickly, and anything that needs a lift or a polisher belongs with a pro.
Keep that rule on the fridge. It'll save you from overthinking every wash and it'll stop winter grime from turning into a repair bill later. A clean car is nice. A protected car in Ontario is the one that ages better.
If you're tired of fighting salt, slush, and stained mats every weekend, book a proper detail and rust-focused cleanup with Nanak Car Wash so the next wash starts from a cleaner, better-protected baseline.



 6600 Finch Ave W, Etobicoke, ON M9V 3Z6
 647-703-8515
 MON – SUN 8 AM to 7 PM