
You wash the car after an Ontario winter, admire the clean white paint, then pull into direct sunlight and see the story. Salt haze, road grit, automatic-wash swirls, and dull patches spread across the bonnet like a spider web. A quick search for buffing vs polishing produces conflicting advice, and the problem gets worse when detailing menus use both terms as if they mean the same thing.
They don't always mean the same thing in practice. Buffing is generally the cutting, material-removal part of correction, while polishing is the finer refinement step that restores clarity and gloss. The names can overlap, and some shops use “buff and polish” as a convenient package name, but the paint condition determines which service makes sense.
| Factor | Buffing | Polishing |
|---|---|---|
| Main role | Heavier correction and cutting | Refinement and gloss enhancement |
| Typical target | Deeper scratches, oxidation, heavy swirls, etching | Light marring, haze, micro-scratches |
| Abrasive action | More aggressive | Finer and more controlled |
| Clear-coat risk | Meaningful material removal | Lower material removal |
| Usual place in a correction | Early cutting stage | Final refining stage, or a stand-alone service |
| Best GTA use | Winter-worn, heavily marked paint | Lightly dull paint that mainly needs clarity |
The practical distinction matters because clear coat is finite. Spending money on a heavy correction when a light polish would restore the finish is wasteful, while asking a mild polish to remove a deep scratch usually leads to disappointment or excessive working of one small area.
Table of Contents
- Why Ontario Drivers Confuse Buffing and Polishing
- What Buffing Does to Your Paint
- How Polishing Restores Gloss Without Heavy Cutting
- Buffing vs Polishing Side by Side
- Ontario Paint Correction Stages and Real Costs
- When to Buff and When to Polish Your Vehicle
- DIY Approaches and When to Call a Professional
Why Ontario Drivers Confuse Buffing and Polishing
A GTA driver can have a perfectly clean car and still see paint defects immediately after washing. Winter contamination hides those defects under salt film and grime, but sunlight exposes them once the surface is clean. That's why spring often creates the impression that the paint suddenly deteriorated, even though the marks accumulated gradually through washing, brushing, grit, and highway driving.
The terminology makes the decision harder. Big-box car-care products use “buffing” and “polishing” in broad marketing language, while older body-shop terminology may call almost any machine work buffing. Modern detailers also use similar rotary or dual-action machines for both stages, so the equipment alone won't tell you what service you're buying.
A useful regional example comes from a GTA mobile detailing business established in 2004, which says it has restored thousands of vehicles through buffing and polishing. Its service guidance describes paint correction as a process using an electric polisher, microfiber buffing pads, and cutting compounds, with Stage 1 commonly taking 4–6 hours and Stage 2 taking 8–12 hours. That workflow shows why the terms overlap in conversation while still representing different levels of correction. (GTA buffing and polishing service guidance)
The simple distinction
Think of a scratched wooden board. A coarse sanding stage levels the obvious ridges and gouges. A finer sanding stage smooths the remaining texture so the surface reflects light evenly. Automotive paint correction follows a similar logic, although a detailer must work within the limited thickness of the clear coat.
- Buffing cuts: It uses a stronger abrasive combination to reduce more visible defects.
- Polishing refines: It uses finer abrasives to improve clarity, gloss, and the appearance left after cutting.
- A wash may be enough: If the paint only has road film and no visible marring under proper light, correction isn't automatically justified.
- The service label isn't enough: Ask which pad, compound, correction stage, and inspection process the detailer intends to use.
The confusion disappears when you stop treating the words as competing products. Ask what the operator plans to remove, how much correction the paint can safely tolerate, and whether the quoted service includes a refining pass.
What Buffing Does to Your Paint
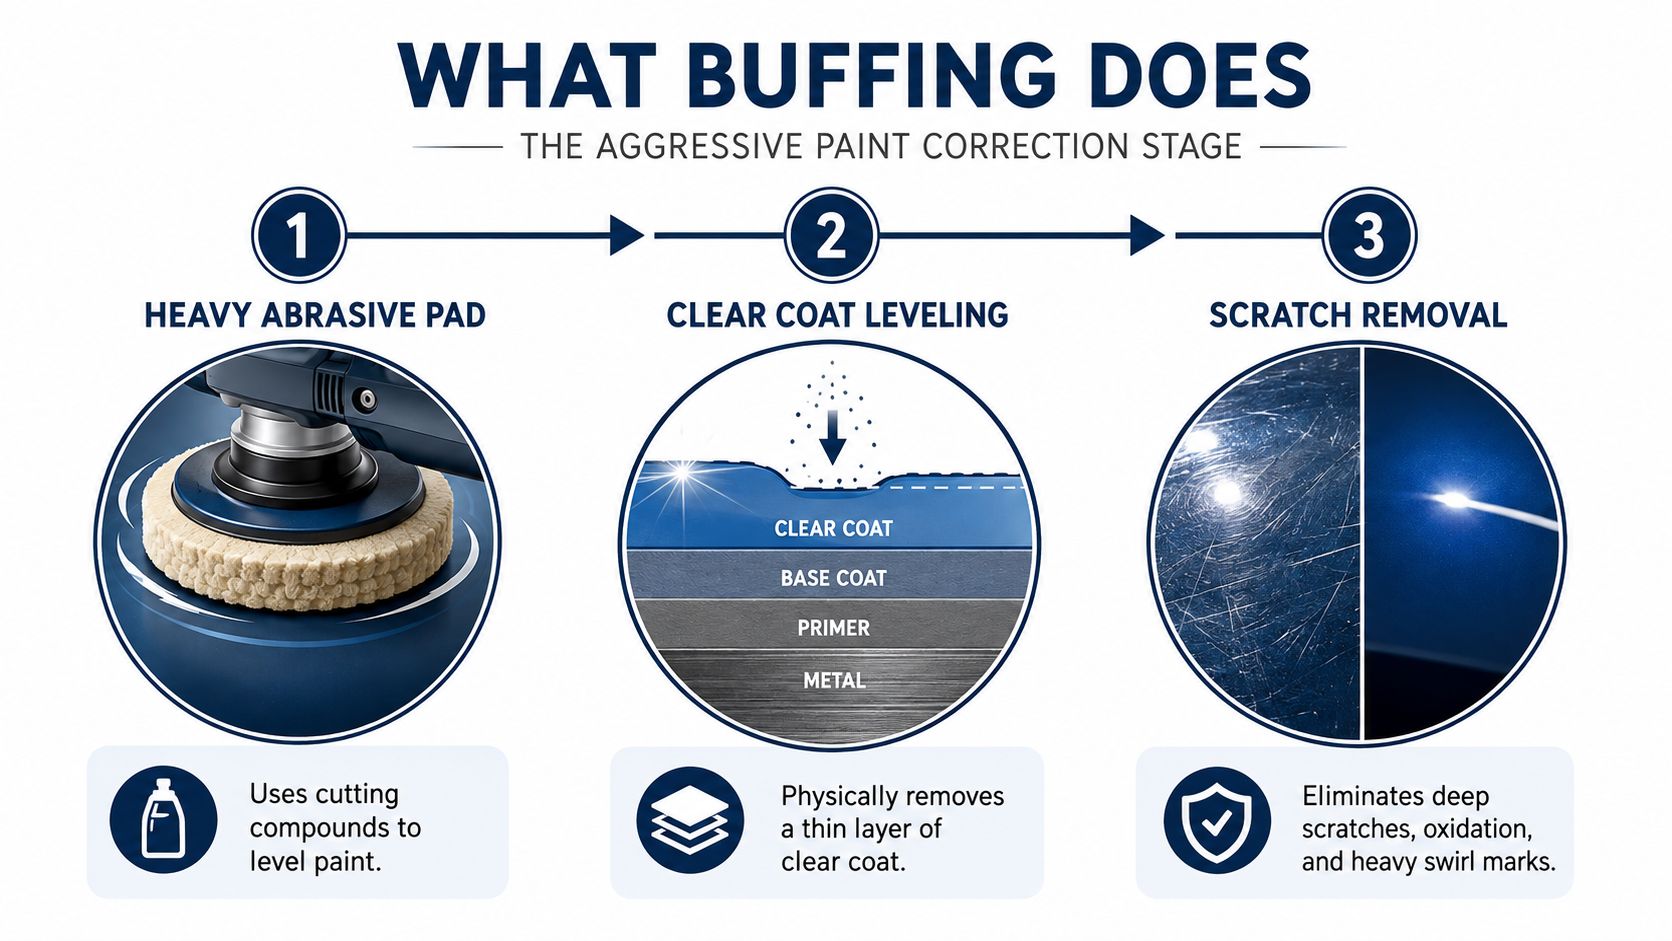
Buffing, in the correction sense, is the more aggressive cutting operation. A detailer pairs a wool or heavy-cut foam pad with a coarse compound and works a controlled section of paint. The abrasive reduces raised edges around defects, lowering the contrast that makes scratches, etching, and heavy marring stand out.
A compound breaks down abrasive particles as it works, progressively refining the surface texture rather than digging deeper. The operator still has to control pad pressure, working time, heat, and section size. Chasing every mark can remove more clear coat than the vehicle's finish can safely spare.
Ontario detailing sources describe paint correction as a measurable clear-coat removal process, with about 1–3 microns potentially removed to restore gloss. (Ontario paint-correction stages and material removal) That figure is not a target for every panel. It shows why a professional should inspect the finish before selecting an aggressive pad and compound, particularly on older vehicles or panels that have been corrected before.
What the cutting stage targets
Buffing may suit defects that a fine polish cannot reduce cleanly:
- Deeper scratches: A scratch that catches a fingernail may extend beyond what light polishing can safely improve.
- Oxidation: Dull, chalky paint usually needs more than a gloss-enhancing pass.
- Heavy swirls: Dense circular marring from poor washing may require a compound stage.
- Etching: Bird droppings, sap, and winter contamination can leave hardened marks in the clear coat.
- Severe haze: A neglected panel may need levelling before its finish can be refined.
GTA detailers may use products such as Meguiar's M105 or Menzerna 300, matched with wool, microfiber, or heavy-cut foam. A rotary polisher can cut quickly, while a forced-rotation or dual-action machine may provide more control, depending on the pad, product, panel shape, and operator's technique.
Why over-buffing is a serious mistake
A cutting pass cannot replace missing paint. Once clear coat is removed, wax, sealant, or ceramic coating will not restore it. Sharp edges and previously corrected areas deserve extra caution because they can have less material available for another aggressive pass.
Practical rule: Correct the defect that matters. Do not remove clear coat simply to claim a higher correction percentage.
The safest process starts with the least aggressive combination that can meet the owner's goal. If a mark remains after a test area, the honest result may be reduced visibility rather than complete removal. On salt-battered Ontario paint, that restraint can matter more than chasing a perfect panel.
How Polishing Restores Gloss Without Heavy Cutting
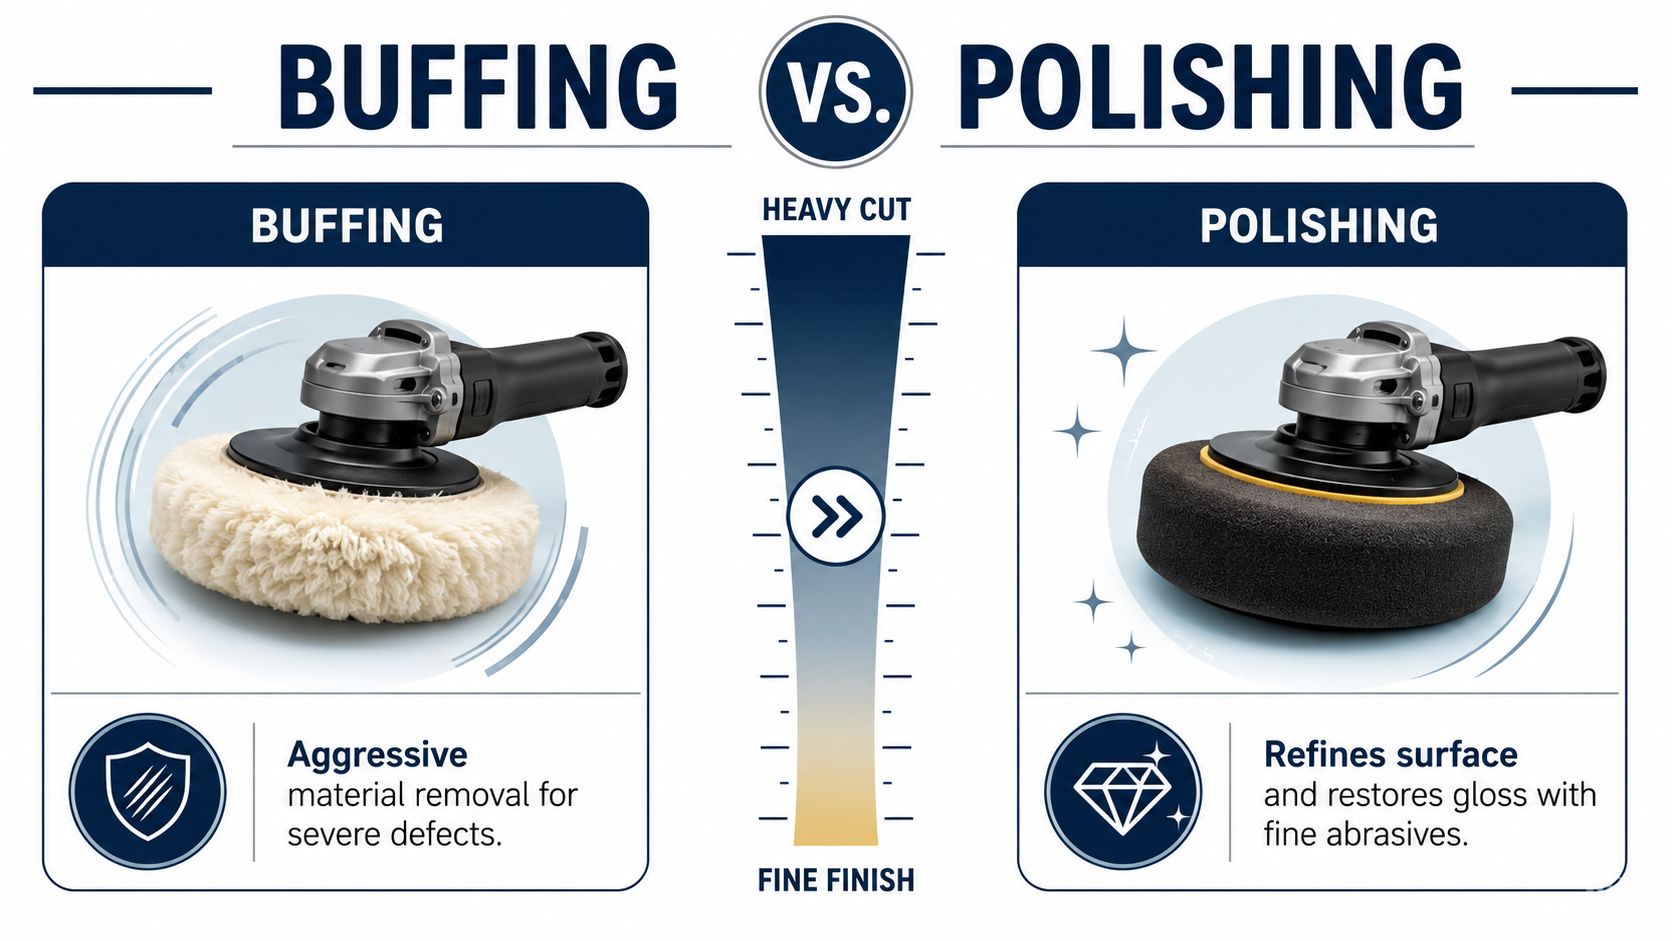
Polishing is the refinement stage. It can follow buffing, or it can be the only correction a lightly marked vehicle needs. Fine abrasives smooth minor texture and micro-marring, helping the paint reflect light more evenly instead of scattering it through a grey or hazy surface.
Polishing works like sandpaper graded finer with each pass. The goal is to smooth the surface, not remove more material than the finish requires. A polishing pad is usually softer than a cutting pad, and the compound is finer. Products such as Menzerna 3800 or Sonax Perfect Finish are examples of finishing-oriented choices, although the correct product still depends on the paint system and the test spot. A dual-action polisher, foam finishing pad, and lighter pressure provide controlled refinement in many cases.
Where polishing earns its keep
Polishing suits paint that looks tired without severe damage. Common examples include light wash swirls, mild water-spot haze, and surface dullness caused by exposure and contamination. It also fits the final preparation before wax, sealant, or other protection, because that protection follows the surface underneath it.
The result is clearer reflection, not just more shine. A clean, level surface sends light back more evenly, creating the sharp reflections associated with a professional finish. On dark colours, that can separate a deep-looking panel from one that appears cloudy under a parking-lot light.
What polishing won't do
A polish is not a magic eraser. It generally will not remove every fingernail-catching scratch, severe oxidation, or deep impact scar without a stronger cutting combination. Forcing a finishing polish to do a compound's work can produce uneven correction, unnecessary heat, and wasted time.
| Question | Polishing answer |
|---|---|
| Is it mild enough for regular upkeep? | Often, when the paint has light defects and the operator follows a measured process |
| Does it remove deeper scratches? | Only when the defect is shallow enough for the selected combination |
| Can it stand alone? | Yes, for light marring and gloss improvement |
| Should it follow buffing? | Usually, when a cutting stage leaves haze or micro-marring |
| Does it protect the paint? | No, protection still needs its own product and maintenance plan |
A panel can have reduced scratches and still look disappointing if final refinement is skipped. Polishing a heavily etched panel may improve gloss around the defects while leaving the damage that catches your eye first. For GTA paint marked by winter wear, a polishing stage is worth paying for when the goal is cleaner reflection and improved appearance, not repair-level removal.
Buffing vs Polishing Side by Side
The practical difference comes from abrasive strength, pad choice, machine control, paint removal, and the defect being targeted. Both services may use a machine polisher, but the amount of correction and the risk to the clear coat are different.
| Factor | Buffing, Cutting | Polishing, Refining |
|---|---|---|
| Primary purpose | Level pronounced defects | Refine the surface and improve optical clarity |
| Pad type | Wool, microfiber, or heavy-cut foam | Polishing or finishing foam |
| Product type | Coarse cutting compound | Fine polish or finishing compound |
| Machine approach | Rotary, forced rotation, or aggressive dual-action setup | Controlled dual-action setup or lighter machine combination |
| Defect profile | Deep swirls, oxidation, etching, stronger scratches | Light swirls, haze, micro-marring, and dullness |
| Clear-coat effect | Measurable removal can occur | Generally limited removal when used correctly |
| Finish after the pass | Corrected but potentially hazy | Clearer, glossier, and more reflective |
| Risk | Burn-through, edge damage, or excessive clear-coat loss | Under-correction, residue, or faint micro-marring |
On a GTA vehicle, salt etching, stone marks, and repeated winter washing can make horizontal panels look flat and heavily marked. Buffing can level more of that damage, but it also removes more clear coat and demands closer inspection. The operator needs to check whether the panel is original, repainted, thin around an edge, or already corrected, then confirm the approach with a test section.
Stages matter more than labels
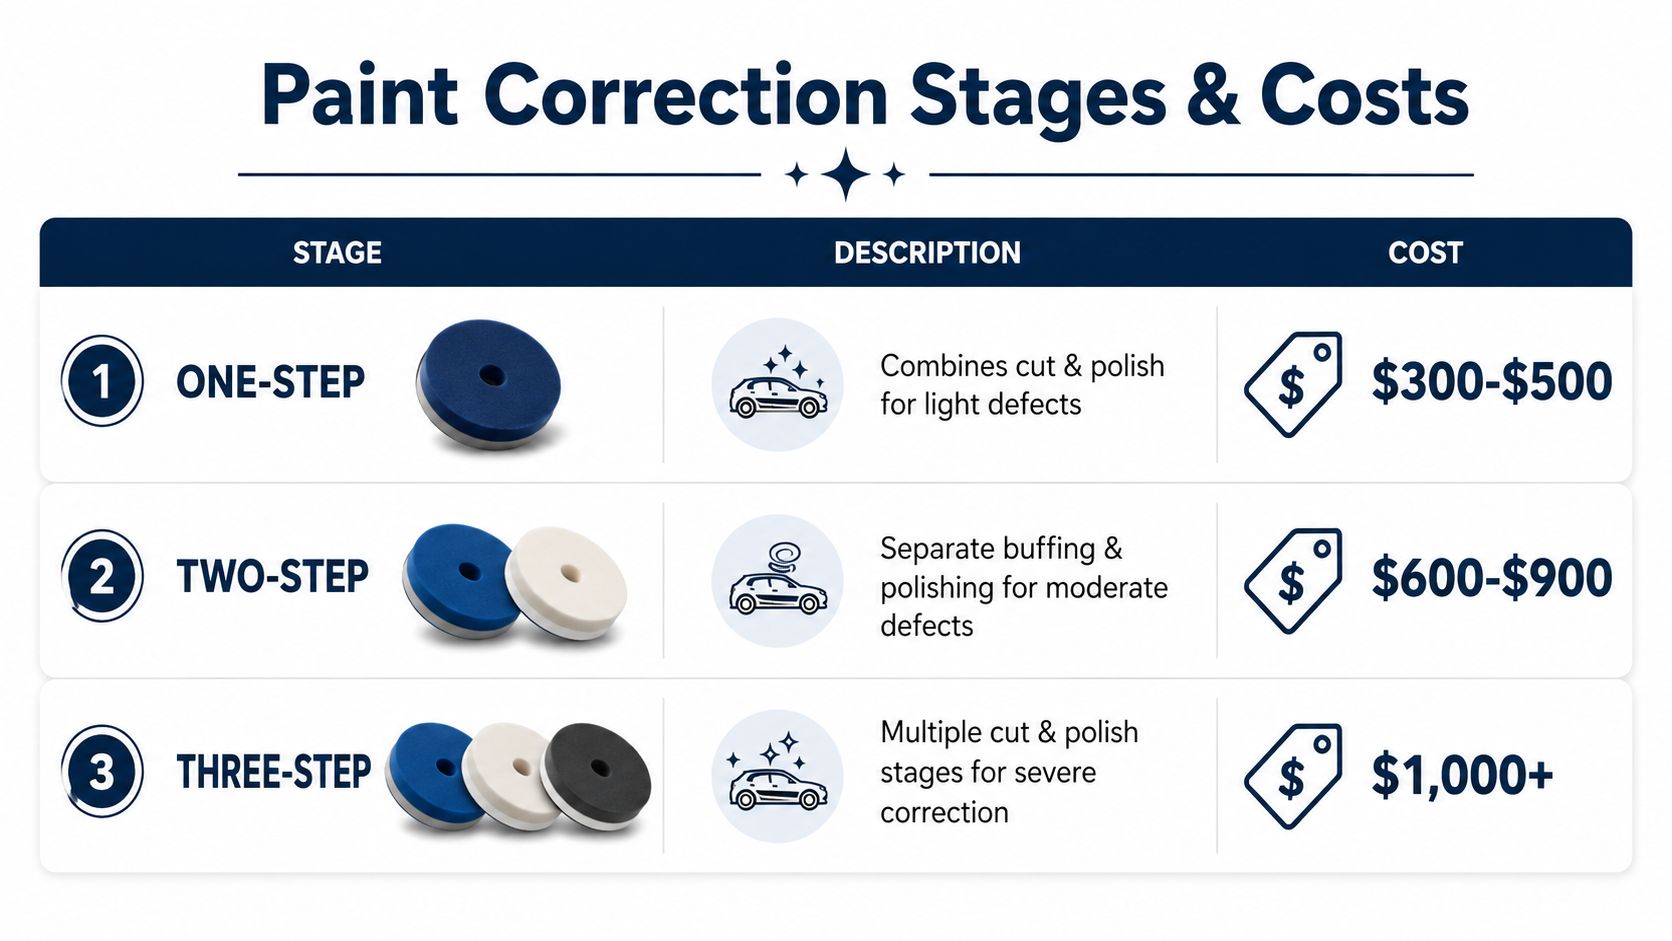
A 1-stage correction generally uses one polishing step for very light defects and a noticeable gloss improvement. A 2-stage correction adds a heavier cutting pass before the finishing polish, making it more suitable for substantial marring and defects that a fine abrasive cannot address alone. Toronto paint-correction stage guidance
That difference affects both the result and the bill:
- Choose one-step work when the main goal is better gloss and reduced light marring, not repair-level removal.
- Choose two-stage work when the panel needs cutting and the finish must then be refined.
- Allow more labour for heavier correction: GTA service timings range from 4–6 hours for Stage 1 to 8–12 hours for Stage 2. GTA correction service timings
- Set a sensible winter-wear threshold: if a scratch catches a fingernail or exposes a sharp impact mark, chasing complete removal may sacrifice too much surrounding clear coat. Softening its appearance can be the safer choice.
Buffing without polishing may leave haze, pad marks, or a flat reflection. Polishing alone can improve gloss and light marring, but it will not handle defects beyond the capability of a fine abrasive. A useful quote should identify the defect level, the intended stage, and whether the price includes the finishing step.
Ontario Paint Correction Stages and Real Costs
Ontario correction pricing becomes clearer when the service is divided by the amount of paint correction required. A Markham detailing source lists Stage 1 correction starting at $400, with typical working time of 4–6 hours. Its heavier Stage 3 service starts at $1,500 and can take 25+ hours. (Markham paint-correction pricing and stages)
That gap reflects more than shine. Labour includes inspection, washing and decontamination, test spots, machine work, pad and compound changes, residue removal, lighting checks, and caution around edges or previously repaired panels. Two cars that look similar from several metres away can therefore need very different amounts of work.
How the stages usually function
A light stage may use one corrective polish to improve reflection and reduce shallow marring. It suits an owner who wants a visible refresh while limiting material removal.
A heavier two-stage workflow usually combines cutting or compounding with a finishing polish. The first pass addresses defects that a fine abrasive cannot handle alone, while the second restores clarity and reduces haze or pad marks. Toronto correction guidance describes this as a more thorough heavy-cut and finish-polish process. (Toronto correction-stage comparison)
A severe correction may add further cutting, sanding, or specialised work. An Ontario detailing page describes a full Stage 4 orange-peel-removal process as potentially exceeding 100 hours and starting at $175 per panel. (Ontario advanced correction pricing) That level of work is rarely sensible for a daily driver exposed to Ontario salt, grit, and winter washing. Compare the vehicle's value and expected use with the goal of a show-car finish, especially when preserving original paint matters.
What to ask before approving the work
Ask whether the quote includes the wash, chemical and mechanical decontamination, test spot, cutting pass, refining pass, and protection. Confirm how the operator will handle repaired panels, thin edges, and defects they will deliberately leave alone. A useful quote should state the intended finish, correction stage, preparation included, and limits on scratch removal.
Ontario's car wash and auto detailing market includes polishing within its industry definition and has about 1,478 establishments, with the sector described as continuing to grow into 2026. (Ontario car wash and auto detailing market overview) More providers make comparison easier, but service language matters. A low price may cover a quick gloss pass rather than measured correction.
When to Buff and When to Polish Your Vehicle
Start with the paint, not the calendar. A newer vehicle with light wash marks may respond well to polishing, while an older vehicle with oxidation and etched contamination may need a cutting stage. Vehicle age can provide context, but it can't replace a close inspection because panels may have different histories.
Park the car in shade, wash it properly, and inspect it under a strong handheld light or direct sunlight. Look at the panel from several angles. If the marks disappear when wet or remain visible only as faint haze, a polish may be enough. If they catch a fingernail, show a sharp edge, or sit inside obvious oxidation, ask a professional to assess whether correction is safe.
A practical decision guide
- Light swirls and dull reflection: Begin with a polish-only test area.
- Moderate wash marring: Consider a one-step correction if the goal is a visible refresh rather than complete defect removal.
- Deep scratches or etching: Request a staged correction assessment instead of assuming a polish will solve it.
- Fresh protection or excellent paint: Skip unnecessary correction and maintain the surface with careful washing.
- Thin, previously corrected, or damaged paint: Treat aggressive buffing as a risk, not an upgrade.
Water behaviour can offer a clue about existing protection, but beading alone doesn't diagnose paint condition. A protected, dirty, or freshly washed panel can all behave differently. Use it as a maintenance observation, not as proof that the clear coat is healthy.
A good correction plan sometimes ends with “leave that mark alone.” Preserving sound paint is more valuable than making one defect disappear at any cost.
Budget also changes the sensible choice. A polish-only service can improve the vehicle's overall presentation without the time and material removal associated with heavier work. Buffing costs more because the operator spends longer correcting defects, then may need a separate refinement pass to remove the haze created by cutting.
If you're comparing providers, look for businesses that explain both exterior correction and related protection work. For fleet, resale, or dealership preparation, this overview of auto dealership cleaning services can help clarify how cleaning and presentation services are separated from more intensive paint correction.
DIY Approaches and When to Call a Professional
A car that looks dull after an Ontario winter may only need a thorough wash. Salt film, road grime, and bonded contamination can hide the paint's real condition, so clean and inspect the surface before buying a buffing package. Light swirls can often be polished at home with a consumer dual-action machine, clean foam pads, suitable compound, quality microfibres, and a sealant.
A sensible one-step workflow
- Prepare the surface: Wash thoroughly, rinse away grit, and decontaminate the paint before machine work.
- Choose a mild combination: Start with a polishing foam pad and moderate compound, rather than the most aggressive product available.
- Run a test spot: Work a small section, wipe it clean, and inspect the finish under strong light.
- Control the machine: Keep the pad flat, work a manageable area, and avoid pressing hard on edges or body lines.
- Inspect the correction: If the finish is clearer but the deeper mark remains, stop instead of escalating without a plan.
- Protect the result: Remove residue and apply a compatible sealant or wax according to its instructions.
The safe approach is deliberately boring. Pads become contaminated, compound gets used up, and a mistake on a sharp edge can cost more than the professional service you wanted to avoid.
Leave these jobs to a GTA detailer
Call a professional if a scratch catches your fingernail, a previous rotary job has left holograms, or the clear coat is peeling or failing. Repainted panels, metallic finishes, pearl colours, and uneven surfaces also deserve inspection before aggressive machine work.
A GTA detailer can test a pad and compound combination on one area, check the result under proper lighting, and decide whether the defect should be reduced rather than fully removed. That decision matters on leased vehicles, older daily drivers, and salt-battered paint, where preserving remaining clear coat is often more sensible than chasing a flawless panel.
DIY kits from Canadian retailers make light correction accessible, but their purchase price does not include the time needed to learn the machine or correct a poor result. A polish-only service is usually the better trade when the goal is improved gloss and reduced marring. Repair-level buffing takes more labour and may require a refinement pass after heavier cutting.
Nanak Car Wash lists interior and exterior detailing packages that include machine buff and polish, plus salt and stain removal and vehicle-size options. If winter grime is the main problem, book an appropriate wash or detailing service first and ask whether the paint needs correction.
For deeper defects, request a staged assessment that addresses clear-coat risk, labour, and the finish you need.

 6600 Finch Ave W, Etobicoke, ON M9V 3Z6
 647-703-8515
 MON – SUN 8 AM to 7 PM