
A glossy finish rarely comes from one miracle product. It starts with ordinary decisions: lifting grit before a wash mitt touches the paint, removing contamination before applying protection, rinsing salt from hidden areas while the weather allows, and cleaning the cabin without pushing dust from the dashboard into the seats.
The familiar scene is easy to recognise: an SUV wears a crust of road salt after a winter storm, dust has settled across the dashboard, and fine grit has found its way onto a freshly washed sedan. A quick pass with a cloth might make the car look better, but it can also drag abrasive dirt across paint or leave the mess untouched.
These auto detailing tips follow a practical maintenance journey. Start with a safe pre-rinse, then wash and dry carefully. Decontaminate and protect the paint, pay attention to Ontario's winter salt, clean the cabin from broad surfaces down to seams and glass, and finish with the wheels and tyres.
You don't need an elaborate garage full of specialty tools to get good results. A deliberate routine, clean wash media, suitable products and a realistic plan for the jobs you'd rather hand to a professional will take you further than a shelf of products used in the wrong order.
Table of Contents
- 1. Use a Two-Bucket Contact Wash and a Drying Aid
- 2. Presoak and Pre-Rinse to Remove Grit First
- 3. Rinse the Underbody and Protect Against Rust
- 4. Use a Clay Bar Before Waxing or Sealing
- 5. Choose Paint Protection You'll Maintain
- 6. Clean the Cabin from the Top Down
- 7. Clean Leather Gently and Don't Overcondition
- 8. Finish with Tyres, Wheels and Glass
- 8 Essential Auto Detailing Tips Compared
- Build a Detail Routine You Will Actually Keep
1. Use a Two-Bucket Contact Wash and a Drying Aid
After loose dirt is rinsed away, a two-bucket wash helps keep grit out of the shampoo you're using on the paint. Fill one bucket with car shampoo and water, and another with clean rinse water. Work with a soft microfibre wash mitt, rinsing it in the clean bucket after each panel before returning it to the soapy water.
That rinse step matters most on lower panels, where road film and dirt collect. Wash the cleaner upper surfaces first and leave the lower bodywork until last. Use a pH-neutral car shampoo made for vehicles rather than dish soap, which can strip wax and leave you with more work before protection.
Keep the wash controlled
Choose a shaded spot and make sure the bodywork is cool. On a hot surface, soap and rinse water can dry before you've finished working, leaving marks that are harder to remove than the dirt you started with. Wash one area at a time, and don't let the mitt touch the ground.
When the wash is done, use a suitable drying aid before drying with a clean microfibre towel or an air blower. The lubrication can help the towel glide over wet paint, while a blower can clear water from mirrors, badges and other awkward spots without wiping those areas.
Practical rule: Keep your paint towels separate from household laundry. Wash microfibre on its own and skip fabric softener, which can affect how the fibres pick up water and residue.
This approach suits an owner maintaining a glossy car between professional visits, including a rideshare driver doing a regular home wash. It does take more care than a quick drive-through, and the buckets and towels need cleaning after use. The payoff is a repeatable process that keeps dirty wash water and contaminated mitts away from the paint.
2. Presoak and Pre-Rinse to Remove Grit First
The safest contact wash is the one that starts by removing as much loose grit as possible. Sand, salt and dried road film can scratch clear coat when a mitt or cloth pushes them across the surface. A presoak and thorough pre-rinse loosen that material before you make contact.
A delivery driver returning from a snowstorm, for example, can use a wash with a presoak and underbody rinse before washing the body. A contractor's van with heavy grime along its lower panels also benefits from the extra rinse: it can reduce the amount of dirt the mitt would otherwise have to lift. Neither step replaces a careful wash, but both help prepare the vehicle for one.
Work from dirty areas to clean ones
Start with the wheels and lower panels, then move towards the upper body. That order gives runoff from dirtier areas less chance to soil surfaces you've already cleaned. Choose a presoak compatible with your wheel finish, particularly if the alloys are coated or polished, and follow the product directions.
Give the solution time to work, but keep within the manufacturer's recommended dwell time. If it dries on the paint, it can leave residue or become more difficult to rinse away. Rinse thoroughly before applying foam or bringing out a contact mitt.
A pre-rinse is not permission to aim a pressure washer indiscriminately at every surface. Keep the nozzle at a sensible distance and avoid forcing water into damaged trim, exposed wiring or compromised seals. On a car carrying winter salt, a controlled wash location with an appropriate underbody option is often a more practical choice than trying to reach every crevice in a driveway.
The trade-off is straightforward: the presoak adds a step, and it won't remove bonded contamination that has settled into paint. It does, however, reduce the loose dirt left for contact washing. That makes it a sensible first move whenever the vehicle is gritty, muddy or coated in road film.
3. Rinse the Underbody and Protect Against Rust
A clean exterior can hide a salty undercarriage. In Ontario, that matters because chloride-based road treatments and moisture can corrode underside components, wiring harnesses and exposed metal. A Canadian corrosion-control expert reported that damage can be worst in spring, when warming temperatures and moisture react with salt deposits. (CBC's reporting on winter road salt and vehicle corrosion)
A useful routine is to arrange an underbody rinse after major snow or slush events, especially before spring. Direct water towards wheel wells, rocker-panel seams, suspension-adjacent areas and drainage paths, but don't blast electrical connectors or damaged rubber boots with high pressure. Let the vehicle drain properly, or use air drying where suitable, so water doesn't remain trapped around areas you've just rinsed.
The aim isn't to chase every drop of winter grime with a pressure washer. It's to remove salt deposits without damaging the parts that help keep the vehicle sealed and functioning.
Make rust protection part of seasonal maintenance
Rinsing removes residue; it doesn't replace rust proofing. A protective compound can help guard hidden surfaces, and scheduling an application before the heaviest salt season is a practical way to prepare a vehicle that sees regular winter driving. For small-business fleets, arranging the service as a group can also make seasonal upkeep easier to plan.
Check door sills, rocker panels and wheel arches for bubbling paint or lifting edges. Those signs deserve attention rather than a fresh layer of dressing or a quick wash that only improves appearances. If a vehicle will be stored through winter, clean and rinse the underbody before storage so salt and grime aren't left sitting underneath.
Underbody cleaning takes more time than a surface wash, and access to a suitable wash bay matters. If you can't safely reach the underside or manage runoff, use a designated wash facility with underbody cleaning. The long-term value is not a promise that corrosion will never occur. It's a practical way to remove salt and give vulnerable areas appropriate attention before visible damage develops.
4. Use a Clay Bar Before Waxing or Sealing
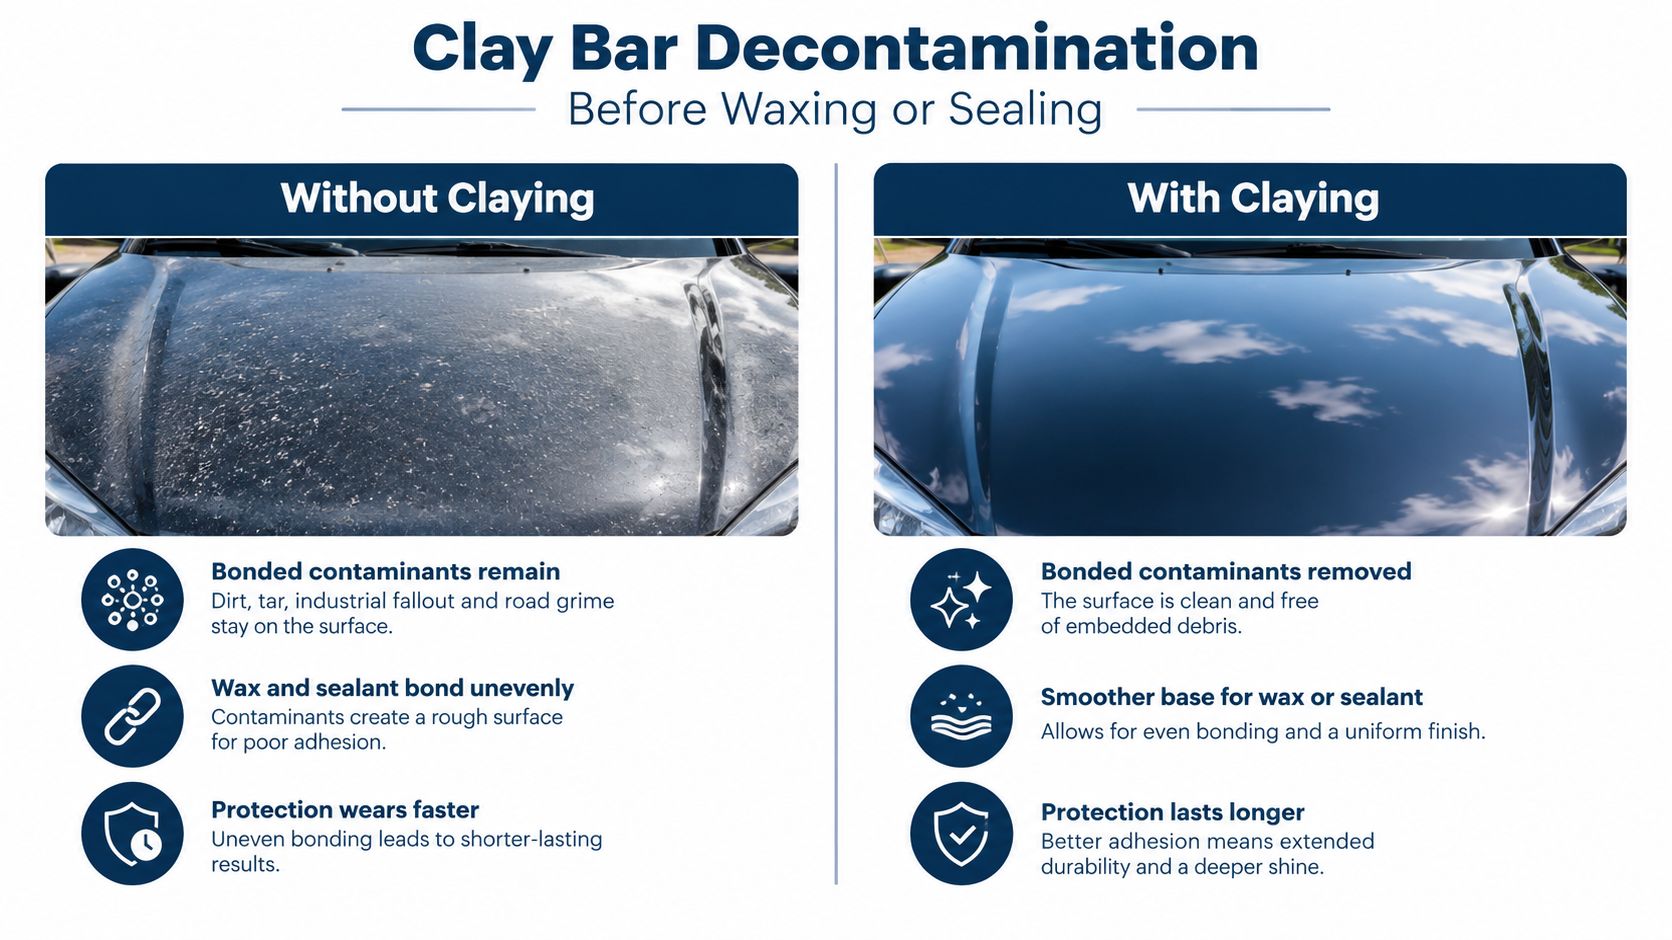
Paint can feel rough even after a careful wash. Tiny bonded contaminants such as tree sap, industrial fallout and overspray may remain on the surface, where regular shampoo can't lift them. A clay bar or synthetic clay mitt, used with lubricant, can remove that contamination and leave paint smoother before waxing or sealing.
Try the bag test after washing: place a clean, thin plastic bag over your hand and gently feel the paint. If the surface feels rough through the bag, contamination may still be present. Test the clay product on a small area first, particularly if you're unfamiliar with the paint or tool.
Lubrication and patience matter
Work on cool, wet paint and use plenty of the product's recommended lubricant. Move the clay gently over a small section at a time, without pressing hard. If the clay picks up visible dirt or becomes contaminated, knead it to expose a clean area if the product allows, or replace it. A dirty clay surface can drag grit across the finish.
A driver who notices small bumps after a wash might clay the affected panel before applying wax. But claying isn't a routine wash step, and doing it too aggressively can mar paint, leaving polishing work behind. Use it when the surface feels rough or when a periodic paint refresh is due, not because the clay is in the detailing kit.
Afterward, rinse or wipe away lubricant residue as directed by the product, then inspect the paint before applying protection. If the surface still feels rough, reassess rather than making repeated passes with contaminated clay. Claying is a preparation step, not a substitute for correcting scratches or oxidation. Used carefully, it helps create a cleaner surface for the protection that follows.
5. Choose Paint Protection You'll Maintain
Wax, synthetic sealants and ceramic coatings all help protect paint, but they don't offer the same upkeep experience. Carnauba wax is often chosen for its appearance and can need more frequent renewal. Synthetic sealants generally suit drivers looking for a longer maintenance interval, while ceramic coatings require careful preparation and ongoing washing to maintain their performance.
The right choice depends on how you use the vehicle and how much maintenance you're willing to do. A high-mileage rideshare driver may prefer a straightforward sealant-wax option added during regular washes. Someone keeping a vehicle for years may consider a professional ceramic coating to reduce the need for frequent wax applications, while recognising that a coating isn't a force field against scratches, chips or neglected washing.
Prepare the surface, then apply lightly
Protection bonds best to clean, decontaminated paint. Follow the product directions, apply a thin and even layer, and allow it to haze or cure as specified. More product doesn't necessarily mean more protection; thick, uneven application can make removal harder and leave streaks.
A useful seasonal rhythm is to check the finish before winter and again in spring. If the vehicle's protection is due for renewal, addressing it before salt season gives you a better starting point, while a spring inspection helps identify what winter washing has removed. Keep washing regularly either way. Dirt and salt left on the surface undermine the purpose of protection.
The comparison below shows why paint preparation deserves attention before wax, sealant or coating goes on. Clay can remove bonded contamination, but it won't repair paint defects or replace a suitable protective product.
6. Clean the Cabin from the Top Down
A good interior clean follows a sequence, not a frantic sweep with a vacuum. Start with the dashboard and other hard surfaces, then vacuum upholstery, carpets and floor mats. Finish by reaching into vents, seat seams, console edges and rails, where crumbs and dust hide from a quick pass.
A family with pets might vacuum regularly using an extended-tip attachment and a rubber brush to lift hair from upholstery. A delivery driver with winter salt marks embedded in the carpet may need shampooing and extraction instead. Vacuuming removes loose debris; it won't pull out contamination that has worked into the fibres.
Remove dirt rather than covering it
Use a soft brush to loosen debris from vents and crevices, then capture it with a vacuum. If using compressed air, direct the debris towards the vacuum nozzle rather than blowing it around the cabin. Remove floor mats before cleaning them separately, and blot spills instead of rubbing, which can spread the stain through the fabric.
Test cleaners on a hidden area before treating a larger section, especially on dyed or delicate materials. For embedded dirt, a shampoo or extraction service can lift residue that a dry vacuum leaves behind. The trade-off is time: wet cleaning means waiting for upholstery and carpets to dry fully. Ventilate the cabin and don't close up damp materials, or the interior can develop a musty smell.
Interior upkeep also matters for more than appearance. California Air Resources Board research found that in-vehicle concentrations of hydrocarbons and carbon monoxide were two to ten times higher than at roadside or fixed monitoring locations, and pollutants from the vehicle ahead could account for as much as half of in-cabin pollution. The findings are from California vehicles, not a Toronto measurement. (CARB's vehicle-pollution research)
Deep vacuuming, cleaning vents and crevices, upholstery extraction and replacing the cabin filter are complementary tasks. One doesn't replace the others. Fragrance may cover an odour, but it won't remove the trapped dirt or damp residue causing it.
7. Clean Leather Gently and Don't Overcondition
Leather seats collect body oils, sweat and everyday dirt, especially on the driver's seat, steering-wheel rim and door-side bolsters. Use a pH-balanced leather cleaner and a soft brush or cloth to lift the grime without soaking the material. Follow with a suitable conditioner if the product and leather finish call for it.
Apply cleaner to the brush or towel rather than spraying a large amount directly onto the seat. That gives you more control and reduces the chance of saturating seams. Work on a small area, wipe away residue, and test any new product in an inconspicuous place before treating the whole interior.
Less is more: A greasy seat isn't proof that leather is well cared for. Wipe off excess conditioner and let the surface rest before driving.
Match the routine to the leather
Leather finishes vary, so avoid assuming that every seat needs the same treatment. Check the vehicle's care guidance and the cleaner's instructions, particularly for coated leather or delicate trim. Overworking the surface, using an unsuitable household cleaner or leaving product in stitching can create problems that a simple wipe-down won't fix.
Cold weather and cabin heating can make interior materials feel dry, but that's no reason to apply conditioner every time you clean the car. Set a routine based on how heavily the seats are used and how they look and feel. An owner of a leather-equipped SUV might clean and condition the seats periodically as part of seasonal interior care, while a rental fleet may use a consistent, light-touch process to keep vehicles presentable.
If seats have heavy staining or ingrained dirt, a professional deep clean may be safer than repeated scrubbing at home. Keep the seat surface clean, avoid leaving cleaner behind, and let it dry before use. The useful result is a tidy, comfortable cabin, not a slippery finish that transfers product onto clothing.
8. Finish with Tyres, Wheels and Glass
Wheels and glass can undo the impression of an otherwise clean vehicle. Brake dust and road grime build up on wheels, while streaked windows make a freshly washed car look unfinished and can interfere with visibility. Treat these areas as separate jobs, with tools kept away from painted panels.
Use dedicated wheel brushes and towels. A cleaner labelled safe for your wheel finish helps avoid damaging a coated or polished surface. Rinse thoroughly, and don't leave cleaner to dry on the wheel. If the finish is delicate or the wheel is hot, wait until it's cool before cleaning.
Keep the finish practical and the view clear
Apply water-based tyre dressing to dry tyres and wipe away excess before driving. A light, even layer gives a clean appearance without the greasy look that comes from overapplication. Dressing is for the tyre sidewall, not the tread.
For glass, use one clean microfibre towel to apply glass cleaner and a second to buff away residue. Work in manageable sections and check the glass from different angles, since streaks can disappear in one light and show up in another. Clean the inside as well as the outside; cabin film can make windscreen glare more distracting at night.
A rideshare driver working evenings may give glass and wheels extra attention because clear windows and a tidy finish matter on every shift. Include the wiper blades and washer fluid in winter preparation, too. Dirty glass, worn blades and low fluid are a poor combination in rain or road spray, regardless of how glossy the paint looks.
Do wheels after the bodywork or use separate tools so brake dust doesn't end up on the paint. Then finish with glass and a quick inspection of the tyres. These small details take little product, but they help the car look cared for and keep the driver's view clear.
8 Essential Auto Detailing Tips Compared
| Car-Care Method | 🔄 Complexity & Resources | ⚡ Time / Efficiency | 📊 Expected Outcome | ⭐ Key Advantage | 💡 Ideal Use Case |
|---|---|---|---|---|---|
| Two-Bucket Contact Wash with Drying Aid | Moderate; two buckets, grit guards, wash mitt, soap, drying aid | Slower than an automatic wash; efficient for careful home maintenance | Cleaner paint with reduced risk of swirls and water spots | Low-cost setup that supports glossy paint between professional visits | Owners who have time, water access, and want extra paint care |
| Presoak and Pre-Rinse | Low to moderate; presoak solution and suitable water pressure | Speeds up the main wash by loosening grime first | Removes loose grit, salt, and road film before contact | Reduces abrasive rubbing and wash-induced scratches | Salt-covered or heavily soiled vehicles before washing |
| Winter Underbody Rinse and Rust Protection | Moderate; underbody rinse equipment; rust proofing adds product and service cost | Rinsing is quick; rust proofing requires periodic service | Less salt buildup and slower underbody corrosion | Helps protect structural components and resale value | Vehicles driven through salted winter roads, especially in Ontario |
| Clay Bar Decontamination | Moderate; clay bar or pad and lubricant | Time-consuming, especially on large vehicles | Smooth paint ready for polishing, waxing, or sealing | Removes bonded contaminants that washing cannot | Rough-feeling paint before applying paint protection |
| Wax, Sealant, and Ceramic Coatings | Varies; wax is simple, while ceramic coating needs preparation and higher investment | Wax requires frequent reapplication; ceramic lasts longer | Added gloss and a protective barrier against contaminants and weather | Offers protection options for different budgets and maintenance needs | Drivers seeking periodic paint protection or long-term coating |
| Interior Vacuuming, Stain Removal, and Shampooing | Moderate to high; vacuum, brushes, cleaners, and extraction equipment for deep cleaning | Routine cleaning is manageable; deep shampooing can take hours | Removes dust, embedded dirt, stains, and odours | Improves cabin cleanliness, comfort, and appearance | Vehicles with pets, children, heavy use, or winter salt stains |
| Leather Cleaning and Conditioning | Low to moderate; pH-balanced cleaner, conditioner, and soft tools | Relatively quick when maintained regularly | Cleaner, softer leather with reduced risk of drying and cracking | Helps preserve appearance and condition | Leather interiors exposed to frequent use or seasonal dryness |
| Tire, Wheel, and Glass Care | Low; dedicated wheel cleaner, brushes, tire dressing, and glass towels | Quick finishing steps; regular cleaning may be needed | Cleaner wheels, finished tires, and clearer glass | Improves appearance and supports driving visibility | Routine finishing, winter maintenance, and vehicle presentation |
Build a Detail Routine You Will Actually Keep
The best detailing plan is the one you can repeat. Rinse away loose grit before each contact wash, use clean wash media, and dry paint carefully. When the surface feels rough, decontaminate it before applying wax or sealant. A ceramic coating may suit a driver who wants a different protection routine, but it still needs regular, appropriate care.
In Ontario, make underbody rinsing a priority after major snow or slush events when conditions allow. Salt can sit in places a standard exterior wash never reaches, and the corrosion-control expert cited earlier has warned that spring moisture can react with winter deposits. Check vulnerable seams and wheel arches, and arrange rust proofing if it fits the vehicle's use and maintenance needs.
Keep the cabin manageable with regular vacuuming and prompt spill cleanup. Shampoo carpets or upholstery when dirt is embedded, not just because the surface looks dusty. Clean vents and crevices as part of interior work, and treat cabin filtration as a separate maintenance step rather than assuming a vacuum can take care of it. Leather needs gentle, suitable cleaning, with conditioning based on the material and product guidance rather than a heavy coating on every visit.
Finish with wheels, tyres and glass. You don't have to complete every deeper task on the same day: a routine wash, a seasonal underbody service and occasional interior extraction can be easier to sustain than an ambitious all-day detail that rarely happens. Correct technique matters more than owning every brush, coating and machine on the shelf.
For busy drivers, rideshare operators and small fleets, professional help can fill the gaps. Nanak Car Wash offers express and full-service washes, professional detailing, rust proofing, prepaid bundles and monthly Unlimited Wash Club passes at locations across the Greater Toronto Area. A professional visit can make sense when you don't have the time, equipment or experience to handle embedded stains, leather deep cleaning or seasonal rust protection yourself.
For a quick maintenance wash, a full-service clean or help with interior detailing and rust proofing, explore the options at Nanak Car Wash. Choose the service that fits your vehicle's condition and your routine, then make the next wash part of your regular care plan.


 6600 Finch Ave W, Etobicoke, ON M9V 3Z6

 647-703-8515
 MON – SUN 8 AM to 7 PM