

Your car probably looks fine from ten feet away. Then you open the door, see winter salt on the mats, dust baked into the vents, and a line of grime along the lower panels, and suddenly “I'll detail it this weekend” sounds optimistic.
A real car deep clean is not one big scrub session. It's a contamination-control sequence, done in the right order, so dirt doesn't get pushed from the worst areas into the clean ones. That matters in the Greater Toronto Area, where winter roads leave a different kind of mess than summer dust, and where an owner can waste a lot of effort by polishing before the salt is gone.
Ontario's vehicle base makes this a practical topic, not a niche hobby. Statistics Canada reported that Ontario accounted for 35.9% of Canada's light-duty-vehicle registrations in 2024, about 8.8 million vehicles (Statistics Canada PDF). That's a huge pool of daily drivers, family SUVs, vans, pickups, ride-hailing cars, and work vehicles that all need the same basic thing, a method that removes contamination without spreading it around.
If you want a useful outside reference on structured home care, the valeting guide for Dublin homes is a solid example of how good cleaning advice stays practical instead of theatrical.
Table of Contents
- What a Real Car Deep Clean Actually Involves
- Exterior Panels Done in the Right Order
- Wheels, Wells, and the Underbody Zone
- Interior Cabin Work From Top Down and Dry to Wet
- Home Driveway Versus Commercial Facility
- Why Ontario Winter Changes the Deep Clean Equation
- Finishing Steps and Common Questions
What a Real Car Deep Clean Actually Involves
A proper car deep clean starts with the idea that not all dirt lives in the same place. Road film sits on painted panels, heavy contamination gathers in wheel wells and underbody areas, loose dust hides in vents and seams, and everyday use leaves residue on glass, touch points, and fabric. If you treat all of that as one mess, you end up moving grime from one zone to another.
Think in zones, not in chores
The first zone is the exterior panels, where you're removing loose grit, traffic film, and surface contamination without grinding it into clearcoat. The second is the wheels, wells, and underbody, which need their own tools because they collect brake dust, salt, and slush. The third is the cabin, where the order changes again, because dust and debris should come out before any moisture goes in.
A fourth zone is glass and vents, which look simple but punish sloppy technique. The fifth is finishing and protection, where drying, inspection, and the right sealant or wax matter more than people admit. Skip the sequence and you usually get a car that looks cleaner for a day, then shows residue, water spots, or lingering odours once the surfaces settle back into normal use.
Practical rule: clean from the least contaminated areas to the most contaminated only when the contamination type stays the same. Once salt, mud, or brake dust enters the picture, the order changes.
Expect a deep clean to take time, not because the job is complicated, but because each step protects the next one. You're not memorising a checklist, you're controlling where contamination goes. That shift in thinking is what separates a maintenance wash from a serious detail.
Exterior Panels Done in the Right Order
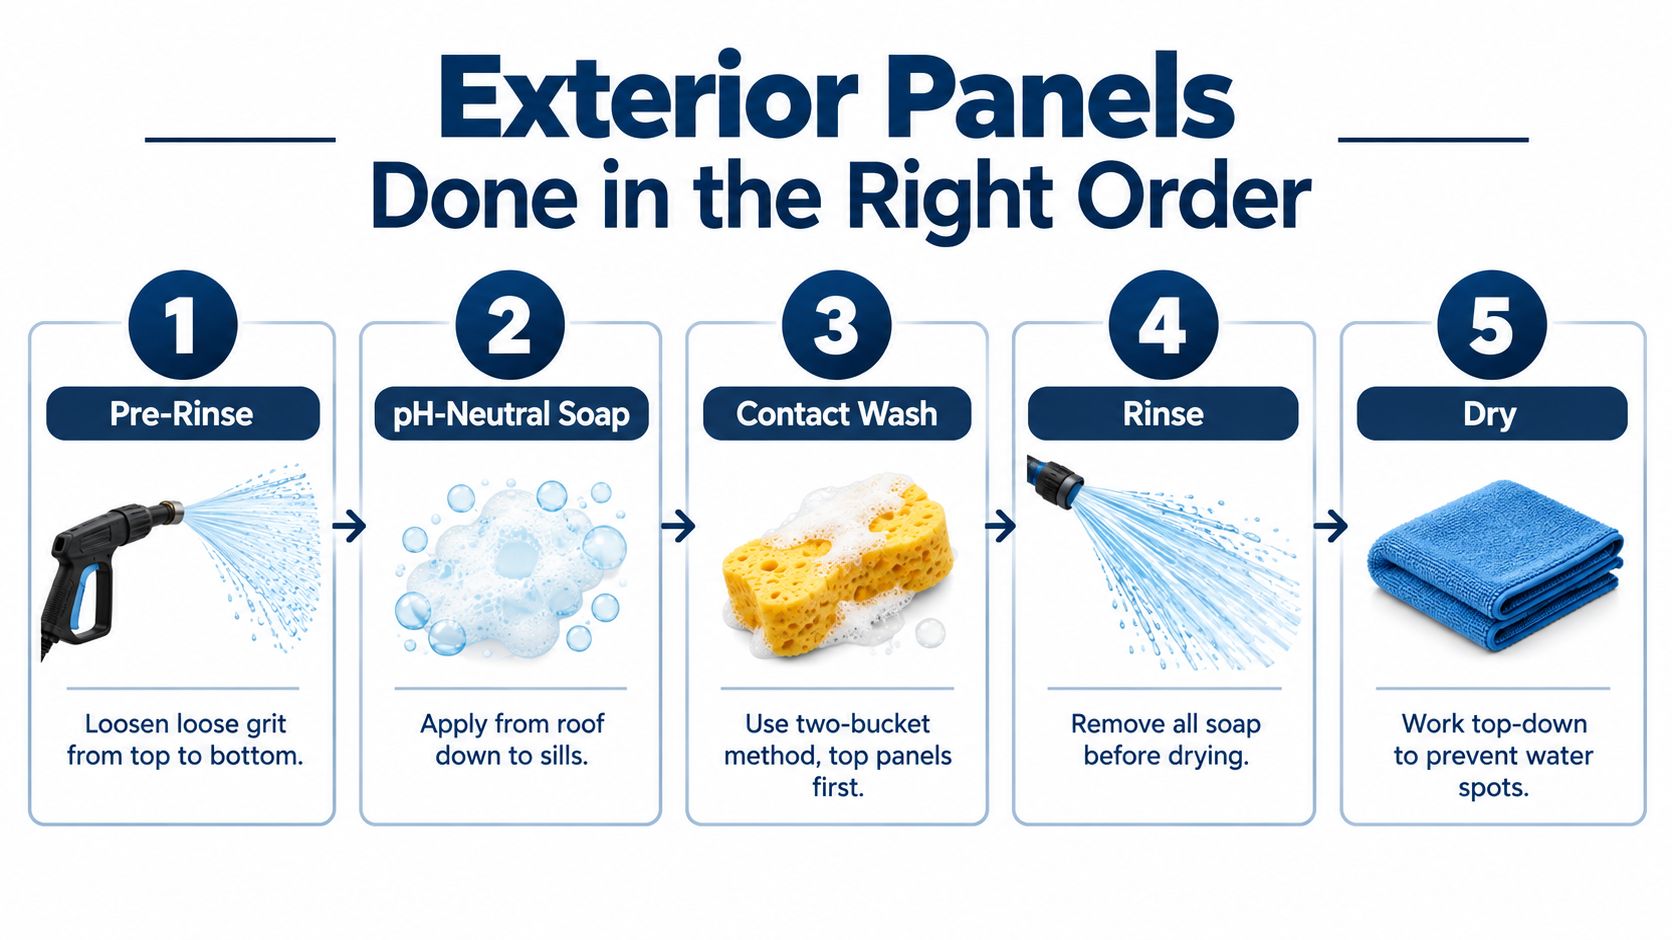
Start with the paint and trim, but don't touch them dry. A pre-rinse removes the loose grit sitting on top of the finish, and it matters because that grit becomes sandpaper the moment you drag a mitt across it. Work from the roof down, not because it sounds tidy, but because gravity keeps pulling loose contamination lower as you go.
The safest contact wash is still the boring one, pH-neutral soap, a clean mitt, and the two-bucket method. One bucket holds the wash solution, the other is for rinsing the mitt before it goes back to paint. That simple separation keeps the dirty water from becoming the new source of scratches.
Work panel by panel, not side to side
Do one panel at a time, rinse often, and keep your mitt clean. The lower doors, rocker areas, and rear bumper collect the heaviest road film, so they deserve extra attention after the upper surfaces are done. A lot of bad detailing happens when someone washes the whole car with one dirty mitt and wonders why the finish still feels rough.
Pay attention to seams, mirrors, door jambs, emblems, and trim gaps during the final rinse. Those are the places where soap, grit, and winter residue hide after the panel looks “done”. Dry with a microfibre towel, not a chamois, because microfibre is easier to control and less likely to drag leftover particles across the clearcoat.
Good drying habits beat aggressive drying tools. Light pressure, clean towels, and top-down movement keep water spots and swirl marks from starting in the first place.
The panel-only mistake is common. People clean what they can see and leave salt packed into the lower edges, which is why the car looks good in the driveway and tired again by the next drive. If the exterior sequence stops at painted surfaces, the deep clean never really starts.
Wheels, Wells, and the Underbody Zone
Wheels are not just dirty panels with spokes. They're a separate contamination zone, loaded with brake dust, winter slush, grit, and salt that behave differently from road film on paint. That's why the tools have to stay separate too, no shared mitts, no shared bucket, no casual “I'll just use the same brush”.
Use a dedicated wheel cleaner and, where suitable, a non-acidic iron remover for stubborn contamination. Follow with separate brushes for face, barrel, lug area, and wheel wells. If a brush touches wheels, don't send it back to painted panels later. That's how you drag metal dust and road grime across clearcoat and trim.
The underbody rinse is the part many owners skip, then wonder why the car still feels dirty after a full detail. It helps flush salt and slush from exposed components, including wheel wells, lower seams, suspension areas, and other spots that trap residue. A surface wash can make the body look clean while the wheel arches keep feeding corrosion.
Ontario's road-maintenance figures show why this zone matters so much. Environment and Climate Change Canada reported 1,679,395 tonnes of solid road salt, 104,187 kilometres of road treated with salt, 135 Ontario organisations reporting practices, plus 36,198,084 litres of liquid products and 791,365 tonnes of abrasives in the cited period (Environment and Climate Change Canada). That isn't a light dusting of winter residue, it's a province-wide contamination load.
Why the underbody needs its own pass
A proper rinse does more than make the underside look better. It reduces the residue that sits in wheel wells and lower cavities after slush melts and refreezes. Ontario-focused technical material also notes the corrosive impact of deicing salt under local conditions, which is why underbody rinsing is not a luxury move, it's basic preservation (Transportation Association of Canada PDF).
If you only have time for one exterior add-on beyond the normal wash, make it this one. Wheels and underbody contamination don't stay politely in place, they keep coming back through splashback and trapped residue.
Interior Cabin Work From Top Down and Dry to Wet
Inside the cabin, the biggest mistake is adding moisture too early. Dust, crumbs, and sand have to come out first, because once they're wet, they smear into fabric, seams, and foam. The cleanest interiors usually come from the slowest opening move, not the fastest.
A strong sequence starts with personal items, floor clutter, and any loose rubbish removed from the vehicle. After that, blow out vents, seat rails, crevices, and console gaps before vacuuming. That step matters more than people think, because compressed dust hidden in seams turns into mud if you damp-clean too soon.
For readers who want a deeper walkthrough of cabin care products and workflow, the deep clean a car interior guide is a useful companion resource. It fits especially well if you're comparing light maintenance to a full interior reset.
Dry work comes first, wet work comes later
Vacuum carpets, floor mats, seats, trunk liners, and narrow channels with the right attachments. Use a crevice tool and a brush head where needed, but keep the suction path controlled so loose grit doesn't bounce back into the cabin. Spot-test any cleaner on a hidden area before using it on visible trim or fabric.
Controlled moisture belongs in the middle of the process, not the beginning. Fabric and carpet respond best to careful extraction, not soaking. Leather needs a material-appropriate cleaner, not a generic detergent blast, because aggressive products can damage coatings and leave the surface uneven.

Watch the moisture level. If liquid reaches foam, carpet backing, seat seams, or electronics, the car can smell “clean” for an hour and still develop odour or hidden staining later.
Glass is last because it catches overspray and fingerprints from every earlier step. Finish with ventilation and a full dry-out period before handing the vehicle back to regular use. Salt staining in the cabin needs the same discipline, start dry, loosen the residue, then extract lightly instead of soaking the mark and spreading it wider.
Home Driveway Versus Commercial Facility
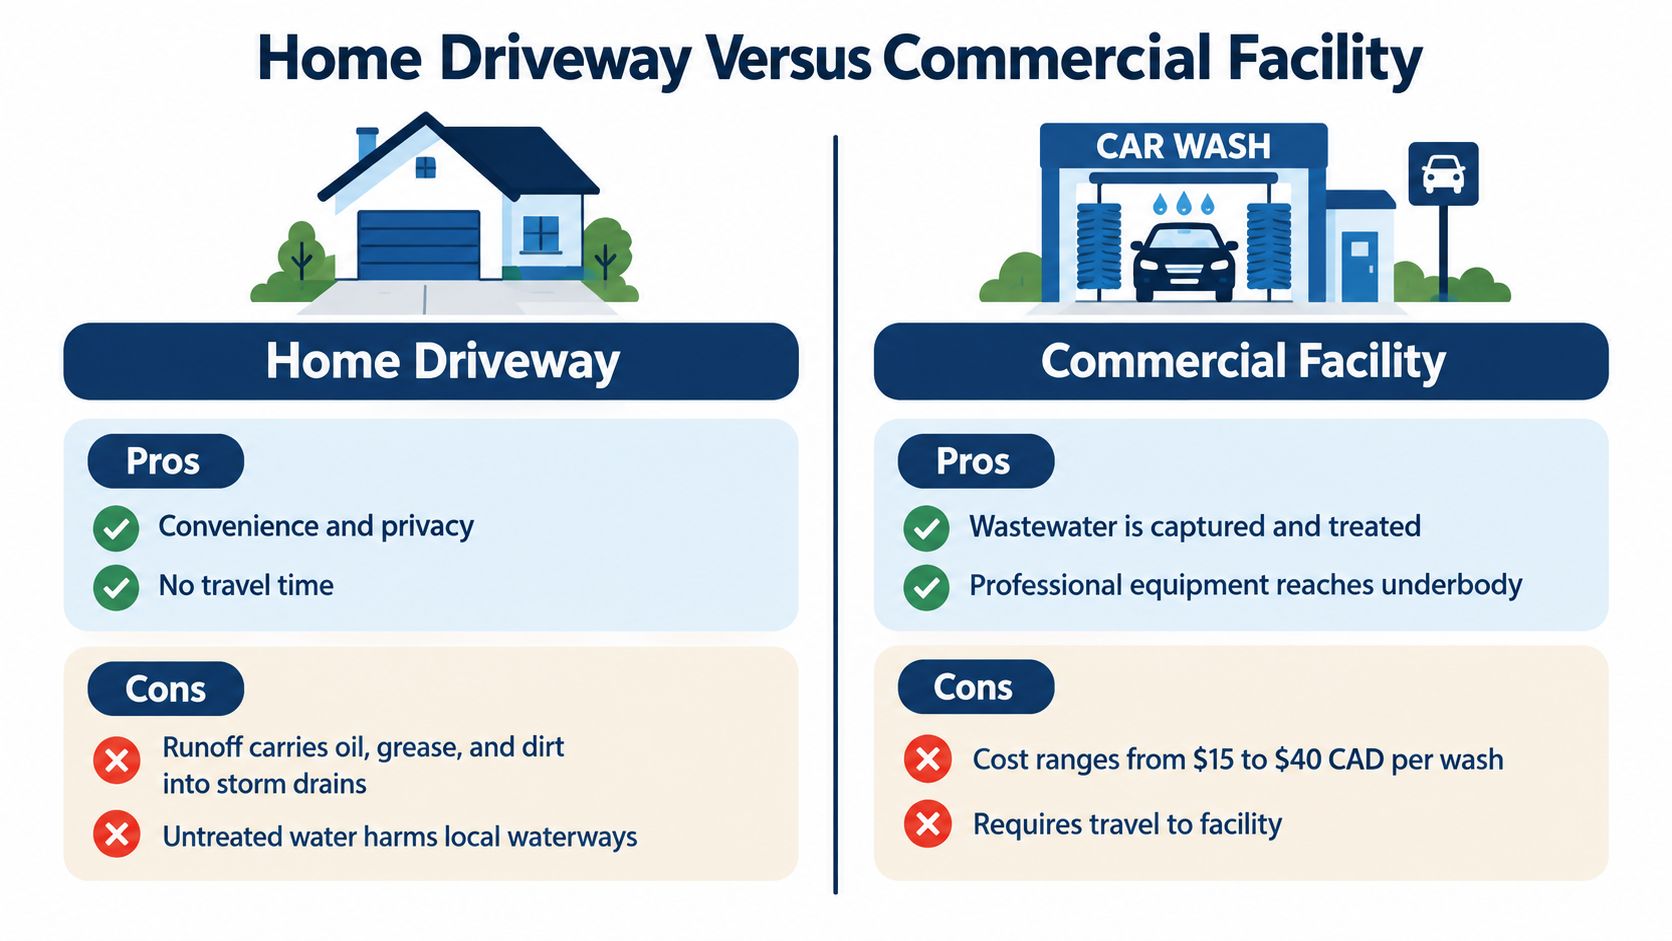
A driveway job looks cheaper until you ask where the dirty water goes. Vehicle wash water can carry dirt, oil, grease, rust, salt, antifreeze, soap, and other chemicals, and that mixture should not end up in roadside catch basins. Toronto's guidance points owners toward commercial facilities or contained disposal for small amounts of wastewater, while Vaughan states that commercial car washes must discharge contaminated water to sanitary sewers for treatment (Vaughan guidance).
That changes the choice. A home wash works for some tasks, but it is not automatically cleaner or more responsible just because it happens in the driveway. If runoff reaches the storm system, the problem has moved from the vehicle to the environment.
Use the right place for the right task
At home, keep to work that stays contained, such as interior vacuuming, dusting, glass cleaning, and light surface wipe-downs. Those jobs do not create contaminated runoff if you keep the mess inside the cabin. They are also easier to repeat between deeper services.
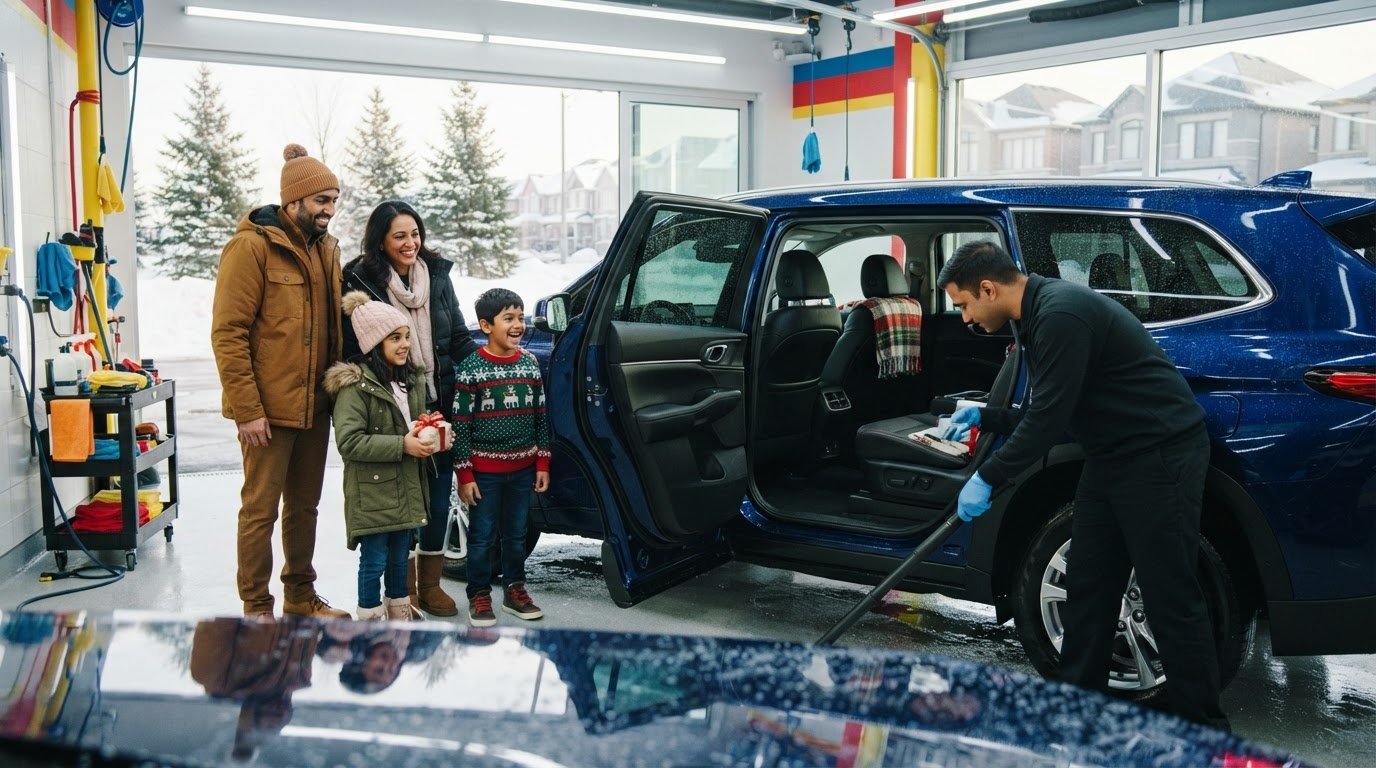
A commercial facility is the better fit for underbody rinsing, exterior washing with wastewater capture, and any job that benefits from controlled drying. That matters for bigger vehicles, heavier winter use, and the kind of salt exposure GTA drivers get from commuting and delivery work. If you are dealing with odour or stale cabin air, a car and home ozone generator can be part of a broader odour-management plan, but only after the source contamination has been removed.
Nanak Car Wash fits into this category as one practical option, because it offers exterior washes, interior cleaning, detailing, and rust proofing in the GTA. That gives owners a place to handle visible dirt and the winter underbody problem in one stop, which matters when the vehicle needs both cleaning and protection.
Simple rule: if the mess can leave your driveway and reach a drain, it belongs at a facility, not beside your garage door.
Why Ontario Winter Changes the Deep Clean Equation
Ontario's winter road burden changes what “clean” means. The province's road organisations used a very large amount of salt, and those materials don't just sit on the road surface, they move onto wheel wells, lower panels, floor mats, carpets, and cabin seams. That's why a winter detail has to start with salt removal, not with dressing, wax, or interior fragrance.
For GTA drivers, the order is straightforward. Exterior contamination comes off first, then the underbody and wheel zone, then the cabin. If you reverse that sequence, you risk dragging salt deeper into the vehicle while pretending you're improving it. Salt is not just an appearance issue, it's a maintenance issue, because it stays active in hard-to-reach places long after the car looks shiny.
The maintenance rhythm should match the season. During active salting, an underbody rinse every 1 to 2 weeks is a sensible benchmark, with an additional wash after heavy slush or thaw events. That rhythm gives the vehicle a better chance of shedding residue before it accumulates in wheel arches, brake lines, and lower seams.
GTA Deep Clean Maintenance Cadence
| Zone | Active Salting Season | Spring to Fall |
|---|---|---|
| Exterior panels | Wash regularly, prioritise salt removal and drying | Maintenance washing as needed |
| Wheels, wells, underbody | Rinse often, especially after slush and thaw | Periodic cleaning after road grime builds |
| Cabin surfaces | Vacuum and dry clean more often, especially mats and touch points | Routine interior upkeep |
| Glass and vents | Clean whenever visibility or dust buildup demands it | Light maintenance cleaning |
A city like Toronto makes this even more relevant because commuting, deliveries, and short trips all keep vehicles in circulation while residue remains on the body. For ride-hailing and fleet owners, that turns detailing into preventive maintenance, not indulgence. The car doesn't just look better, it stays easier to manage between bigger services.
Finishing Steps and Common Questions
Finish with drying, then protection. A clean vehicle that stays wet at the seams will spot faster, so hand-dry door jambs, mirrors, trim edges, and panel gaps before anything else. After that, use wax, sealant, or a suitable surface protectant on the right material, then add tyre dressing and a light interior protectant only where it belongs, not on every surface in reach.
A final inspection should happen under good light, with the doors open and the mats lifted. That catches the trapped salt, the damp carpet corner, or the streak on glass that looked harmless indoors. It's easier to fix one missed area than to reopen the whole car a day later.
A few questions come up every time
How long should upholstery dry before you close the car? Until it's fully dry to the touch and the cabin has been ventilated. If the seats or carpet still feel cool and damp, leave the doors open longer.
Do pet hair and odour change the workflow? They usually add more extraction and more time in the vacuum stage, but the order stays the same. Remove debris first, then deal with fabric and smell sources once the loose material is gone.
When should you hand the job to a professional detailer? If the cabin has heavy salt staining, persistent odour, delicate surfaces, or a lot of soaked fabric, a pro setup is safer. Controlled moisture and stronger extraction gear matter more in those cases than guesswork.
Can you rewet a salt stain until it disappears? Not usually. That often spreads the residue instead of removing it, which is why dry vacuuming and careful extraction work better than repeated soaking.
Tape this on the garage door if you want the short version, salt first, top down, dry before wet, separate tools for wheels, full dry-out before closing the car.
If you want a proper deep clean without turning your driveway into a runoff problem, visit Nanak Car Wash for exterior washing, interior cleaning, detailing, and rust proofing across the GTA. It's a practical option when your car needs salt removal, cabin reset, and underbody care in one stop.

 6600 Finch Ave W, Etobicoke, ON M9V 3Z6

 647-703-8515
 MON – SUN 8 AM to 7 PM