
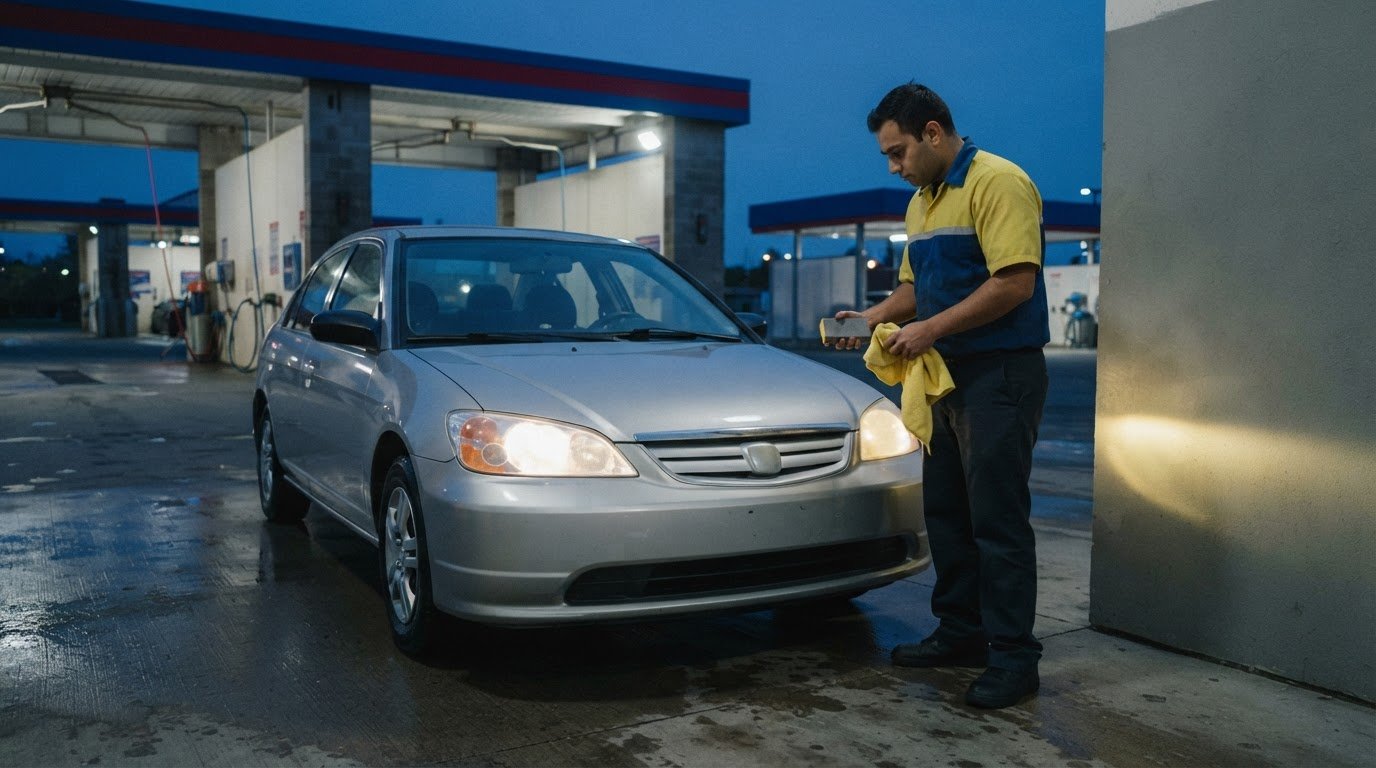
Cloudy headlights can dim and scatter the beam you need at night. Headlight restoration for better night driving visibility can remove surface oxidation and help produce a brighter, more focused beam. If the lens is intact, a DIY kit may make a noticeable difference on dark roads.
If your headlights look yellowed or hazy, you may wonder whether restoration will actually help you see better. In short, it can: clearing the lens may improve nighttime visibility, although the result depends on the lens condition and the quality of the restoration.
Learn why headlight lenses oxidize, how clouding affects brightness and beam pattern, and what a DIY restoration kit can change. You’ll also find out what to expect from the result and why protecting the lens matters afterward.
Key Takeaways
- Sun exposure, heat, pollution, harsh detergents, and chemicals can all contribute to headlight oxidation.
- Cloudy lenses can weaken and scatter a headlight beam, while clearing the lens may help make the beam brighter and more focused.
- Most modern headlights use polycarbonate, whose protective coating can deteriorate over time.
- DIY restoration kits typically use sanding to remove damaged coating, followed by a protective layer; keeping the lens wet during sanding helps the process.
- Restoration may improve night-time visibility, but results depend on the headlight’s condition and how well the lens is restored and protected.
Causes of headlight oxidation
Headlight oxidation develops as the outer lens and its protective coating weather. Most modern headlights use polycarbonate, a strong thermoplastic that can still become cloudy over time. Sunlight, heat, pollution, harsh detergents, and chemicals can all contribute. The damage often develops gradually, so a lens may look clear from a distance before yellowing or haze becomes obvious up close.
Ultraviolet exposure from the sun is a major source of wear. The protective coating deteriorates as the lens ages, particularly on vehicles exposed to a lot of sunlight. Heat adds stress, while airborne pollution and road grime settle on the lens. Over time, these factors can leave the surface discoloured or hazy rather than evenly transparent.
Cleaning products matter, too. Harsh detergents and other chemicals can wear down the lens surface or its protective layer. For example, repeated washing with an abrasive cleaner may leave a lens dull rather than clean. These factors can combine: a sun-exposed headlight that also faces road pollution and frequent chemical cleaning may show oxidation sooner.
Clouding alone doesn’t tell you whether a headlight can be restored. Replacement is generally the better option if the lens is cracked, broken, or damaged internally, because sanding the outside won’t fix those problems. Restoration is intended for surface oxidation when the lens and housing beneath it remain intact.
Canadian inspection requirements depend on the province or territory where the vehicle is inspected. Assess a cloudy lens against the applicable local requirements for headlight condition and operation, rather than assuming there is a Canada-wide brightness threshold.
Professional headlight restoration costs in Canada depend on the lens condition, vehicle, and work required. The price is provided after a quote request, and the extent of oxidation and the restoration process can affect the cost.
Restoration doesn’t prevent future oxidation permanently. Hazing may become noticeable again over time, and environmental conditions and driving frequency can mean restoration is needed again. Reapplying a protective UV-resistant coating helps shield the lens from sunlight and can extend the result.
Incorrect sanding can leave visible scratches, an uneven finish, or further damage to the lens. Keeping the headlight wet while sanding helps achieve better restoration results, while skipping the protective layer leaves the surface exposed to renewed wear. Careful sanding matters: the aim is to remove the damaged coating without harming the lens beneath it.
Changes in beam brightness and light scatter
Cloudy lenses can reduce how much light reaches the road and make the beam less even. Restoration may improve brightness and focus.
Reduced Beam Brightness
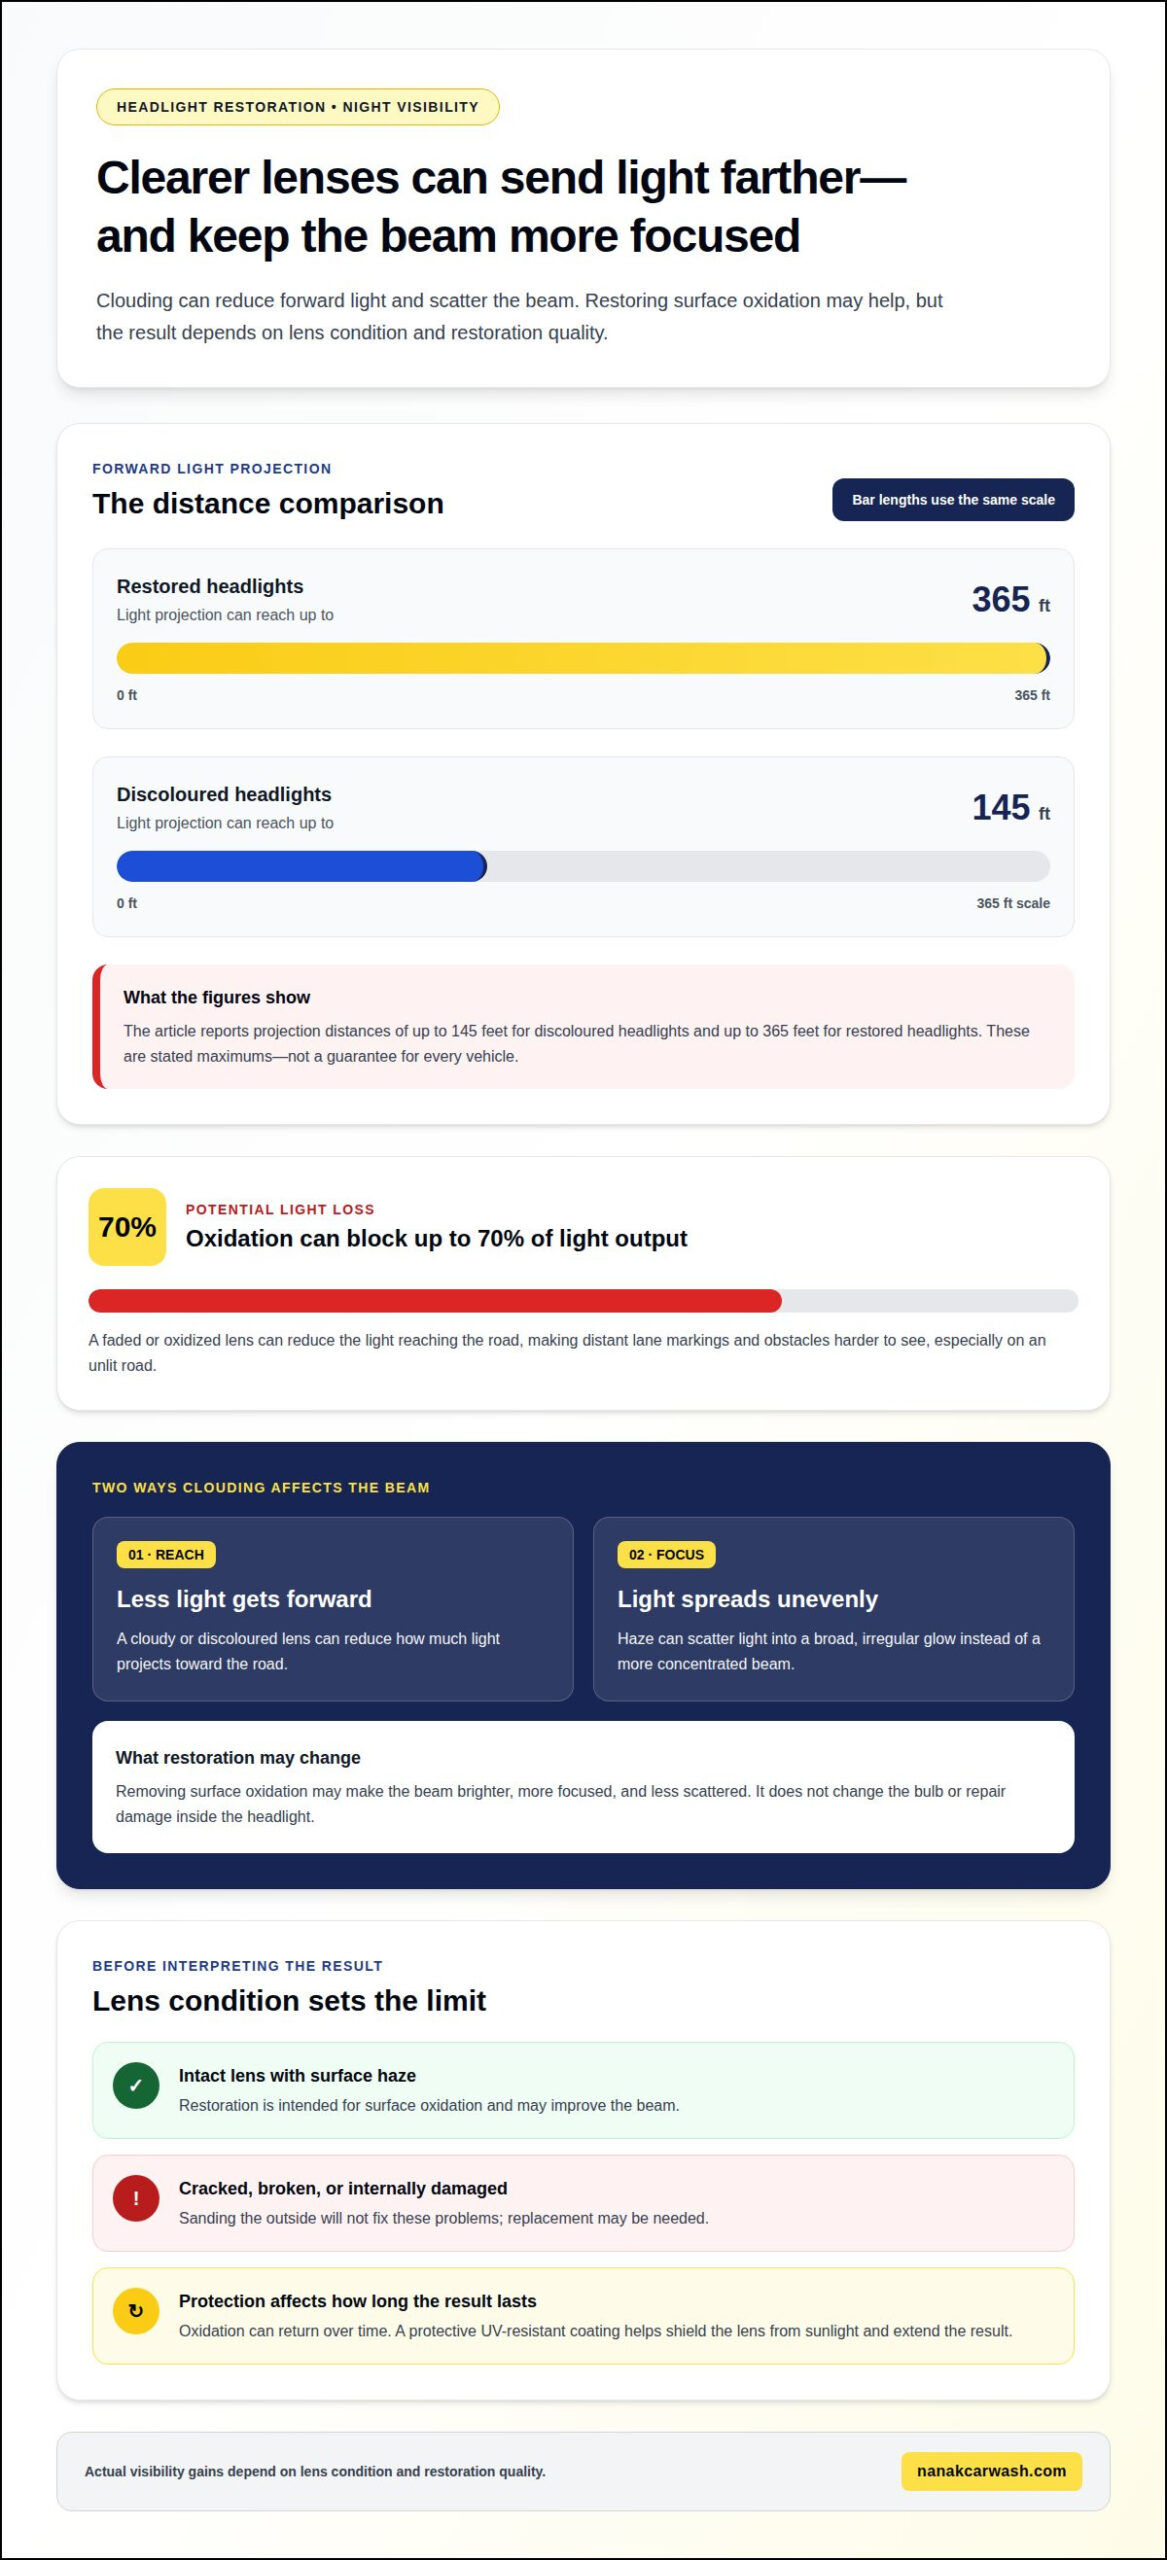
Reduced beam brightness means a cloudy or discoloured lens allows less light to project forward. Discoloured headlights can project light up to 145 feet, while restored headlights can project it up to 365 feet. Faded or oxidized headlights can also block up to 70% of their light output. These figures show why lens condition matters: less forward light can make it harder to see road details at night.
The change may be most noticeable on an unlit road, where a weakened beam can make lane markings or obstacles farther ahead harder to see. Restoration can remove surface oxidation and help the headlight project more light, but it doesn’t change the bulb or repair damage inside the housing. The lens is one part of the lighting system, not the only factor affecting visibility.
Increased Light Scatter
Increased light scatter occurs when a cloudy lens spreads light unevenly instead of allowing a more concentrated beam. After restoration, headlights have projected a slightly brighter, more concentrated beam with less scattered light. That difference matters because a focused beam directs more of its light toward the road rather than dispersing it around the lens.
Scattered light can make the beam look unclear, even when the headlights are switched on and producing light. A hazy lens, for example, may create a broad, irregular glow instead of a defined pattern on the pavement. Restoring the outside surface may reduce that effect when oxidation is causing the haze. It won’t correct every beam issue, since internal damage or another lighting problem may remain.
Signs of Needed Headlight Work
Yellowing, a cloudy film, or uneven discolouration across a lens can indicate oxidation that may affect the beam. Reduced projection and a scattered, less concentrated pattern can also point to a surface problem. Compare both headlights under the same conditions: a lens that looks noticeably hazier than the other deserves attention.
Restoration is suited to surface oxidation on an intact lens. A crack, broken housing, or damage inside the headlight is different: sanding the exterior won’t repair those defects, so replacement may be needed. Check the distinction before starting. If the lens is intact but hazy, clearing its surface may improve the beam. If it is physically damaged, a surface treatment cannot repair the damaged parts.
Polycarbonate headlight oxidation
Most headlights manufactured today use polycarbonate, a strong thermoplastic selected for headlight lenses. Its strength doesn’t prevent the outer surface from changing over time. Polycarbonate headlights can oxidize and need restoration or replacement. As the lens ages, its protective coating deteriorates, leaving the surface more prone to haze and discolouration. This change affects the lens itself, not just dirt sitting on top.
The coating is a key part of the lens’s protection. It helps shield the polycarbonate, but exposure gradually wears it down. Areas with strong sun exposure can show deterioration more readily because ultraviolet light affects the coating. A vehicle regularly parked outdoors in a sunny area, for example, may develop lens haze as the protective layer ages. The material remains polycarbonate, but its surface becomes less clear.
Oxidation changes the lens in stages. The surface may first look dull, then develop yellowing or a cloudy appearance. These signs can make headlights look uneven, especially when one lens gets more sun or weather exposure than the other. A visible difference between the left and right headlights can reflect different surface wear, even on the same vehicle. It doesn’t, by itself, show whether the damage extends beyond the outer lens.
Restoration treats the affected outer surface by removing oxidation and applying a protective, UV-resistant coating. This matters because removing the deteriorated layer without restoring protection leaves the polycarbonate exposed again. The process has two linked purposes: clear away the oxidized surface and protect the lens afterward. A clearer lens is only part of the result; the new coating helps preserve it.
For drivers considering restoration, the material explains why the work can help and why the result needs maintenance. Polycarbonate continues to face sunlight and other environmental exposure after restoration. A UV-resistant coating helps protect it, but doesn’t make the lens immune to future ageing. A restored headlight that spends long periods in direct sun, for instance, still faces conditions that wear coatings down.
Think of the lens and its coating as a pair. Polycarbonate provides the lens material, while the coating protects its surface. Once that coating deteriorates, oxidation becomes visible; restoration removes the affected surface and adds new UV protection. That’s why sanding alone isn’t a complete restoration. The protective finish is an essential part of caring for a polycarbonate headlight.
The protective coating on polycarbonate headlight lenses deteriorates as headlights age, particularly in areas where cars receive a lot of sun. This link between the lens and its coating helps explain why lenses change over time. Gradual deterioration of the protective layer is central to understanding how haze develops.
DIY restoration kits
A DIY restoration kit is designed to remove damaged lens coating through sanding, then apply a protective layer. Clearing oxidation from the headlight surface may improve night-time visibility. Results depend on the lens condition and how evenly the restoration is done. A kit won’t repair a cracked lens or damage inside the headlight housing.
Most kits follow the same basic sequence, even though their materials may differ. Sanding removes the oxidized outer coating, and a final protective layer helps shield the restored surface. Keeping the headlight wet while sanding helps achieve better restoration results. Work evenly across the lens to avoid visible differences in clarity.
- Prepare the lens: Clean away surface dirt so grit doesn’t become part of the sanding process.
- Sand the damaged coating: Keep the lens wet while sanding and work evenly across the affected surface.
- Apply protection: Finish with the kit’s protective layer after removing the damaged coating.
Some kits require an electric drill for buffing. A drill changes how the buffing step is done, but it doesn’t replace sanding or the protective layer. Read the kit directions before starting, especially if the process calls for a drill. Methods and materials can differ, so follow the instructions for your specific kit rather than combining steps.
Is DIY headlight restoration as effective as professional restoration? A DIY kit can improve night-time visibility, but a comparable result depends on even sanding, a clear finish, and proper application of the protective layer. The lens condition matters, too: surface oxidation is different from cracks or internal damage that sanding can’t fix.
Check the lens before choosing a kit. A uniformly hazy exterior is the kind of surface problem a sanding-based kit is intended to address. A cracked lens, broken housing, or visible internal damage needs a different solution because the kit treats the outside surface. If the headlights have different levels of clouding, restoring them evenly may take extra care.
After the protective layer is applied, the lens remains exposed to sunlight and environmental wear. The restored surface may haze again over time, so a kit isn’t a permanent repair. Keeping the surface wet while sanding and applying the final protection are both important. Skipping either step can leave the lens less clear or less protected than intended.
Use that range as a starting point when comparing options, rather than assuming every kit includes the same materials or uses the same process. The kit’s directions still matter, especially when deciding whether its sanding and protective steps suit the lens condition.
A kit’s price doesn’t change the limits of surface restoration: it can’t repair cracks or damage inside the housing. Focus on the exterior condition and the steps needed to apply the protective layer. Careful, even work and following the kit instructions remain central to the restoration, whatever the cost.
Night-driving visibility results
Restoring a headlight lens can improve night-time visibility when oxidation reduces the beam’s clarity. In a nighttime test using a ninth-generation Toyota Corolla, restored headlights produced a slightly brighter, more concentrated beam with less scattered light. For drivers considering headlight restoration for better night driving visibility, the practical takeaway is that clearing an oxidized lens can help light reach the road more effectively, though the result depends on the lens condition.
That improvement matters in the beam’s usable pattern, not just the lens’s appearance. A clearer, more concentrated beam can make the road ahead easier to distinguish from the surrounding darkness. A driver, for example, may notice lane markings or roadside details more clearly after surface haze is removed. Headlight restoration for better night driving visibility is most relevant when oxidation reduces clarity.
Before-and-after comparisons are most useful when conditions are consistent. Use the same vehicle, parking position, surface, and lighting conditions to compare the beams. Look for a clearer pattern and less scattered light, rather than judging only how bright the lens looks while parked. A clean-looking headlight alone doesn’t show how much the beam has changed on the road.
Restoration has limits. It treats oxidation on the lens surface, so it won’t correct every cause of weak visibility. If the headlight has another problem, the beam may remain dim or uneven after restoration. The Toyota Corolla test shows a possible result, not a universal outcome for every vehicle, lens condition, or restoration kit.
Night-driving conditions affect how noticeable the change is. On a dark road, a clearer beam may make the forward view easier to read. In a brightly lit area, the improvement may be less apparent because surrounding light already illuminates the road. Rain or other poor weather can also make visibility difficult, even when a restored lens produces a more focused beam.
Treat the result as one part of a broader visibility assessment. If the lens was cloudy and becomes clearer after restoration, check whether the beam also appears more concentrated. If the lens clears but the beam still seems weak, oxidation may not have been the only factor. This distinction helps set realistic expectations before choosing a kit or deciding whether more work is needed.
Restoring oxidized lenses can make a practical difference, especially when haze is scattering light. For a separate vehicle refresh, explore car detailing packages as part of your maintenance routine.
Nanak Car Wash
Nanak Car Wash can help with vehicle cleaning while you consider what your headlights need. A cloudy lens may call for restoration, while a cracked lens needs a different solution; a wash or detailing package does not replace that work. For broader vehicle upkeep, choose from Car Detailing Packages, a Full-Service Car Wash, an Express Car Wash, or the Unlimited Wash Club. These options support keeping your vehicle clean as part of regular maintenance, alongside decisions about headlight visibility. If you’ve identified a separate cleaning need for your vehicle, contact Nanak Car Wash to discuss the available options.
Make Your Next Visibility Check Count
Use your next drive to notice how clearly you can see the road through your headlights. If surface clouding seems to be part of the problem, decide whether you can restore the lenses carefully or need another solution for physical damage. Headlight restoration for better night driving visibility is a practical next step when oxidation affects the lens, but clear lenses alone can’t address every cause of poor visibility.
Keep your next vehicle-care decision focused on the issue you’ve identified. For cleaning and detailing support alongside your maintenance routine, contact Nanak Car Wash today. A clear plan for your vehicle’s care can help you feel more prepared every time you head out after dark.
Frequently Asked Questions
Do Headlight Restoration Kits Actually Improve Night Vision?
Yes, a kit can improve nighttime visibility when oxidation on the lens reduces the beam’s clarity. This is most relevant when the haze is on the outside surface and the lens is intact. If the lens looks clearer after restoration, for example, compare the beam on the same road under similar conditions. A kit won’t fix a failed bulb, cracked housing, or another lighting problem.
Why Do Headlights Get Cloudy?
Headlights become cloudy as exposure wears down the lens surface and its protective coating. Sunlight, heat, pollution, harsh detergents, and chemicals can all contribute. A car parked outdoors in direct sun, for example, faces ongoing ultraviolet exposure even when it isn’t being driven. Cleaning may remove surface dirt, but oxidation changes the lens itself, so washing alone won’t clear the damage.
How does headlight restoration improve night driving visibility?
Restoration can improve visibility by clearing the lens surface so light passes through with less obstruction. That may help create a brighter, more concentrated beam on the road. The result is most useful when oxidation is the cause of reduced clarity. If the beam remains weak after the exterior lens is clear, the issue may involve another part of the lighting system.
How to restore cloudy headlights step by step?
Follow the kit’s directions, since materials and methods differ. A typical kit uses these steps:
- Clean the lens to remove dirt and residue.
- Sand the damaged coating evenly, keeping the headlight wet during sanding.
- Apply the kit’s protective layer after sanding.
Some kits require an electric drill for buffing. Don’t skip the protective layer, which helps shield the restored surface.
Which headlight restoration kits work best and how much do they cost in Canada?
No single kit is right for every lens. Choose one that includes sanding materials and a protective layer, and check whether its buffing step requires an electric drill. For a lens with cracks, internal damage, or a broken housing, a sanding kit won’t repair the defect. Match the kit instructions to the lens condition and the tools included.


 6600 Finch Ave W, Etobicoke, ON M9V 3Z6

 647-703-8515
 MON – SUN 8 AM to 7 PM