Streaks. Haze. Glare. Does this sound like your car’s windshield? You scrub the inside, but that weird, hazy film just won’t disappear. You attack the outside, but bug guts and bird droppings are stuck like cement. It is a BIG frustration. A clean car is great, but a dirty windshield ruins the drive and can be unsafe. You deserve a perfect, crystal-clear view without paying for expensive detailing.
This is your COMPLETE, streak-free guide. We give you the professional techniques for the BEST clean, every single time. Learn the simple tools you need-no special, costly equipment! We will show you exactly how to clean your windshield inside AND out, even those impossible-to-reach corners. Say goodbye to frustrating streaks for good. Get ready to save time, save money, and Enjoy a Clean Ride!
Key Takeaways
- Get a pro-level clean with simple tools. The right gear makes all the difference and we list exactly what you need.
- Your inside glass needs a different technique than the outside. Learn how to tackle interior film and exterior grime for a perfect finish.
- Stop fighting your interior windshield. We show you the easy trick to reach every corner for a crystal-clear, streak-free view.
- Avoid the common mistakes that cause streaks. One wrong move can ruin your hard work-we list what NOT to do.
Why Is a Perfectly Clean Windshield So Hard to Achieve?
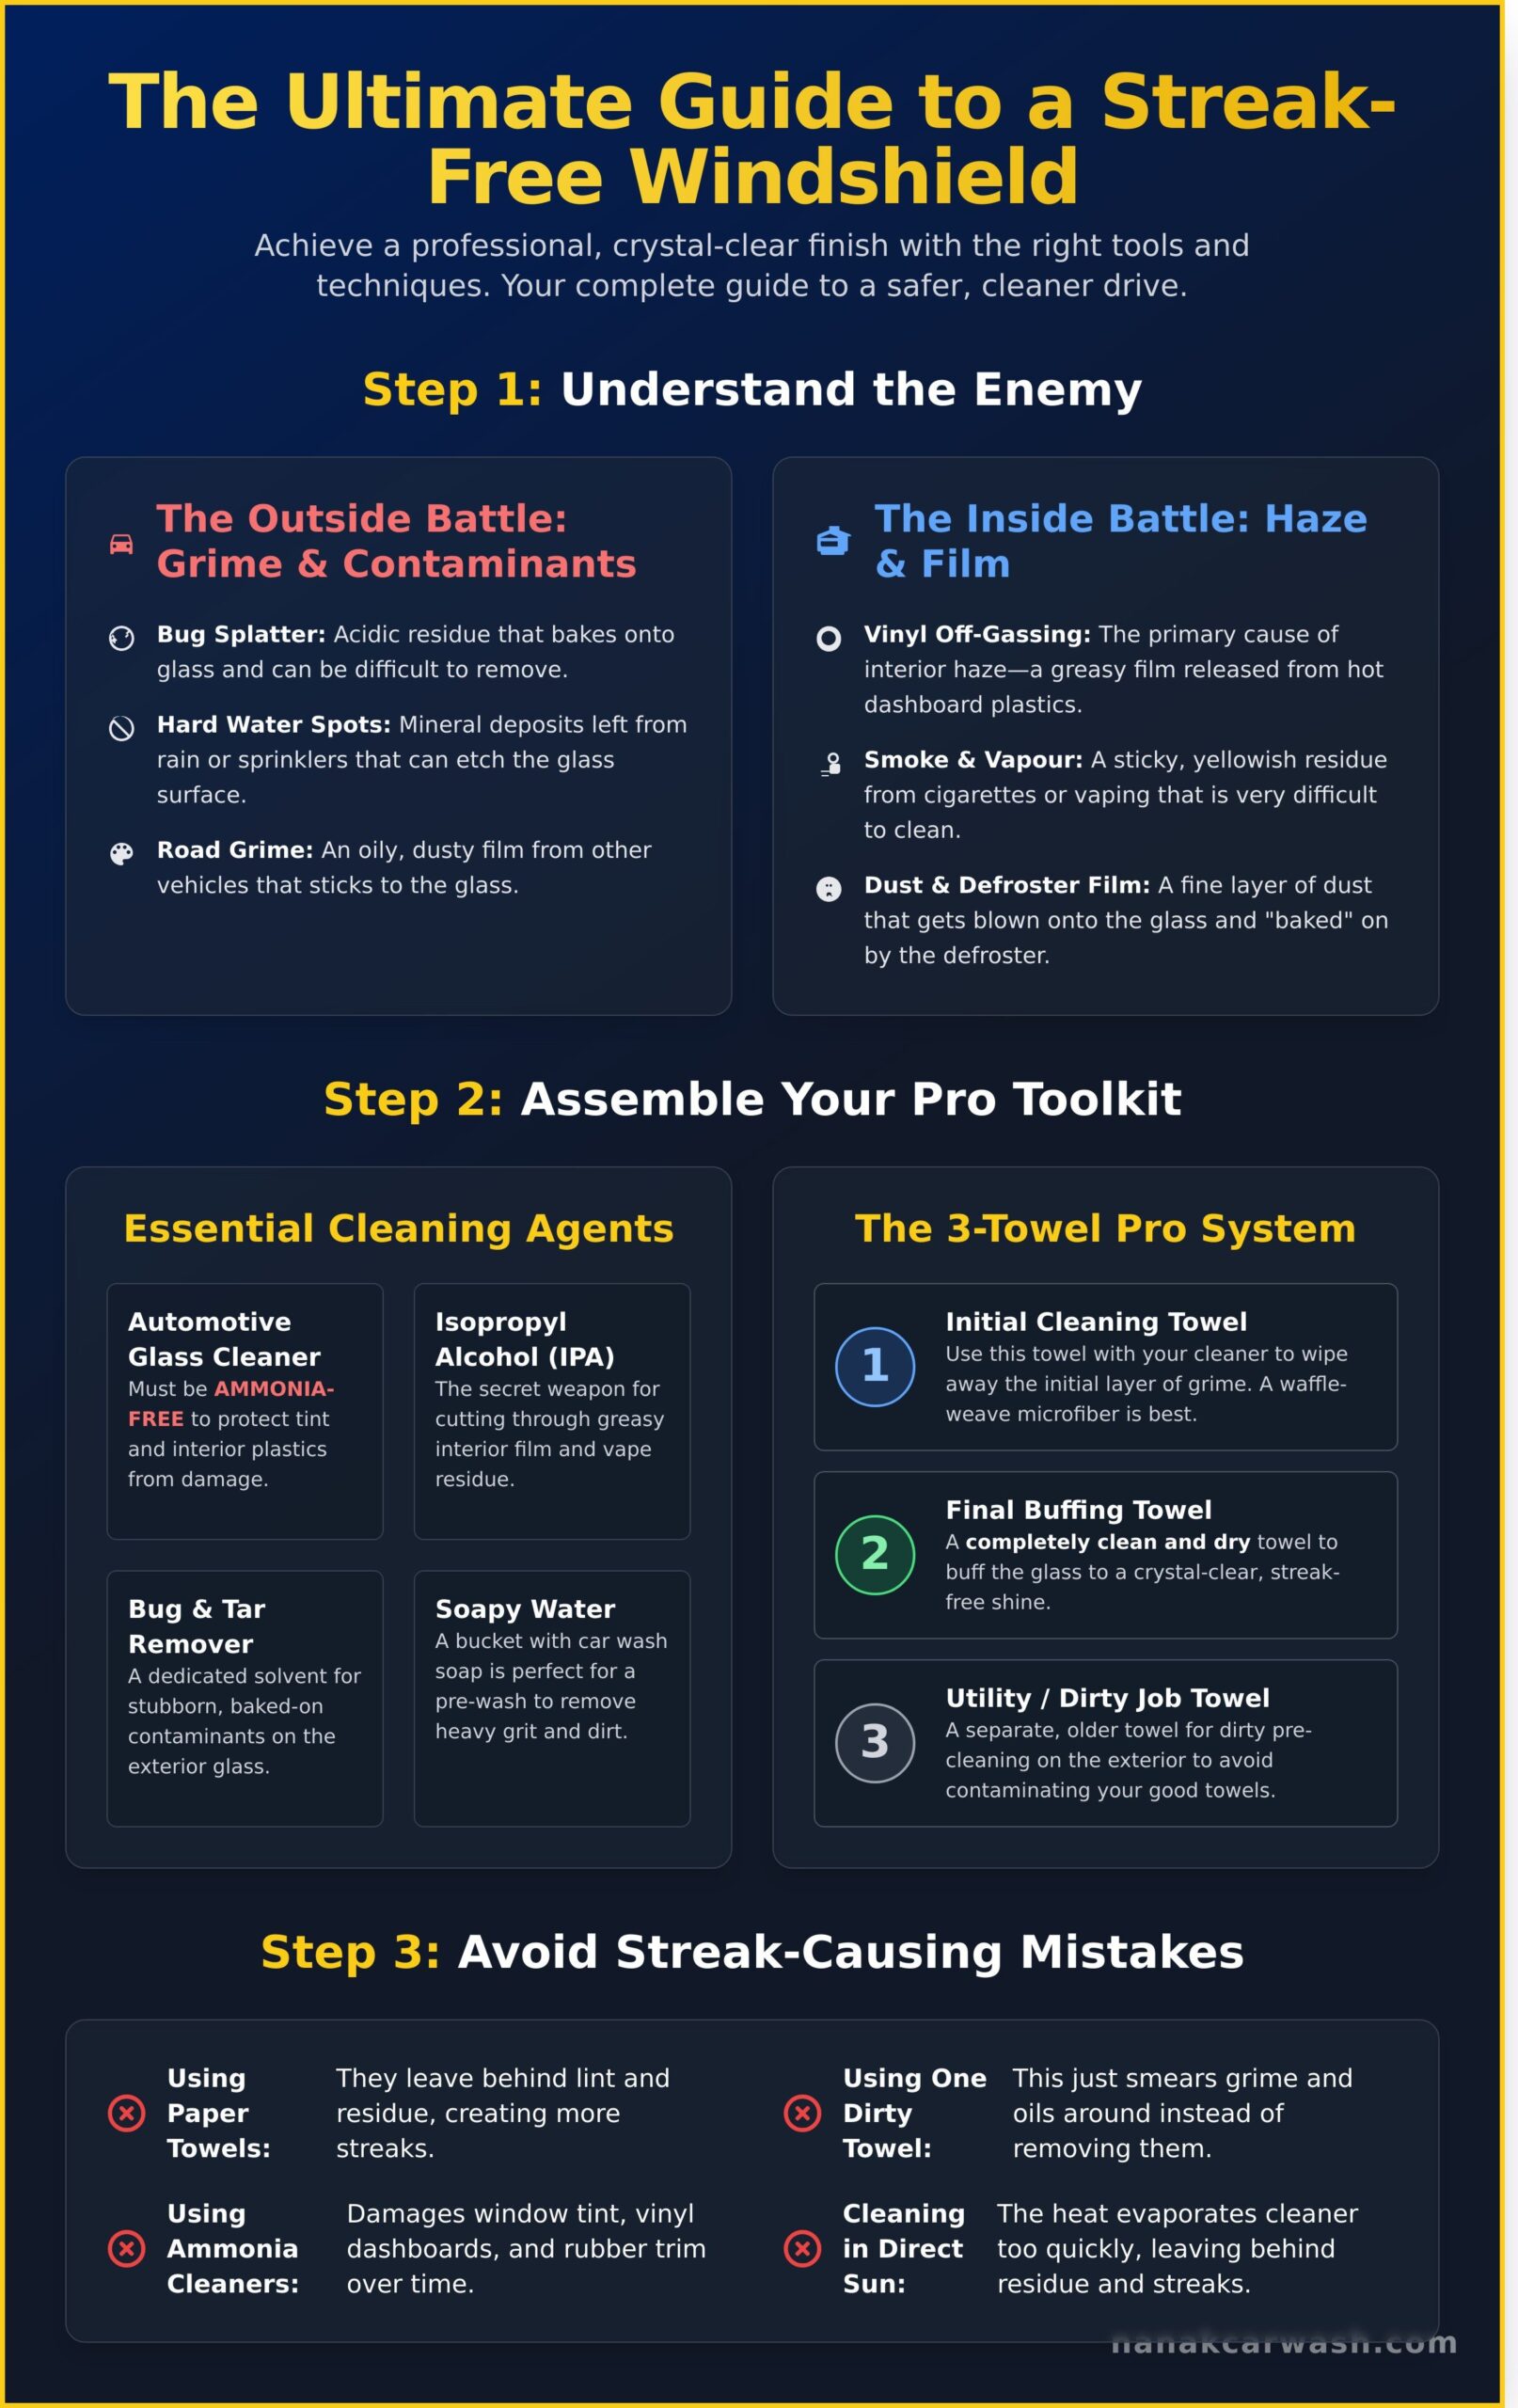
You spray, you wipe, and you still see streaks and haze. It is a common frustration. Getting a perfectly clean car windshield can feel impossible. The reason it’s so difficult is that you are fighting two completely different battles: one on the outside of your car and one on the inside.
Your exterior and interior glass get dirty in very different ways. You need the right approach for each.
The Outside Battle: Your exterior glass is constantly attacked by everything on the road.
- Road Grime: A non-stop film of oil, salt, and dust from other cars.
- Bug Splatter: These are acidic and can be very hard to remove once baked on by the sun.
- Hard Water Spots: Minerals left behind from rain or sprinklers that etch into the glass.
- Wiper Residue: Old rubber from worn blades and even some types of Windshield washer fluid can leave a film.
The Inside Battle: The inside of your windshield gets dirty from the air inside your car.
- Vinyl Off-Gassing: A chemical film released from your hot dashboard plastics.
- Smoke & Vapour: Sticky residue from cigarettes or vaping.
- Fingerprints: Oily smudges from touching the glass.
- Dust & Defroster Film: A layer of dust that gets “baked on” by your defroster vents.
The Science of Streaks and Haze
The right tools are key. Using the wrong ones makes the job harder and can cause damage. Paper towels leave lint and residue behind. Ammonia-based window cleaners are a BAD idea. They can damage your window tint and dry out dashboard materials, causing cracks. That stubborn haze you see on the inside? It’s often from ‘off-gassing’-oils released from the vinyl in your car as it heats up. This creates a greasy film that regular cleaners struggle with. For a truly deep clean of your vehicle’s cabin, a professional interior car detailing service can remove these stubborn films and restore every surface.
Why a Clean Windshield is a SAFETY Essential
This is not just about looking good. A clean windshield is a MAJOR safety feature. A dirty, hazy surface creates dangerous glare from the sun and oncoming headlights, making it very hard to see. Streaks and smudges can hide pedestrians or other cars, especially in the rain or at night. A clear view means faster reaction times on the road. Don’t risk it. Keep your glass perfectly clean for a safe, enjoyable ride.
Gathering Your Tools: The Pro’s Windshield Cleaning Kit
Getting a streak-free finish isn’t about scrubbing harder-it’s about using the right tools for the job. This is 50% of the work. Using the wrong products, like paper towels or household cleaners, just moves dirt around and creates ugly, dangerous streaks. This is more than just annoying; the National Safety Council highlights the importance of clear visibility for safe driving. Stop wasting time and money on supplies that don’t work. Get the pro kit for a perfect view every time. Enjoy a clean ride and a safer one.
Essential Cleaning Agents
Your cleaning liquids do the heavy lifting. Do NOT use home cleaners. They can cause damage. Use these for the best, safest results on your vehicle’s glass.
- Automotive Glass Cleaner: It MUST be ammonia-free. Regular blue window cleaners contain ammonia, which can damage your car’s window tint, dashboard, and trim over time. Get a cleaner made for cars.
- Isopropyl Alcohol (IPA): This is the secret weapon for that stubborn, hazy film on the inside of your windshield. A quick wipe with IPA on a cloth cuts right through oils and vape residue that normal cleaners miss.
- Bug and Tar Remover: For the tough exterior jobs. Baked-on bugs, tree sap, and road tar need a special product to dissolve them without damaging your glass.
- Soapy Water: A simple bucket of clean water with a bit of car wash soap is perfect for the first wipe-down on a very dirty exterior. It removes the heavy grit before you do the final cleaning.
The Right Towels and Applicators
Paper towels are for kitchen spills, not your car. They leave behind lint and cause streaks. Invest in good towels. It’s a one-time, super money-saving cost for perfect results again and again.
- Three High-Quality Microfiber Towels: This is the pro system. Use a waffle-weave style if you can-they are the BEST for glass because they absorb everything and leave nothing behind.
- Towel 1: For the initial cleaning wipe with your spray cleaner.
- Towel 2: A completely clean, dry towel for the final buff to a perfect shine.
- Towel 3: A separate, older towel for the dirty exterior pre-clean.
- Reach Tool (Optional): A simple plastic wand with a microfiber pad on the end. This tool makes cleaning the awkward inside corners of your windshield quick and easy. No more stretching.
Step-by-Step Guide: Cleaning Your Exterior Windshield
Your exterior glass takes the most abuse. Road grime, bugs, and Canadian weather all leave their mark. For the BEST results, always start with the outside of your windshield and work in the shade if possible. Direct sun makes cleaners dry too fast, which is a primary cause of streaks. Follow these quick, super money-saving steps for a perfectly clean view and enjoy a clean ride.
Step 1: The Pre-Wash and Decontamination
Before you aim for that streak-free shine, you must remove the heavy layer of dirt. Skipping this critical first step just smears grime around, making more work for you. Get the tough stuff off first for a truly professional finish. It’s a simple process that makes a HUGE difference.
- Rinse First: Use a hose to spray down the glass. This simple action removes all the loose dust and dirt, preventing scratches in the next step.
- Wash Properly: Mix your favourite car wash soap with water. Use a clean microfiber wash mitt to gently scrub the glass surface.
- Attack Stubborn Spots: For stuck-on bug guts or tree sap, use a dedicated bug and tar remover. Follow the product instructions. NEVER use a razor blade or harsh scrub pad.
- Rinse and Dry: Rinse the entire area with clean water. Dry it completely with a fresh, high-quality microfiber drying towel before moving on.
Step 2: The Final Streak-Free Clean
Now that the surface is properly prepped, it is time for the final, crystal-clear finish. Using two sides of a towel is a simple trick for getting professional results without the high cost. This technique, a key part of many expert windscreen cleaning tips, ensures you apply the cleaner evenly and buff it away completely for a perfect shine.
- Prepare Your Towel: Take a clean, dry microfiber glass towel and fold it into quarters. This gives you eight clean surfaces to work with.
- Apply Cleaner to the Towel: Lightly spray a quality, ammonia-free glass cleaner onto one side of the folded towel. DO NOT spray directly onto the glass, as this causes drips and uneven application.
- Wipe Clean: Wipe the glass in one consistent direction. Start at the top and wipe side-to-side (horizontally) all the way down.
- Buff to Perfection: Immediately flip the towel to a clean, dry side. Buff the glass in the opposite direction (vertically) until all moisture disappears and you are left with a perfect, streak-free shine.
Mastering the Interior Windshield: The Ultimate Challenge
Cleaning the inside of your windshield is the toughest part of the job. The awkward angle, the dashboard getting in the way, and that stubborn hazy film can make it frustrating. But getting a perfect, streak-free finish is possible. Follow our simple, effective steps for a crystal-clear view every time. We do our best to give you good service and helpful tips.
Step 1: Prep and Initial Wipe-Down
A little prep work saves you a lot of time. First, place an old towel over your dashboard to protect it from any drips or overspray. This quick step prevents damage to your interior vinyl or leather. Then, get started:
- Get a Better Angle: Sit in the passenger seat to clean the driver’s side of the glass, and vice-versa. This gives you more room to move and a much better angle to reach the entire surface.
- Start With a Dry Wipe: Before using any cleaner, wipe the entire inside of the glass with a clean, dry microfiber towel. This removes the top layer of dust and lint, preventing it from turning into a muddy mess.
- Cut Through the Haze: If you have a stubborn, oily film, lightly dampen a separate cloth with a bit of isopropyl alcohol (rubbing alcohol) and wipe the glass. This will break down the grime that builds up from interior plastics.
Step 2: The Two-Towel Cleaning Method
This is the professional secret to a guaranteed streak-free shine. You need two clean, high-quality microfiber towels. Label one as your ‘wet’ towel and one as your ‘dry’ or ‘buffing’ towel.
- Lightly spray your ‘wet’ towel with a quality, ammonia-free glass cleaner. NEVER spray cleaner directly onto the windshield. This prevents overspray from damaging your dashboard and interior trim.
- Wipe the inside of the glass in strong, overlapping vertical (up-and-down) strokes. Make sure you cover every inch.
- Immediately, before the cleaner can dry, follow up with your second, completely dry ‘buffing’ towel. Use the same vertical strokes to wipe away all moisture and buff the glass to a perfect shine.
- To reach the tight corners where the glass meets the dashboard, use the back of your hand to press the dry towel firmly into the space.
Pro Tip: The Vertical vs. Horizontal Method
Here’s a simple trick to instantly find any remaining streaks. Clean the OUTSIDE of your glass with side-to-side (horizontal) strokes. Clean the INSIDE with up-and-down (vertical) strokes. If you see a streak after you’re done, you’ll know exactly which side it’s on. A vertical streak is inside; a horizontal one is outside. No more guessing!
This method gives you a perfect view for a safer drive. Too much hassle? Let our interior detailing pros make it perfect. We deliver the best results at a super money-saving price. Enjoy a Clean Ride.
Common Windshield Cleaning Mistakes and How to Avoid Them
You followed all the steps, but your windshield still has streaks. Don’t worry. Getting a perfect, crystal-clear finish is easy when you know what to avoid. These common mistakes are simple to fix and will guarantee you get the best results every time. Save yourself time and frustration with these expert tips.
Mistakes to Avoid
Get a professional result by avoiding these simple errors. Small changes make a BIG difference.
- The Mistake: Using paper towels or old, dirty rags. Paper towels leave behind lint, and old rags just smear grime around instead of lifting it.
The Solution: ALWAYS use clean, high-quality microfiber towels. Use one for washing and a separate, dry one for the final buff. This is a super money-saving trick for a perfect shine. - The Mistake: Cleaning in direct, hot sunlight. The sun causes your cleaning solution to evaporate almost instantly, leaving behind residue and stubborn streaks before you can wipe it away.
The Solution: Wash your car in the shade, in a garage, or on a cool, overcast day. This gives you the time you need to clean and dry the glass properly. - The Mistake: Forgetting about your wiper blades. Dirty wiper blades will smear a line of grime across your perfectly clean glass the first time you use them.
The Solution: Take 30 seconds to clean your wiper blades. Simply wipe them down with a cloth dampened with a bit of rubbing alcohol to remove built-up dirt and oil.
Maintenance for Lasting Clarity
A clean windshield is a safe windshield. A few simple habits will keep your view clear long after you’ve finished washing your car. It’s quick, easy, and gives you peace of mind on the road. For a truly spotless interior, pair your windshield cleaning routine with a thorough car vacuum session to eliminate crumbs, dust, and debris from every corner of your vehicle. When you’re ready to go beyond the glass, a complete interior car detailing service will deep clean every surface, from carpets to consoles, for a truly fresh and healthy cabin.
- Replace Your Wiper Blades: In Canada, harsh weather wears out blades fast. Replace them every 6 to 12 months for the best performance.
- Top Up Your Washer Fluid: Use a quality, all-season washer fluid that won’t freeze in the winter. NEVER use plain water, as it can freeze and damage your system.
- Keep a Towel Handy: Store a clean microfiber towel in your glove box. It’s perfect for quick touch-ups to remove dust or bug splatters before they get baked on.
For a deep clean that covers every detail, visit the professionals at Nanak Car Wash. We do our best to keep prices low and give good service. Enjoy a Clean Ride!
Your Streak-Free Windshield, Made Easy
Achieving a perfectly clean view is simple with the right steps. Remember to use two separate microfiber towels-one for cleaning and one for drying. Always tackle the tricky interior glass last to avoid smears. These pro tips make a big difference for a safe and clear drive.
But cleaning that interior windshield can be a real challenge. It takes time and the right technique to get into every corner without leaving streaks behind. Why struggle with awkward angles and stubborn haze when there is an easy, affordable solution?
Let the experts at Nanak Car Wash handle the tough spots for you. Our expert interior cleaning services are designed to deliver a flawless finish every time. As one of the most highly recommended car cleaning services on Google in Brampton, we guarantee a professional result. Tired of the streaks? Book a Full-Service Wash for a crystal-clear view today!
Enjoy a Clean Ride!
Frequently Asked Questions
Can I use Windex or other household glass cleaners on my car’s windshield?
We do NOT recommend it. Household cleaners often have ammonia. This chemical can damage your window tint, rubber seals, and dashboard plastics over time. It is a bad choice for your car. ALWAYS use a proper automotive glass cleaner. They are made SAFE for all car materials. Get the right product for a streak-free clean and avoid expensive damage. It is a smart, money-saving choice.
What causes that foggy, oily film on the inside of my windshield?
That film is from “off-gassing.” The plastics and vinyl inside your car, like the dashboard, release oils into the air. This gets worse in the heat. These oils stick to the inside of your windshield and mix with dust. This creates a dangerous glare. The ONLY way to stop it is with regular interior cleaning. Keep your view clear for safe driving. We can help with that.
How often should I clean my windshield for optimal safety?
For BEST safety, clean your windshield every one to two weeks. A dirty view causes bad glare from sun or headlights. This is very dangerous, especially in a Canadian winter with salt spray. If you drive a lot or in bad weather, clean it more often. A clear view is a safe view. Our monthly passes make it easy and super money saving to keep your car clean and safe.
What’s the best way to clean the very bottom of the interior windshield near the dashboard?
That spot is tough. Use the “two-towel” method for a PERFECT finish. Spray automotive glass cleaner onto your first microfiber towel, not the glass. This stops drips on your dashboard. Wipe the area firmly. Then, immediately use a second, clean and dry microfiber towel to buff the area dry. This simple trick reaches the tight corner and leaves no streaks. Easy and fast.
Will a clay bar scratch my windshield glass?
NO. A clay bar is safe for glass. Your windshield is much harder than your car’s paint, so it will not scratch. Using a clay bar is a GREAT way to remove stuck-on dirt like tree sap, bugs, and road grime that normal washing misses. Always use plenty of clay lubricant spray. This helps the clay glide smoothly and lift dirt away safely. Your glass will be super smooth.
How do I remove stubborn hard water spots from my windshield?
Hard water spots are tough mineral stains. For light spots, try a 50/50 mix of white vinegar and distilled water. Spray it on, let it sit for a minute, then scrub with a microfiber towel. For VERY stubborn spots, you need a special water spot remover or a fine glass polish. It takes a lot of work. For a guaranteed perfect result, visit us. Our detailing service gets it done FAST.