
You pull into the driveway after a long GTA winter, expecting the sharp gloss your car had in October. Instead, the hood looks grey and hazy, the doors carry a film that no wash seems to remove, and sunlight reveals a web of fine scratches. That's the moment many owners search for buffing machine car polish, hoping a machine and a bottle of compound can bring the finish back.
The machine can help, but it isn't a magic eraser. Machine polishing levels a controlled amount of clear coat, and every pass should be chosen around the defect, the paint's condition, and the protection your vehicle will face next. In Ontario, that last point matters. Winter contamination keeps returning, so correction without proper cleaning and protection can be a short-lived victory.
Table of Contents
- Why Your Paint Looks Dull After a GTA Winter
- Choosing the Right Buffing Machine for Your Skill Level
- Matching Pads and Compounds to the Defect
- Step-by-Step Buffing Machine Car Polish Technique
- Clear-Coat Safe Habits and Mistakes to Avoid
- DIY Polish Versus Professional Machine Correction
Why Your Paint Looks Dull After a GTA Winter
A GTA vehicle often looks its worst in spring because several types of damage arrive together. Road salt, calcium brine, gritty plow slurry, freeze-thaw cycles, and automatic-wash brushes leave the surface dirty, abraded, and visually flat. Ontario spreads roughly 1.5 to 3 million tonnes of road salt each winter, while humid Great Lakes weather and repeated freezing conditions can extend corrosion exposure for about five to six months each year, as described in this Ontario road-salt and vehicle corrosion guide.
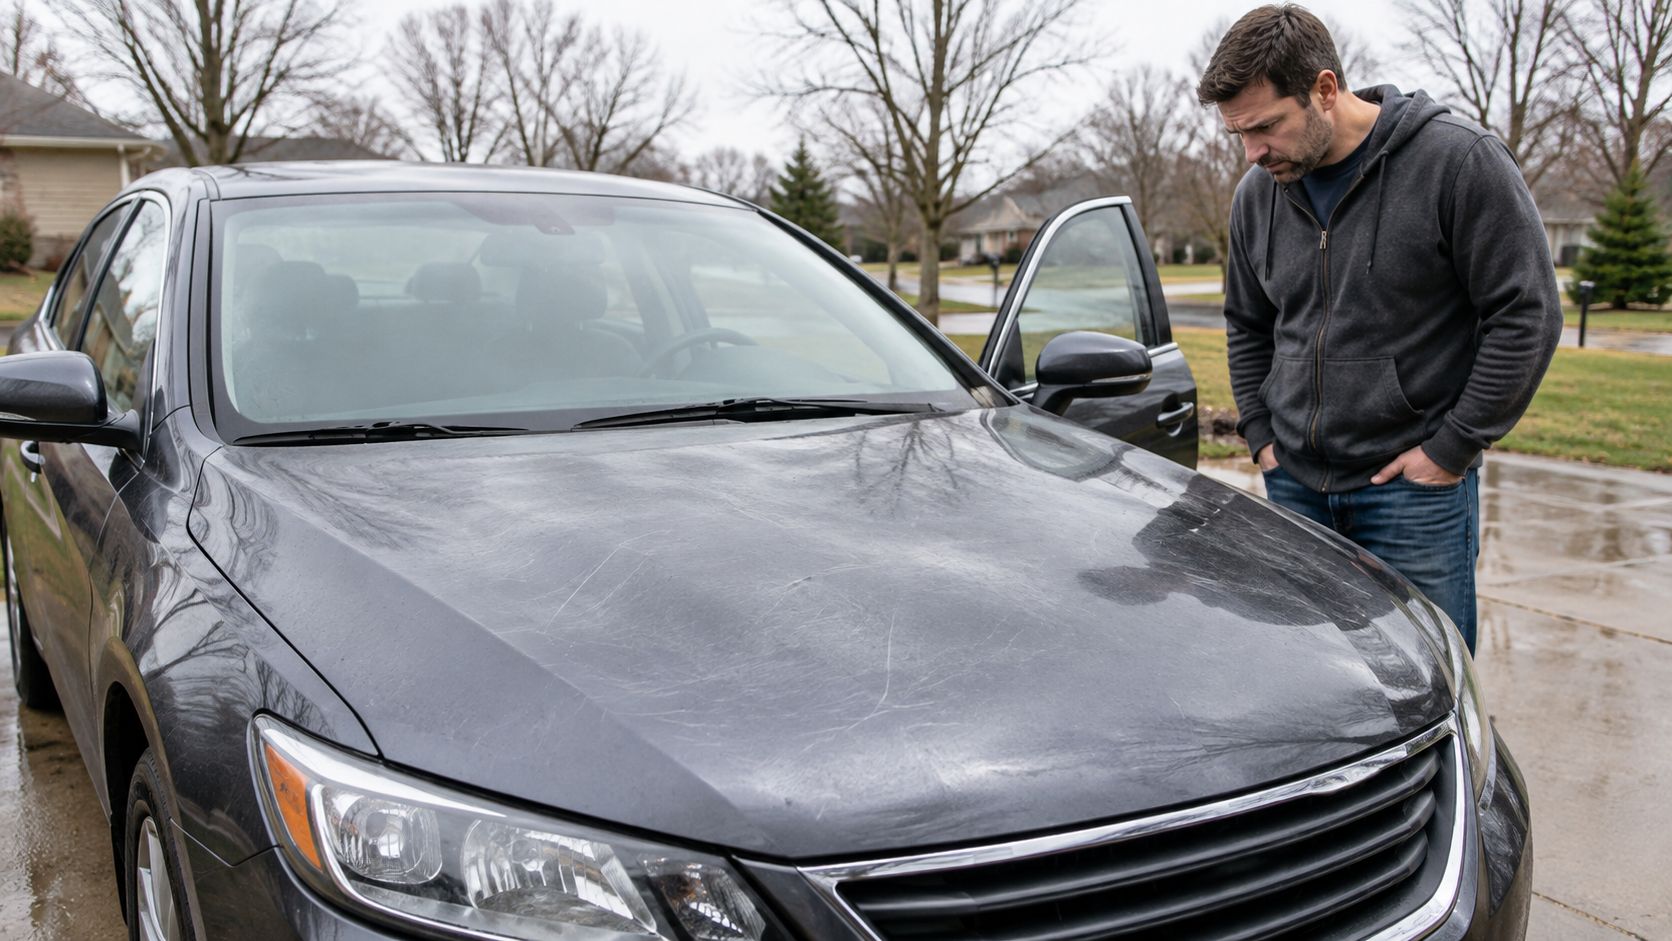
The contamination doesn't just sit on top like dust. Salt residue attracts moisture, abrasive grit drags across the surface during washing, and repeated exposure can stain or dull the clear coat. Toronto's annual winter salt use is estimated at about 130,000 to 150,000 tonnes, which helps explain why local paint sees such persistent seasonal abuse. Poorly protected vehicles can show visible rust in as little as two to three winters, while structural rust risk may appear after eight to twelve years of year-round driving without rustproofing, according to the same regional corrosion reference.
What the polisher actually touches
Most modern automotive paint has a basecoat that provides colour beneath a transparent urethane clear coat. The clear coat is often roughly 40 to 60 microns thick, and it's this upper layer that a machine polisher works on. The goal isn't to grind through the finish. It's to reduce or level the raised edges around defects so light reflects more evenly.
After winter, the common defects are predictable:
- Fine wash marks: Automatic brushes and contaminated mitts create circular or cross-hatched swirls.
- Oxidation and haze: Horizontal panels, especially hoods and roofs, lose clarity first.
- Embedded fallout: Iron particles and road film remain after an ordinary shampoo wash.
- Etched spots: Tree sap, bird droppings, and mineral deposits can leave marks that a quick wipe won't remove.
Ontario-focused detailing guidance describes paint correction as a measurable clear-coat removal process, with about 1 to 3 microns potentially removed when restoring gloss. You can review that risk framework in this buffing versus polishing explanation.
The practical rule: polishing is controlled paint removal, not a cosmetic rinse. If the defect is deeper than the safe working layer, more passes can make the finish weaker without making the scratch disappear.
That's why a spring correction should begin with inspection, not the most aggressive compound on the shelf.
Choosing the Right Buffing Machine for Your Skill Level
The machine changes how much control you have over heat, cutting power, and pad movement. For a first project, a dual-action random orbital is usually the sensible starting point because the pad both rotates and oscillates instead of spinning on one fixed axis. That movement is more forgiving when your pressure or arm speed isn't perfect.
A rotary polisher spins on a fixed axis. It cuts quickly and can rescue hard paint or serious defects in experienced hands, but it concentrates heat and correction in a way that punishes hesitation. A forced-rotation or forced-orbital machine adds stronger pad rotation to an orbital motion, giving it more authority than a typical DA while retaining some of the control that makes orbital tools approachable.
Buffing machine types compared for DIY use
| Machine Type | Orbit / Action | Cutting Power | Learning Curve | Best For |
|---|---|---|---|---|
| Dual-action random orbital | Oscillates and rotates, with free-spinning or controlled movement depending on design | Moderate | Most forgiving | First-time users, light correction, finishing |
| Rotary | Spins around one fixed axis | High | Steep | Experienced operators, hard clear coats, focused correction |
| Forced-rotation orbital | Orbital movement with mechanically driven rotation | Moderate to high | Moderate | Heavier correction with more resistance to stalling |
| Long-throw DA | Larger orbit, commonly 15mm or 21mm | Moderate to high | Approachable | Faster work on broad panels and controlled one-step correction |
For a newcomer, I'd choose a 15mm or 21mm long-throw DA with a backing plate that matches the pad size. An 8mm throw is easier to control in tight areas and is useful for refinement, while a 15mm or 21mm throw covers larger panels efficiently. A 5-inch backing plate suits tighter panels and offers precise pad control. A 6-inch setup covers broad hoods and doors faster, but it's less convenient around mirrors, pillars, and curved bumpers.
Prosumer tools from brands such as Rupes, Flex, and Milwaukee can perform well when the operator controls speed, pressure, and pad cleanliness. The badge matters less than the machine's balance, backing-plate fit, trigger control, and your willingness to test a small area first.
Where each machine earns its place
A DA is the right tool for most driveway users correcting swirls, haze, and light oxidation. It can still generate heat, but it generally gives you more warning before a mistake becomes permanent.
Forced-rotation machines make sense when a DA bogs down on a hard clear coat or when a production detailer needs more correction without immediately reaching for a rotary. They're powerful enough to demand disciplined panel inspection.
Rotaries belong with operators who already understand pad angle, edge behaviour, heat, and finishing technique. They're excellent tools, but a beginner shouldn't learn on a sharp body line or a thin repainted panel.
Wear eye protection, hearing protection, nitrile gloves, and a suitable respirator when product labels call for one. Keep loose clothing, cords, and hair away from the pad, and work in a shaded, ventilated area.
Matching Pads and Compounds to the Defect
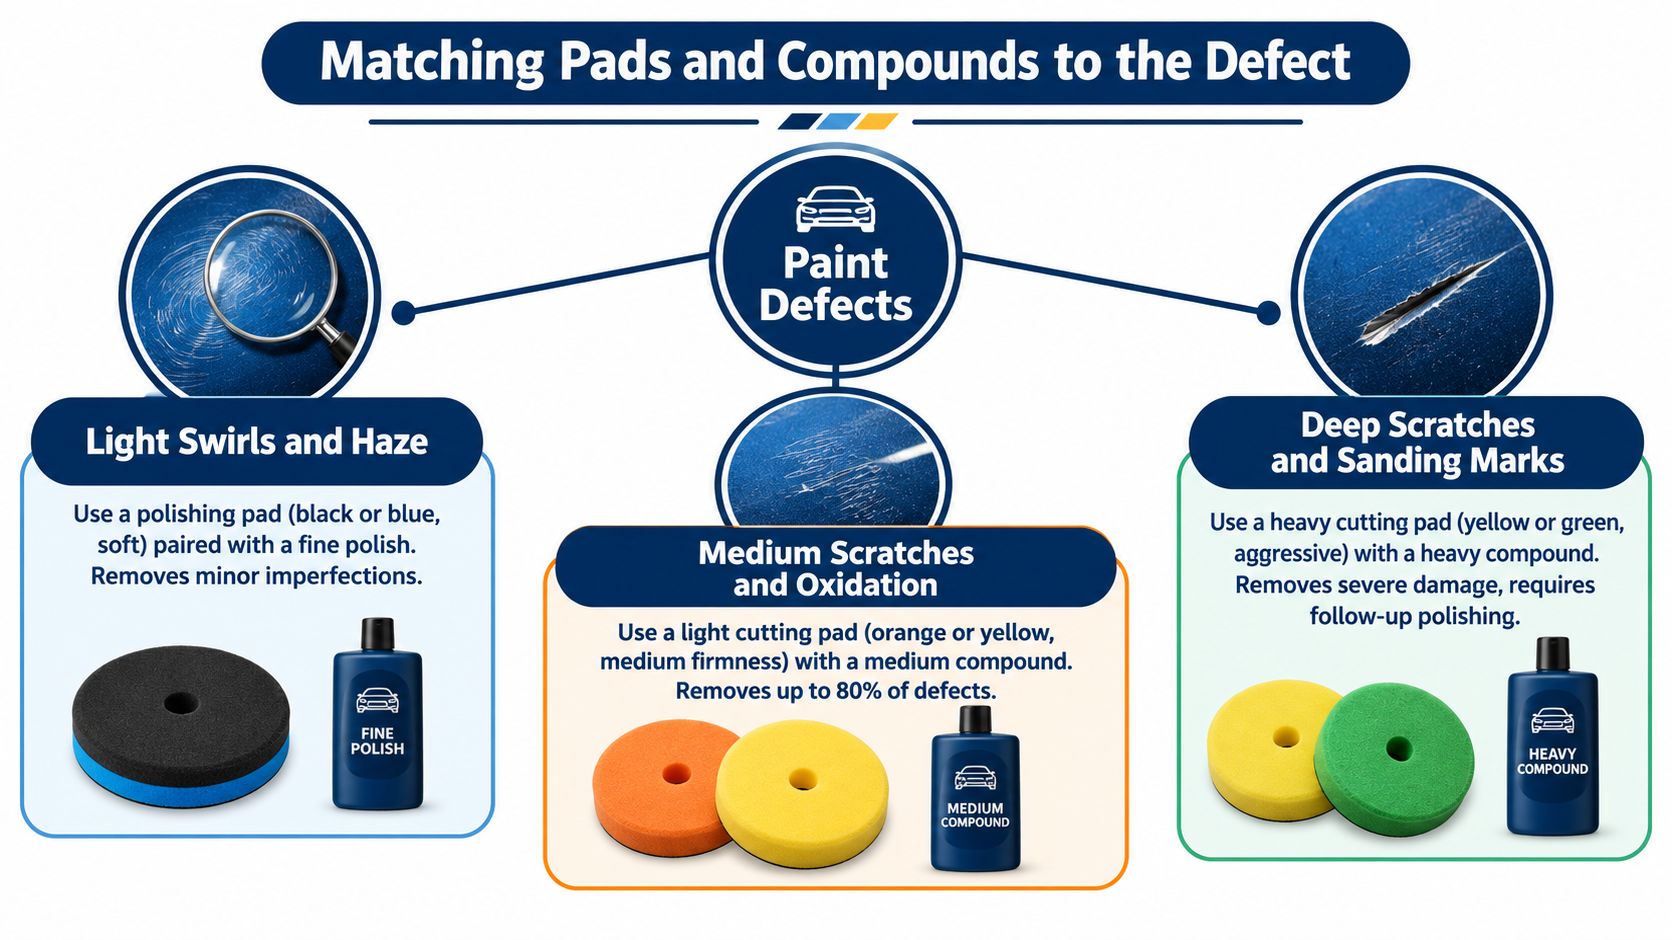
Pad and compound selection should follow the defect, not a favourite colour or brand. A hard cutting pad paired with a heavy compound may remove more material than necessary, while a soft finishing pad won't correct oxidation because you spend longer on it.
Start by washing, drying, and wiping a test area with an appropriate panel-wipe product, often an isopropyl-alcohol-based cleaner. Inspect the surface under a strong LED or direct sunlight. If the marks disappear when the panel is wet but return when dry, you're likely dealing with surface-level clarity defects rather than a missing section of paint.
A practical pairing sequence
Cutting foam is firm and aggressive. Orange and yellow pads are common examples, although colour codes vary between manufacturers. Pair one with a heavy-cut compound when you're addressing moderate oxidation, pronounced swirls, or scratches that remain after a lighter combination.
Polishing foam sits in the middle. White and green pads are often used for refining or moderate correction, depending on the manufacturer. Match one with a medium polish when the paint has light wash marks, road-salt haze, or mild dullness and you want a useful balance between correction and finish.
Finishing foam is soft and gentle. Black and red pads are common examples. Use one with a fine polish or finishing glaze when the surface is already fairly clear and your priority is removing light haze and improving reflection.
Microfibre cutting pads bring more bite than ordinary polishing foam. They can help with stubborn defects, but they also require more frequent cleaning and closer inspection because a loaded pad can create excess heat and uneven results.
Let the test spot decide
Use the least aggressive combination that produces an acceptable result. For light spring haze, begin with a polishing foam pad and a medium or fine polish. If the inspection light still shows the same defects, move to a firmer polishing pad or a light cutting combination. Save heavy-cut compound for paint that needs it.
An all-in-one polish can suit a daily driver with mild swirls when the owner wants gloss enhancement and light cleaning in one pass. It won't deliver the same defect removal as a staged correction, but that may be the correct trade-off for a vehicle that still needs its clear coat for future winters.
Heavy compounds are useful when lighter combinations fail, but they often leave haze or micro-marring that requires a second polishing step. Finishing glazes can improve visual depth, though they may mask rather than permanently correct some marks. Always wipe the panel clean before judging the result.
A clean test spot beats a confident guess. If the first small section doesn't improve, change one variable at a time, such as pad firmness, compound strength, or machine speed.
Step-by-Step Buffing Machine Car Polish Technique
Machine correction rewards order. A pad can't safely level paint if grit, iron particles, or salt film remain between the surface and the abrasive.
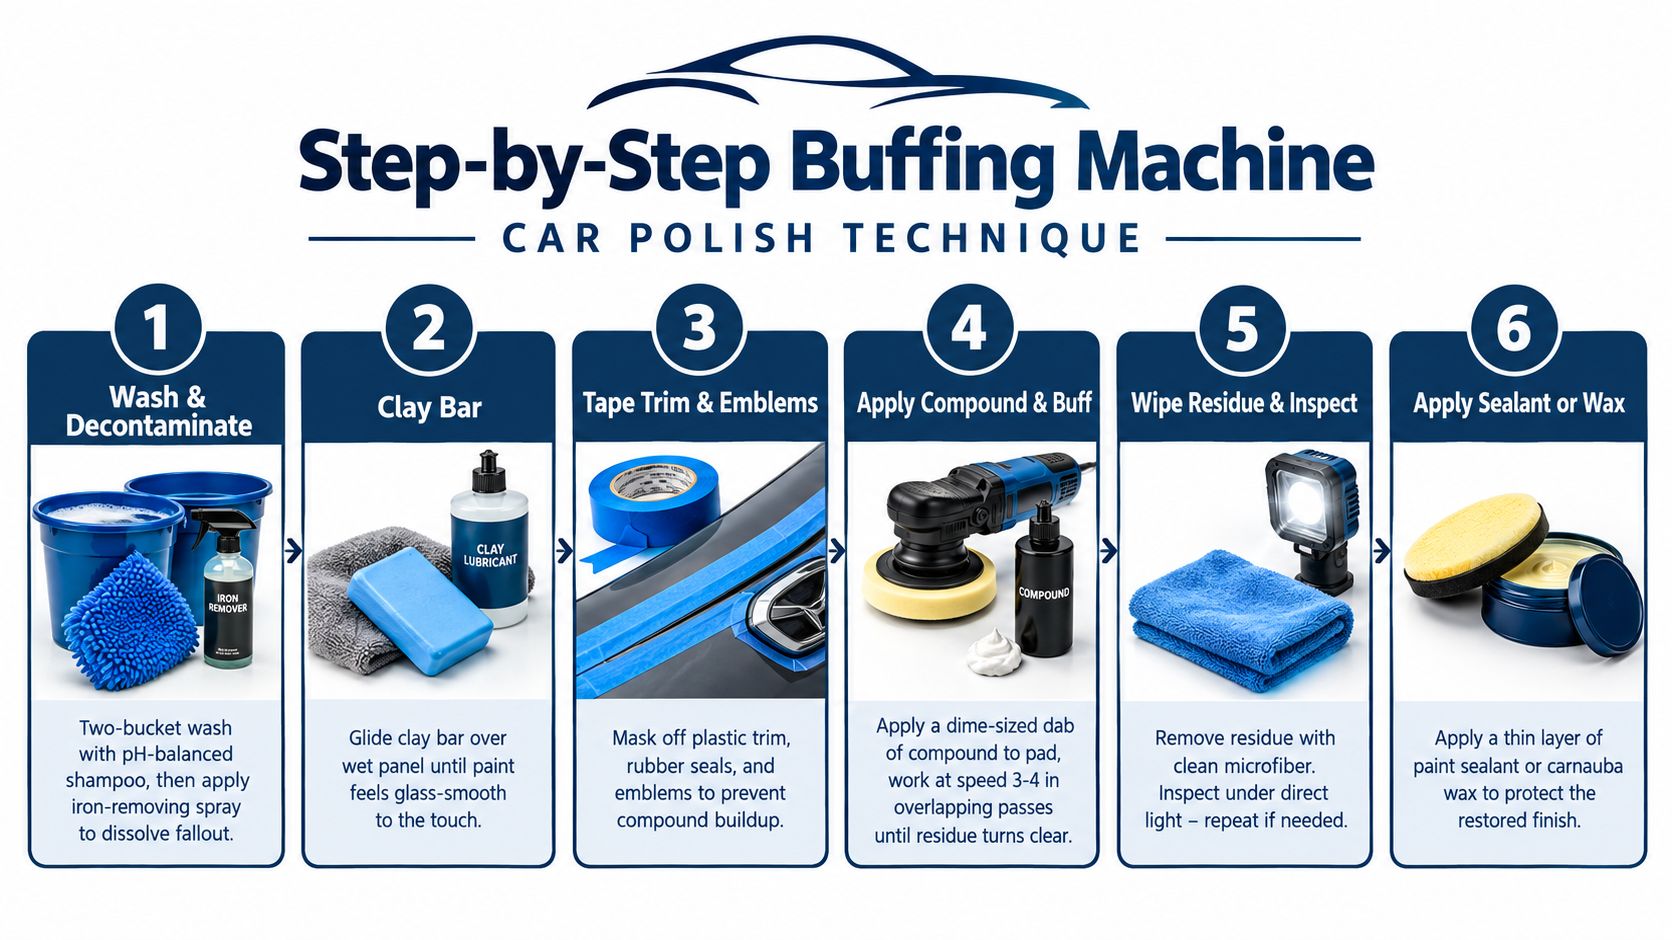
1. Wash and decontaminate
Use a two-bucket wash, a clean microfibre mitt, and a pH-balanced shampoo. Rinse the vehicle thoroughly, giving extra attention to wheel arches, rocker panels, lower doors, and the underside of bumpers where salt slurry collects.
Follow with an iron-removing product on suitable painted surfaces. Let the product work according to its label, rinse completely, and remove tar or other bonded contamination with a compatible product. Never polish a panel that still feels gritty.
2. Clay the paint
Lubricate the panel generously and glide a clay bar or synthetic clay media across the surface with light pressure. Continue until the paint feels smooth under a clean plastic bag or your fingertips. Fold or clean the clay as it picks up contamination, because dirty clay can create fresh marring.
3. Mask vulnerable areas
Tape rubber seals, textured plastic, badges, sharp edges, and trim. Compound residue can stain porous plastic and collect around emblems. Masking also gives you a visible boundary, so you're less likely to drag a pad across an edge while trying to chase a defect.
4. Perform a small test spot
Choose a less prominent area, such as the panel behind a door, and work a section roughly 2 by 2 feet. Apply a modest amount of product to the pad, spread it at low speed, then make controlled overlapping passes.
For a long-throw DA, keep the pad flat and use moderate pressure for the initial passes. Let the tool move slowly, around one inch per second, rather than sweeping quickly across the panel. Use two passes with pressure followed by two lighter passes, and keep checking the surface so you don't continue cutting after the defect has improved.
5. Correct in small sections
Once the test spot works, divide the panel into manageable areas. A section around 18 inches wide is easier to keep wet with product, inspect, and control than an entire hood.
Keep the panel cool to the touch and below 110°F during the process. If the pad feels hot, the product dries immediately, or the machine changes tone under pressure, stop and allow the area to cool. Brush or clean the pad between sections, then switch to a fresh pad when the face becomes caked or glazed.
6. Wipe and inspect
Remove residue with a clean, short-pile microfibre towel. Use a swirl-finder light from several angles, because a finish can look glossy in shade while still showing haze under direct illumination.
If the cutting step leaves micro-marring, change to a polishing pad and finer product. Don't respond to haze by applying more heavy compound. Refinement requires a cleaner pad, less aggression, and a controlled finishing pass, often around speed 3 on a DA.
7. Protect the corrected finish
Once the paint is clean and the polishing oils have flashed off or been removed according to the protection product's instructions, apply a wax, sealant, or ceramic coating. Thin, even application is safer than laying down a heavy film.
The protection step matters especially after winter correction. Regional guidance notes that corrosion may begin within 48 to 72 hours of salt contact under moist conditions, and GTA winter-care recommendations include washing within 24 hours of heavy salt or brine exposure. Those intervals are documented in this Ontario rust-proofing and winter-care guidance. Corrected paint still needs regular salt removal and attention to the underbody.
Clear-Coat Safe Habits and Mistakes to Avoid
The fastest way to damage paint is to treat every defect as a cutting problem. More compound, heavier pressure, and extra passes may make a pad feel productive, but they also raise heat and remove clear coat that you may need later.
Modern urethane clear coats commonly measure 40 to 60 microns, and Ontario vehicles already endure repeated abrasion from winter contamination. A single aggressive pass can visibly improve a panel while leaving less margin for the next repair. The correct aim is not perfect removal at any cost. It's the best improvement that preserves a healthy finish.
The habits that protect the paint
- Keep the pad flat: Tilting onto an edge concentrates pressure and heat.
- Use machine weight intelligently: Add only the pressure needed to maintain correction. Don't lean hard enough to stall or overload the pad.
- Prime lightly: Spread a thin film across a new pad, then use a small amount of working product. A thick bead causes sling and residue without adding useful correction.
- Clean often: Brush the face between sections and replace a pad when it becomes glazed, hot, or packed with spent compound.
- Stop on success: If the test spot removes the target defect and leaves a clean finish, repeating the pass only spends clear coat.
Avoid polishing directly over exposed edges, sanded-through areas, or panels with uncertain repaint history. A rotary running beyond 1500 RPM belongs in trained hands, not in a first attempt on an unfamiliar vehicle. Don't chase holograms with a more aggressive pad either. Holograms usually need better control and a finer refining step.
Clear-coat cost of each polishing stage
| Pad & Compound Pairing | Microns Removed Per Pass | Risk Level |
|---|---|---|
| Finishing foam with fine polish | Light, vehicle and product dependent | Low when used correctly |
| Polishing foam with medium polish | Potentially within the overall 1 to 3 micron correction range, depending on defect and technique | Low to moderate |
| Cutting foam with heavy compound | Can approach the higher end of the 1 to 3 micron range or exceed it on sensitive areas | Moderate to high |
| Microfibre cutting pad with heavy compound | Requires close inspection because the combination has strong correction potential | High |
| Rotary with aggressive pad and compound | No fixed safe amount. Heat and operator error can accelerate removal | High |
The 1 to 3 micron benchmark comes from Ontario-focused detailing guidance on measurable correction, not a promise for every vehicle or product. Paint hardness, pad condition, machine movement, and previous polishing all change the result.
Stop correcting when the improvement becomes disproportionate to the material removed. A few remaining marks are often a better outcome than a thinner, more vulnerable clear coat.
DIY Polish Versus Professional Machine Correction
The DIY decision comes down to three questions. How severe are the defects? How much controlled time can you give the job? How comfortable are you with clear-coat risk when the paint history is unknown?
For a daily driver with mild swirls and spring haze, a one-step enhancement is often a reasonable weekend project. A soft or medium polishing pad with a light polish can improve clarity without turning the job into a full restoration. It suits an owner who wants a cleaner reflection, understands that some deeper marks will remain, and can work patiently in a shaded garage.
A staged correction is a different commitment. Cutting, polishing, and finishing demand several pad types, multiple compounds, reliable lighting, and ideally a paint-thickness gauge. The work takes longer because every stage requires residue removal and inspection. It also creates more opportunities to over-correct a weak area.
A practical decision filter
Choose DIY one-step correction when the paint has light swirls, mild haze, and no obvious history of aggressive repairs. Start with the gentlest workable pad and polish, and accept improvement rather than chasing every mark.
Consider professional correction when you see heavy oxidation, etched bird-dropping marks, deep scratches, sharp edges, or inconsistent colour from a repainted panel. Those conditions make the machine choice and test-spot result much less predictable.
Hand the job to a professional when the clear coat is visibly thin or the reading is below 80 microns, as Ontario-focused detailing guidance identifies that situation as a point where correction requires much greater caution. You should also step back if you don't have strong lighting, a safe work area, or the patience to inspect every section.
Cost and equipment trade-offs
A quality dual-action machine can cost roughly $150 to $400, before buying pads, compounds, towels, lighting, masking tape, and paint-protection products. That equipment can make sense for someone who maintains several vehicles, but it doesn't remove the learning curve or the risk of burning through an edge.
Local GTA guidance places one-step gloss enhancement around $199 to $549, two-step correction around $350 to $799, and multi-stage work at a custom quote. Single-stage jobs commonly take four to six hours for sedans and five to eight hours for SUVs or minivans, according to this GTA paint-correction service guidance. Those ranges reflect the practical cost of controlled labour, inspection, pad changes, and cleanup rather than running a machine over the car.
At Nanak Car Wash, the machine buff and polish detailing service is one option for owners who want correction handled alongside professional exterior detailing. Its detailing packages include machine buff and polish, while the business also offers rust proofing and winter-focused cleaning services, so the correction and protection conversation can happen together.
The right handoff point is clear. If a test spot doesn't improve the defect with a gentle combination, if the panel gets hot quickly, or if you can't establish how much clear coat remains, stop polishing and book an assessment instead of escalating blindly.
If your GTA vehicle is carrying winter haze, salt staining, oxidation, or machine-polishing risk you'd rather not manage alone, visit Nanak Car Wash for detailing that includes machine buff and polish, with rust-proofing options available for ongoing Ontario protection. Bring the vehicle in for a practical assessment before the next aggressive pass, and let the finish guide the service.


 6600 Finch Ave W, Etobicoke, ON M9V 3Z6
 647-703-8515
 MON – SUN 8 AM to 7 PM