
You slide into the driver's seat, put your coffee in the cup holder, and feel yourself move sideways a little more than expected. Yesterday's leather treatment has given the seat the shine of a dress shoe and the grip of a buttered dinner plate. The bottle promised luxury. Your trousers are less impressed.
Or perhaps you're facing the opposite problem: a dull bolster, a pale winter mark, and a shopping aisle full of bottles that all promise softer leather. Before choosing a car leather conditioner, look at the seat's finish. What's on top, what's underneath, and whether either is damaged matter more than the fragrance on the label.
Table of Contents
- What Car Leather Conditioner Does and Doesn't
- Match Your Seat Finish to the Right Product
- Reading the Label Before You Buy
- How to Condition Leather Seats Without a Greasy Film
- Ontario Seasons and When Seats Need Care
- How Professional Detailers Handle Leather Care
- Decide Between DIY Care and a Professional Visit
What Car Leather Conditioner Does and Doesn't
Think of car leather conditioner as hand cream for a seat that feels dry. It can improve softness, suppleness and appearance when it suits the material. But the comparison has a catch: your hands don't leave the factory wearing an automotive protective topcoat.
Many modern leather seats do. That coating changes how a treatment behaves, so don't assume a rich cream will sink into the hide. On a coated seat, care is largely about maintaining the finished surface rather than feeding an exposed piece of leather.
Say your black driver's seat spends a July afternoon in an open parking lot. The sun-facing bolster looks faded, so you apply more conditioner there than anywhere else. It looks darker while wet, but that temporary change doesn't mean you've reversed the fading or provided meaningful sun protection.
Practical rule: Choose shade for sun exposure, cleaning for contamination, and repair assessment for broken surfaces. Conditioner isn't a substitute for all three.
What the bottle can't fix
Keep these limits in mind before treating a tired-looking seat:
- Cracks: Conditioner can't join split material back together.
- Flaking coating: A dressing won't rebuild the missing finish.
- Old stains: Dark denim transfer and embedded marks need cleaning assessment, not camouflage.
- Sun exposure: Don't assume a conditioner provides UV protection unless its label specifically says so.
More product doesn't overcome those limits. A thick application can leave a slick surface that collects dust, giving you a shinier seat without a healthier finish.
Before buying anything, inspect your own seat in daylight. Gently press a clean finger against an intact area and compare its feel with a less-used passenger seat. A tacky surface points towards cleaning; visible cracks or lifting edges call for assessment; an intact, clean surface that feels dry may suit light conditioning.
Dull isn't automatically damaged, either. A clean factory-matte seat shouldn't need to shine to prove you've looked after it.
Match Your Seat Finish to the Right Product
Start with a white microfibre cloth, barely dampened, on an inconspicuous area, provided the vehicle's care instructions allow it. If colour transfers, stop. That's a warning to investigate, not a reliable diagnosis of aniline leather: transferred colour could also be contamination or an unstable finish.
Check the owner's manual or upholstery specification before treating unfamiliar material. Grain, sheen and water behaviour offer clues, but they don't reliably distinguish every leather, synthetic covering and coating. A single seat can contain several materials with different care needs.
Seat finish, product type and what to avoid
| Seat finish | How to recognise it | Suitable product type | Avoid |
|---|---|---|---|
| Coated or pigmented leather, common on factory seats | Often an even sheen; water may bead on the surface | Thin water-based protectant or light conditioner approved for coated automotive leather | Heavy oil dressings that sit on the topcoat |
| Perforated or ventilated seats | Visible holes, stitched sections and ventilation openings | Finish-compatible, thin water-based protectant applied through an applicator | Liquid pooling in holes and seams |
| Aniline or unfinished leather | Confirm through upholstery specifications; colour transfer warrants caution | Specialist aniline or unfinished-leather conditioner, only where explicitly approved and patch-tested | General automotive conditioner that excludes unfinished leather, pigmented sealers and heavy dressings |
| Suede, buckskin or fabric inserts | Napped, brushed or woven surface | A product made for that specific material | Ordinary leather conditioner |
| Vinyl side bolsters | May look smooth or leather-grained; confirm the material specification | Vinyl-specific protectant, or a product explicitly approved for vinyl | Leather conditioner used by default |
| Cracked or peeling coating | Flaking topcoat, rough edges or exposed fibres | Professional repair assessment first | Conditioner applied as a fix |
The exclusions aren't small-print decoration. Armor All's Canadian Leather Care Gel guidance excludes suede, buckskin, unfinished leather and fabric, recommends an inconspicuous test, and makes clear that appearance enhancement isn't crack repair.
That doesn't mean unfinished leather can never receive specialist conditioning. It means a general automotive leather product isn't automatically suitable. The label must name the material you're treating.
Test the result, not just the application
A hidden-patch test isn't finished when the product goes on without drama. Let it dry, then compare colour, sheen and feel with the surrounding surface. Check whether a matte patch has become glossy or whether residue transfers onto a clean cloth.
For perforated seats, the material and the holes both matter. Perforations don't identify the upholstery, but they do demand better liquid control.
If a bolster is peeling, leave the bottle closed. A repair specialist needs to assess what's failing before you add another substance to the surface.
Reading the Label Before You Buy
You're standing in the shop holding a thick leather balm and a lightweight interior protectant. Both have handsome cars on the packaging. Turn them around, because the useful information is usually on the back.
Buy for compatibility and finish, not thickness or scent. A product that smells like a gentleman's library can still be wrong for your ventilated commuter seat.
The shop-aisle check
- Check the base. For coated automotive leather, favour a water-based protectant or light conditioner explicitly approved for that finish. Reserve heavy oils and waxes for materials the manufacturer specifically names.
- Read the exclusions. Look for clear instructions covering coated leather, unfinished leather, vinyl and any inserts in your seats. A combined leather-and-vinyl product may be suitable, but don't infer vinyl compatibility from the word leather.
- Examine the UV claim. Choose an explicitly UV-rated product if sun protection is part of the job. Don't treat vague protection wording as proof that it addresses fading.
- Read the application directions. Look for controlled dosing, residue removal and a stated drying or curing instruction. A product that demands saturation is a poor default for coated or ventilated seating.
A useful label tells you where the product belongs and how to leave less of it behind.
You don't need a universal winning brand. You need a formula that matches your upholstery and leaves the appearance you want, usually close to the original finish.
Compare likely use rather than bottle size alone. A small amount applied sparingly may be more practical than a large bottle you keep pouring onto the seat. If you can't establish finish compatibility or find a testing instruction, leave that product on the shelf.
How to Condition Leather Seats Without a Greasy Film
Say the seat has a salty mark near the front edge and a shiny patch where your jacket rubs the bolster. Neither is an invitation to start conditioning. Begin with the contamination, then decide whether the clean surface needs anything else.
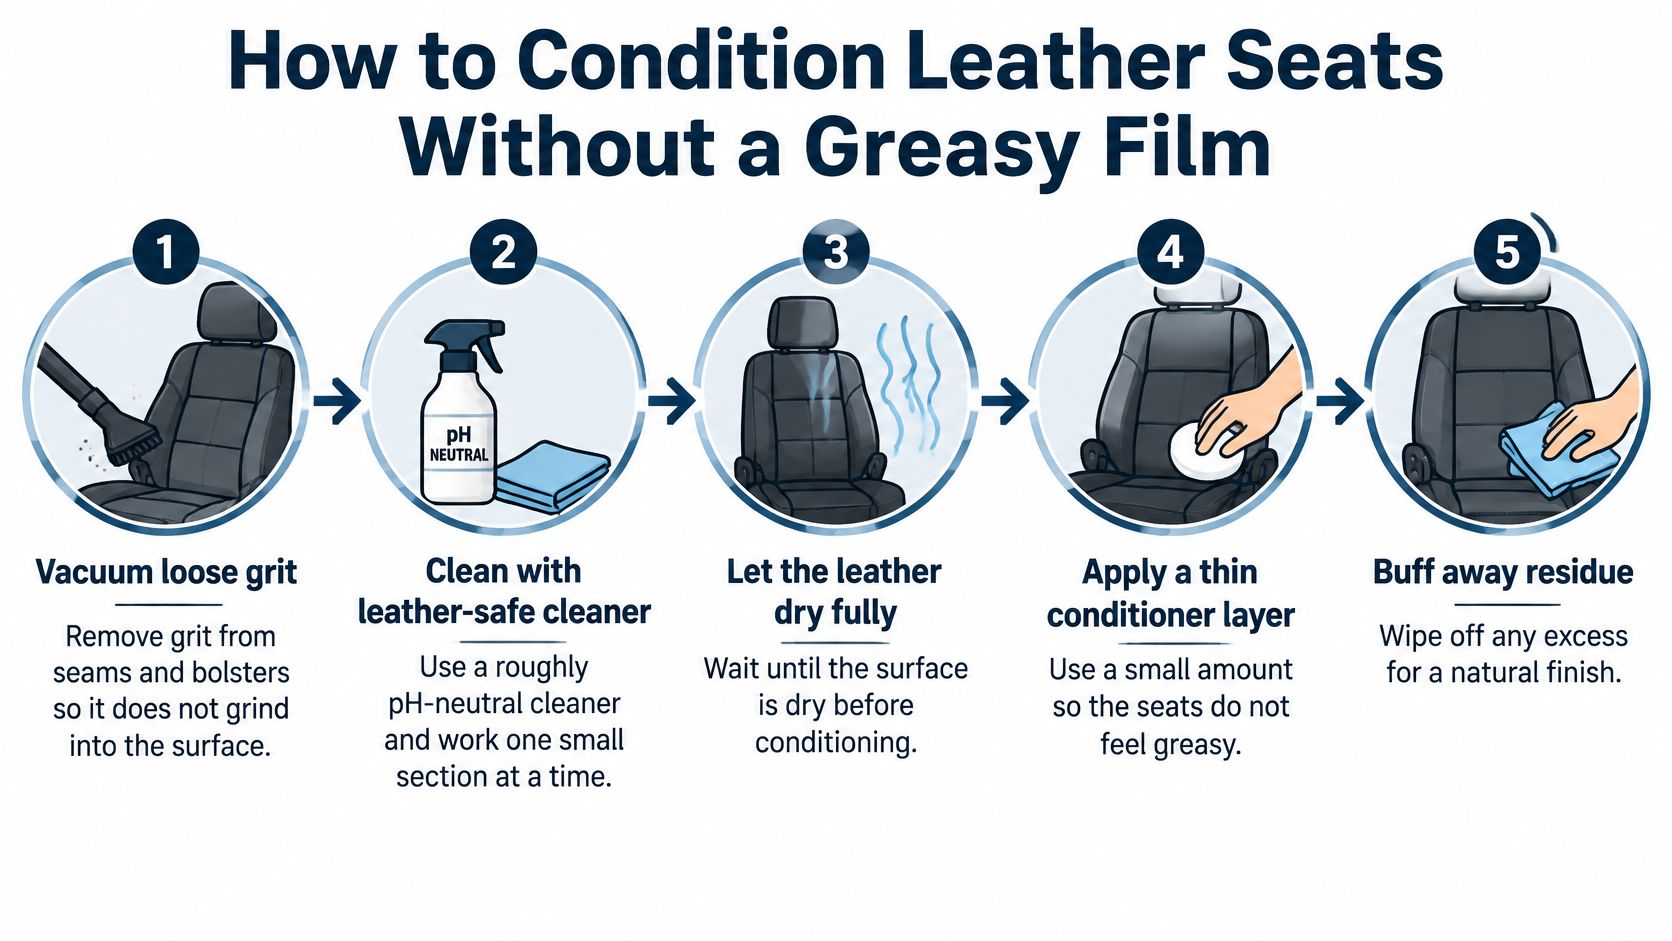
Nanak Car Wash's leather-seat treatment guide recommends a leather-safe, approximately pH-neutral cleaner, residue removal, complete drying and restrained application through an applicator. That order matters especially on coated and perforated seats, where excess product can remain on the finish or collect in openings.
The basic workflow keeps cleaning separate from the final protective treatment.
The controlled application method
- Vacuum the loose grit. Use a soft upholstery attachment around seams and bolsters so your cloth doesn't drag abrasive debris across the finish.
- Clean a small section with a leather-safe, approximately pH-neutral cleaner, applying it to your cloth or suitable soft tool rather than flooding the seat. Gentle passes give you control without soaking the upholstery.
- Remove the cleaner and lifted soil with a fresh microfibre cloth, turning to a clean face as it becomes dirty. Otherwise, you're redistributing contamination instead of removing it.
- Let the surface dry fully in a shaded, ventilated space before continuing. Don't judge readiness by the disappearance of visible droplets; seams and creases shouldn't remain damp.
- Test the chosen treatment beneath a discreet seat edge or another hidden, representative area. Let the patch dry and check for darkening, increased gloss or tackiness before treating visible panels.
- Put a small amount onto a foam applicator, distribute it through the pad, then spread a very thin, even layer. Pouring directly onto the seat makes heavy spots harder to control.
- Pass lightly over perforated sections without forcing product into the holes or stitching. If beads collect, lift them away promptly with a clean cloth rather than pushing them deeper.
- Buff excess gently with a dry microfibre cloth and allow the product's stated curing period before use. Make a final touch check for residue, because a slick or sticky patch needs attention, not another coat.
Judge the finish with your hand
Inspect from the open door and from the opposite side of the cabin. Side lighting makes streaks and overloaded edges easier to spot than looking straight down at the cushion.
The target is an even surface with no transferable residue. Don't chase uniform shine if the original finish was matte, and don't add more just because one worn area still looks different.
If you've over-applied, stop and reassess product removal using a compatible cleaner. Don't reach for a harsh household degreaser to undo a gentle-care mistake.
For summer exposure, combine an appropriate UV-rated protectant with a windshield sunshade. Extra conditioner isn't extra shade, no matter how enthusiastically you buff it.
Ontario Seasons and When Seats Need Care
Ontario gives your interior different jobs in different weather. Winter brings salt and slush contamination; summer brings UV exposure and heat inside parked vehicles. Treating both with the same automatic dose of conditioner misses what the seat needs.
Check the seats at each change of season and let what you find decide the next step. Winter residue removal and summer UV protection take priority over automatic conditioning. A dressing applied over salt can hold contamination against the finish, and summer care needs to address exposure rather than appearance alone.
Ontario leather care checkpoints
| Checkpoint | Main stress | Care focus | Condition to check |
|---|---|---|---|
| Early spring | Road salt and slush residue | Clean thoroughly, then apply light protection if appropriate for a dry-feeling seat | Clean feel, no grit or white film |
| Midsummer | UV exposure and cabin heat | UV-rated protectant and a shaded windshield; condition only if needed | Even colour, no cracking at the bolsters |
| Fall | Cooler weather before prolonged cabin heating | Light conditioning on compatible coated seats that feel dry | Supple, not tacky |
| Winter | Heavy slush and salt in footwells | Clean after heavy slush days; consider conditioning only once residue is gone | No residue on the seat surface |
The checkpoints are reminders to inspect, not instructions to empty the bottle. A clean, supple coated seat may need only routine cleaning and suitable UV protection. That is a perfectly good outcome.
When driving patterns matter more than dates
Say a rideshare driver works through a week of wet snow. Passengers climb in with damp coats, bags brush the seat edges, and salty moisture travels well beyond the floor mats. That driver needs a contamination check after a messy shift, not a reminder scheduled for the next season.
A lightly used car kept indoors presents the opposite case. If its upholstery stays clean and comfortable, adding product because the weather changed creates unnecessary work, and possibly a slick patch that then needs cleaning off.
Look, feel, then decide. The calendar reminds you to check; the surface tells you what to do.
High-contact areas also deserve attention outside seasonal changes. Body oils, clothing dye and everyday grime collect around the driver's bolster and seat edge long before any seasonal marker arrives. Inspect those spots during regular cabin cleaning, wipe spills promptly, and treat a sticky sheen as a cleaning problem before reaching for conditioner.
How Professional Detailers Handle Leather Care
A useful professional appointment starts with questions and inspection, not a bottle being shaken. What has already been applied? Did the sheen appear suddenly? Is the rough patch dirt, abrasion or a lifting coating?
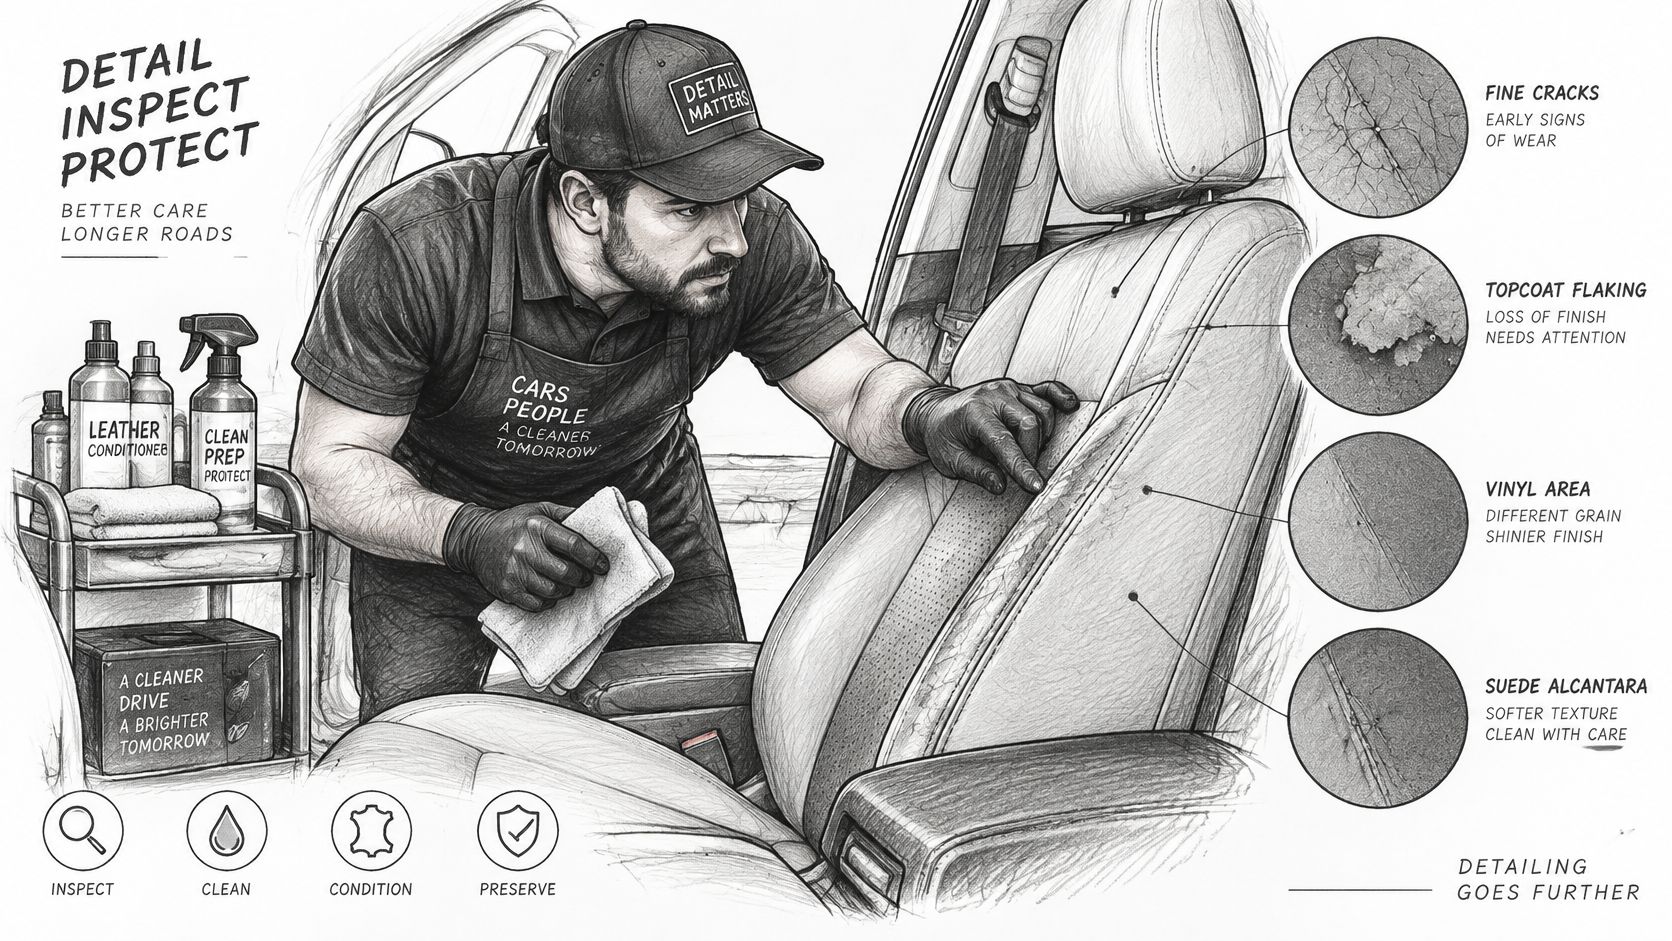
A careful detailer checks upholstery specifications where available, examines the finish and separates leather panels from vinyl or suede-like inserts. A discreet cloth check may flag instability, but it shouldn't become a guessing game based on colour transfer alone.
Inspection also includes the seat's vulnerable areas, where wear and trapped product can be easy to miss.
The greasy rideshare seat
Say a rideshare driver arrives with a black seat that became slippery after a home treatment. The detailer establishes what product was used and inspects an untouched area for a finish reference. The aim isn't to make everything equally glossy.
A gentle, compatible cleaning process removes the unwanted film, with inspection between passes. Once the surface is dry, a hidden-patch test determines whether a light protective treatment improves the result. If the cleaned seat already feels right, stopping there is a valid decision.
The detailer also checks perforations and stitching for trapped residue before handover. A seat that looks fine from the doorway can still have product collected around the holes.
A useful handover includes a care decision
Leather care belongs within a clean, dry cabin, but neighbouring materials need their own methods. Carpet shampooing doesn't mean leather should receive the same treatment, and a cloth used on dressed plastic trim shouldn't become the finishing cloth for a matte seat.
A useful condition record notes worn areas, existing damage, the treatment used and any reaction during testing. It gives the owner something more actionable than a general instruction to condition regularly.
Before agreeing to treatment, ask:
- Finish identification: How will you establish which materials and coatings are present?
- Dose control: How will you prevent residue on the cushion and inside perforations?
- Reasons to stop: What would make you recommend cleaning alone or a repair assessment?
Listen for distinctions, not promises that every seat can be restored with the same cream. A professional should be comfortable explaining why a damaged bolster needs a different specialist, or why an intact seat doesn't need conditioner today.
Decide Between DIY Care and a Professional Visit
Say the owner of a family SUV spots grey salt marks along the seat bolster after a week of slushy commutes. The leather is coated, intact and the finish is known. That job belongs in the driveway with a damp cloth and a small bottle. Now change one detail: the same marks sit on perforated seats that already shine from last summer's heavy-handed balm. That job belongs on a booking form.
DIY suits light upkeep on intact seats with a known finish. A professional visit makes more sense when salt persists, perforations complicate cleaning, a previous treatment has left a greasy film, or the surface itself may be failing.
The deciding factor is whether you can identify the material, control the dose and recognise when to stop. A careful owner with a compatible product beats an enthusiastic owner with a mystery balm and a scrubbing brush.
DIY care compared with a professional visit
| Factor | DIY with a kit | Professional detail |
|---|---|---|
| Best for | Light upkeep on coated seats with a known finish | Heavy salt, perforated seats or a damaged surface needing assessment |
| Testing and dosing | Owner performs the hidden-patch test and controls application | Trained staff should test discreetly and control thin applications |
| Finish identification | Owner judgement supported by upholstery specifications and the chooser table | Staff assess finish, mixed materials and damage before treatment |
| Typical time | A short session at home, plus drying time | A scheduled visit; the $120 detailing package takes 3 to 4 hours |
Start at home if the seat is intact, the instructions are clear and the problem is minor. Stop if cleaning lifts colour, changes the finish unexpectedly or reveals peeling. Each stronger product tried after that point pushes a care decision toward a repair bill.
When to book an assessment
Persistent salt residue, dry-looking patches after winter and an oily sheen from an earlier application all justify a professional look. Flaking needs assessment rather than another coat of conditioner, so describe it when booking.
Our $120 detailing package includes deep cleaning of the leather seats, and car detailing is done by hand. Appointments can be booked online or by calling 416-749-0202.
If the seat work is part of preparing a vehicle for an overseas move, keep the paperwork on a separate checklist. Sunmax Motors provides a resource to review Canadian vehicle export paperwork, so interior preparation doesn't distract from transport arrangements.
Check the seat this month, match the finish, and act on what the surface tells you. The best result isn't a seat that advertises yesterday's treatment. It's one you can sit in comfortably without thinking about the bottle at all.
Nanak Car Wash offers hand-performed detailing and leather-seat deep cleaning for GTA drivers dealing with winter residue, everyday grime or an over-dressed interior. Visit Nanak Car Wash to book your detailing appointment, and tell us about any slick patches, peeling or products you've already applied so we can discuss the right starting point.



 6600 Finch Ave W, Etobicoke, ON M9V 3Z6

 647-703-8515
 MON – SUN 8 AM to 7 PM