
Clean your leather twice a year, once after winter to strip salt and once before winter to seal and condition, and spot-clean spills the moment they land. In the GTA, that cadence matters because winter grime, summer heat, and dry cabin air work on the material all year, not just when the seats look dirty.
By February, a lot of drivers notice the same thing. The seats feel a bit stiff, the bolsters look dull, and that pale winter film keeps coming back no matter how often you wipe it. That isn't just cosmetic wear. It's the surface telling you it's been exposed to salt, slush, heat, and repeated drying cycles.
Table of Contents
- Why Leather Interior Cleaning Matters in Ontario
- Essential Supplies for Safe Leather Care
- Cleaning Smooth Versus Perforated Leather
- Step-by-Step Leather Interior Cleaning Process
- Conditioning and Long-Term Protection Strategies
Why Leather Interior Cleaning Matters in Ontario
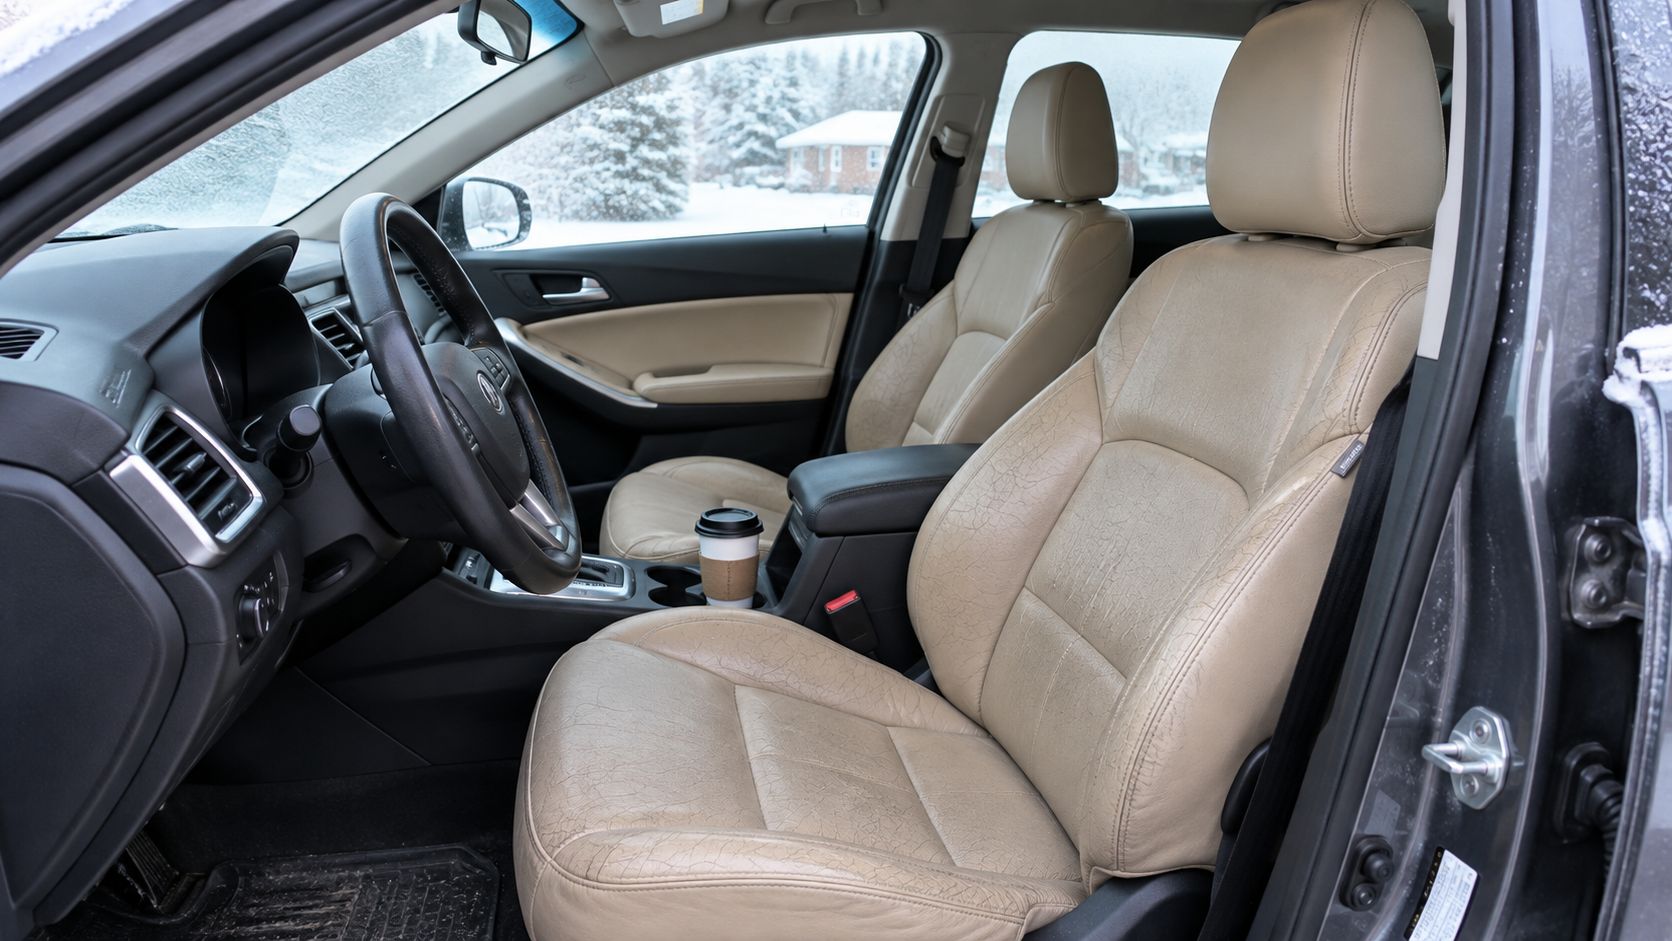
February in the Greater Toronto Area is when leather starts telling the truth. You open the door, sit down, and the seat feels drier than it did in the fall. There's usually a grey haze in the grain, and if you drive through slush every day, there's a good chance you've been carrying road salt in with you whether you meant to or not.
Winter residue is not just dirt
Ontario leather care is different because the material is being attacked from two sides. Winter brings abrasive salt slush and de-icing residue, while summer heat and sun dry out the finish and pull moisture from the seat. Local guidance treats professional deep cleaning at least twice a year, once after winter and again before winter, as part of a real maintenance cycle, not an occasional vanity job, and recommends premium conditioners after cleaning to counter dryness and sun damage. That same regional guidance also points to a 3- to 6-month service rhythm, with leather conditioning commonly suggested once or twice a year depending on use and exposure. Nanak Car Wash interior cleaning guidance and Ontario detailing service timing guidance
Practical rule: if the cabin has seen winter roads, treat the leather like a seasonal surface, not a permanent finish.
The seat can look fine while the damage starts early
Leather is forgiving until it isn't. The problem with salt is that it doesn't sit politely on top of the material, it gets worked into the grain, then it keeps drying and abrading the finish every time someone slides in and out. Heated seats make that worse because they speed up moisture loss, and the repeated hot-cold cycle inside a GTA vehicle adds stress that owners rarely notice until the leather starts looking tired.
A lot of drivers still think a quick wipe is enough. It's not. Local Ontario guidance ties leather wear to winter salt, slush, low humidity, heated seats, and summer heat, which is why a once-a-year wipe-down falls behind fast. The seats might still feel usable, but the protective top layer has already been taking hits for months.
The right goal is preservation, not just appearance
This is where leather interior cleaning changes from a cosmetic task into seasonal defence. The point isn't to make the cabin smell nice for a day. It's to keep contaminants from grinding into the finish, stop salt from lingering in high-contact zones, and slow the drying that leads to cracking and fading. If you keep up with the cycle, the interior stays easier to clean, and the leather keeps its flexibility longer.
Essential Supplies for Safe Leather Care
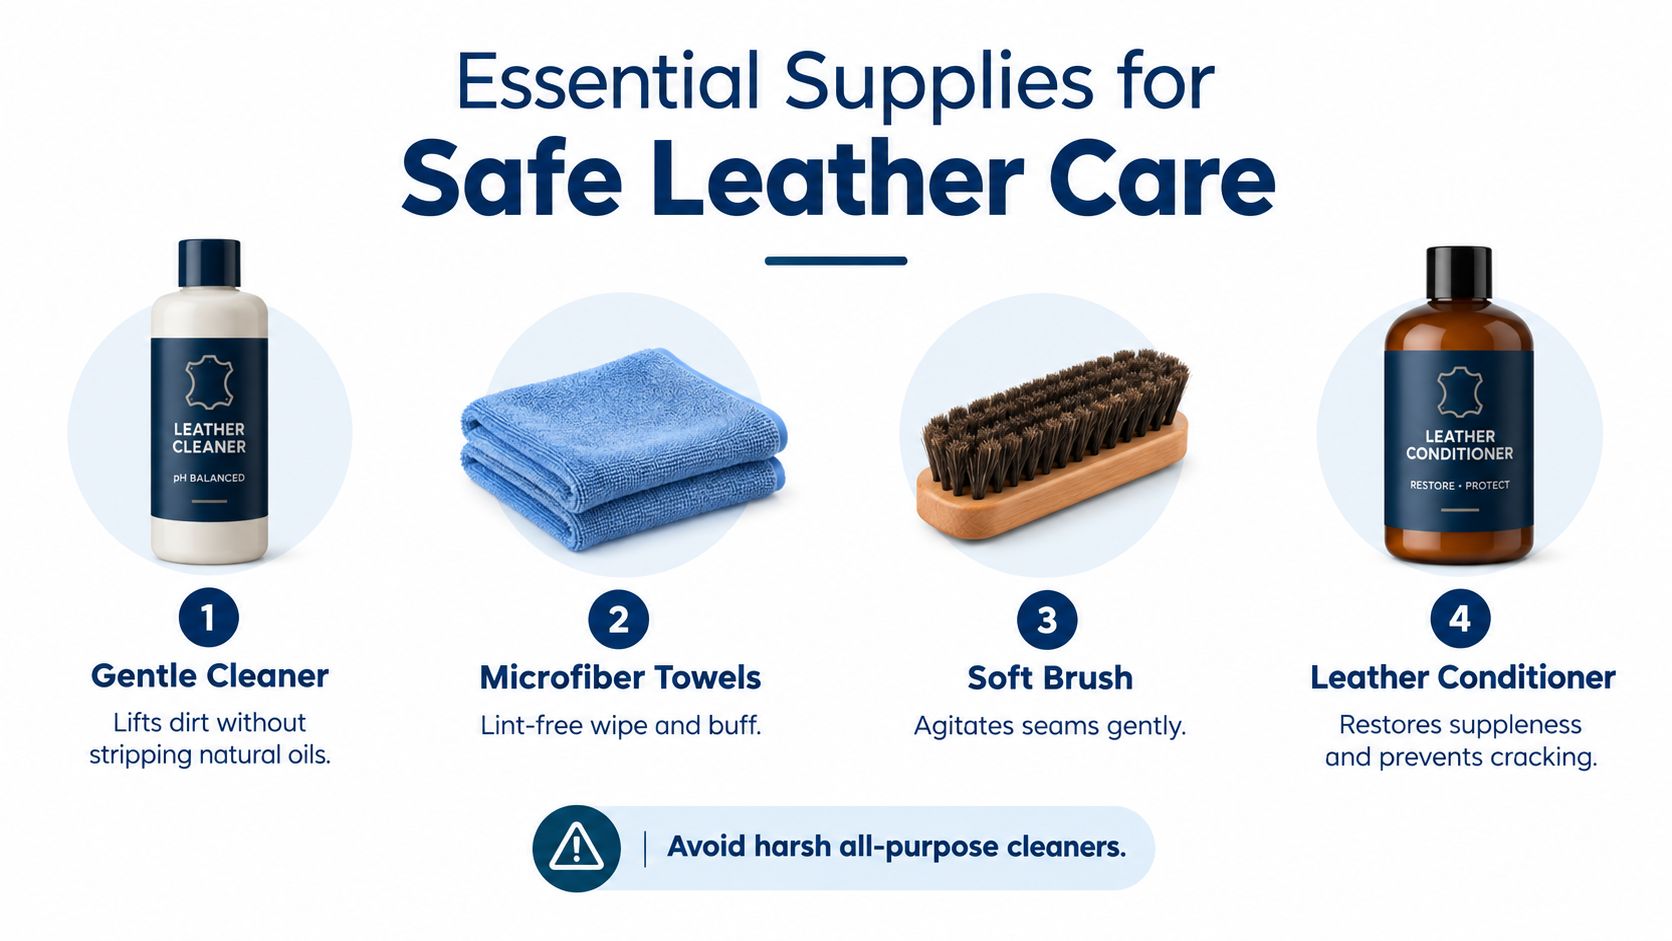
The wrong product can do more harm than winter grime. A decent-looking bottle from the household aisle can strip finish, leave residue, or make the seat sticky enough to attract more dirt the next day. For leather, the tool list is shorter than you might expect, but every item has a job.
Start with the right basics
The safest setup is simple. You need a pH-balanced leather cleaner, a vacuum with a soft brush attachment, a soft bristle brush, and several clean microfiber towels. Ontario and Canadian leather-care guidance specifically recommends vacuuming first, cleaning in small sections, and conditioning only after the surface is clean and dry. It also warns against alkaline cleaners like saddle soap, because leather is naturally acidic, and against over-wetting the surface or letting liquid pool in seams and perforations. Canadian Conservation Institute leather-care guidance and Canadian leather-seat treatment guidance
What not to use
The mistakes are usually familiar. People grab baby wipes, alcohol wipes, all-purpose cleaners, or a strong household spray because those products seem convenient. Canadian guidance specifically advises against detergents, alcohol wipes, baby wipes, and multi-purpose cleaners for leather seats because they can strip the finish or leave residue behind. That is especially risky in winter, when owners are already tempted to scrub harder because they can see salt stains and greasy road film.
Plain water helps with light dust, but it isn't a substitute for the right cleaner when grime has built up.
Prep matters more than pressure
Before any product touches the seat, the cabin needs a quick reset. Loose grit should come out first, because a towel dragged across sand behaves like fine sandpaper. The same principle applies to the brush, keep it soft and controlled, because you're lifting contamination out of the grain, not grinding it deeper.
A quality conditioner belongs in the kit too, especially one designed for automotive leather and, ideally, one that includes UV protection. In the GTA, summer parking and long commutes can dry the surface faster than most owners expect. If the conditioner feels greasy or heavy, that's usually a sign it's leaving too much residue instead of helping the seat.
Cleaning Smooth Versus Perforated Leather
Not every leather seat wants the same treatment. Smooth leather can handle a more direct, methodical clean, while perforated leather punishes over-application fast. Mixing those two up is one of the easiest ways to turn a routine detail into a lingering smell, a sticky feel, or a finish that never looks even again.
Smooth leather is simpler, but not careless
On smooth leather, the cleaner can be worked across the surface with a microfiber towel or a soft brush, then lifted before it dries into a film. The grain gives you some room to move, but you still want to stay gentle and keep the passes controlled. A soft brush is useful here because it gets into the texture without scratching the topcoat.
Perforated leather needs moisture discipline
Perforated leather is a different story. Those tiny holes are designed for ventilation, which means they also welcome liquid if you spray too much product. Once cleaner or moisture gets pushed into the perforations, it can settle in the foam, leave residue, and make the seat smell off even after the visible surface looks clean.
If the seat has holes, stop spraying directly onto it. Put product on the cloth, work lightly, and blot rather than soak.
| Leather type | What works | What breaks it |
|---|---|---|
| Smooth leather | Microfiber cloth, soft brush, controlled passes | Heavy scrubbing, over-spraying, harsh cleaners |
| Perforated leather | Minimal product, blotting, very light agitation | Flooding the holes, pooling liquid, aggressive wiping |
| Delicate leather surfaces | Spot testing, gentle pressure, careful drying | Strong solvents, repeated rubbing, heat drying |
Delicate finishes need even more restraint
Some leather finishes are more porous than standard automotive upholstery. They can mark faster, darken unevenly, and show residue sooner if the cleaner is too wet or too aggressive. That's why any cleaner should be tested on an inconspicuous spot first, especially on premium trims where the colour and texture can shift quickly if the wrong chemical hits the surface.
For anyone who wants a wider upholstery reference before tackling a seat, the luxury furniture cleaning guide is useful for understanding how delicate materials respond to controlled cleaning. The same caution applies in a car, just with tighter seams and more trapped grit.
Step-by-Step Leather Interior Cleaning Process
The best leather cleaning jobs usually look boring while they're happening. That's a good sign. The seat shouldn't be getting soaked, scrubbed white, or shiny from product buildup, it should just end up clean, dry, and even.
Start with contamination control
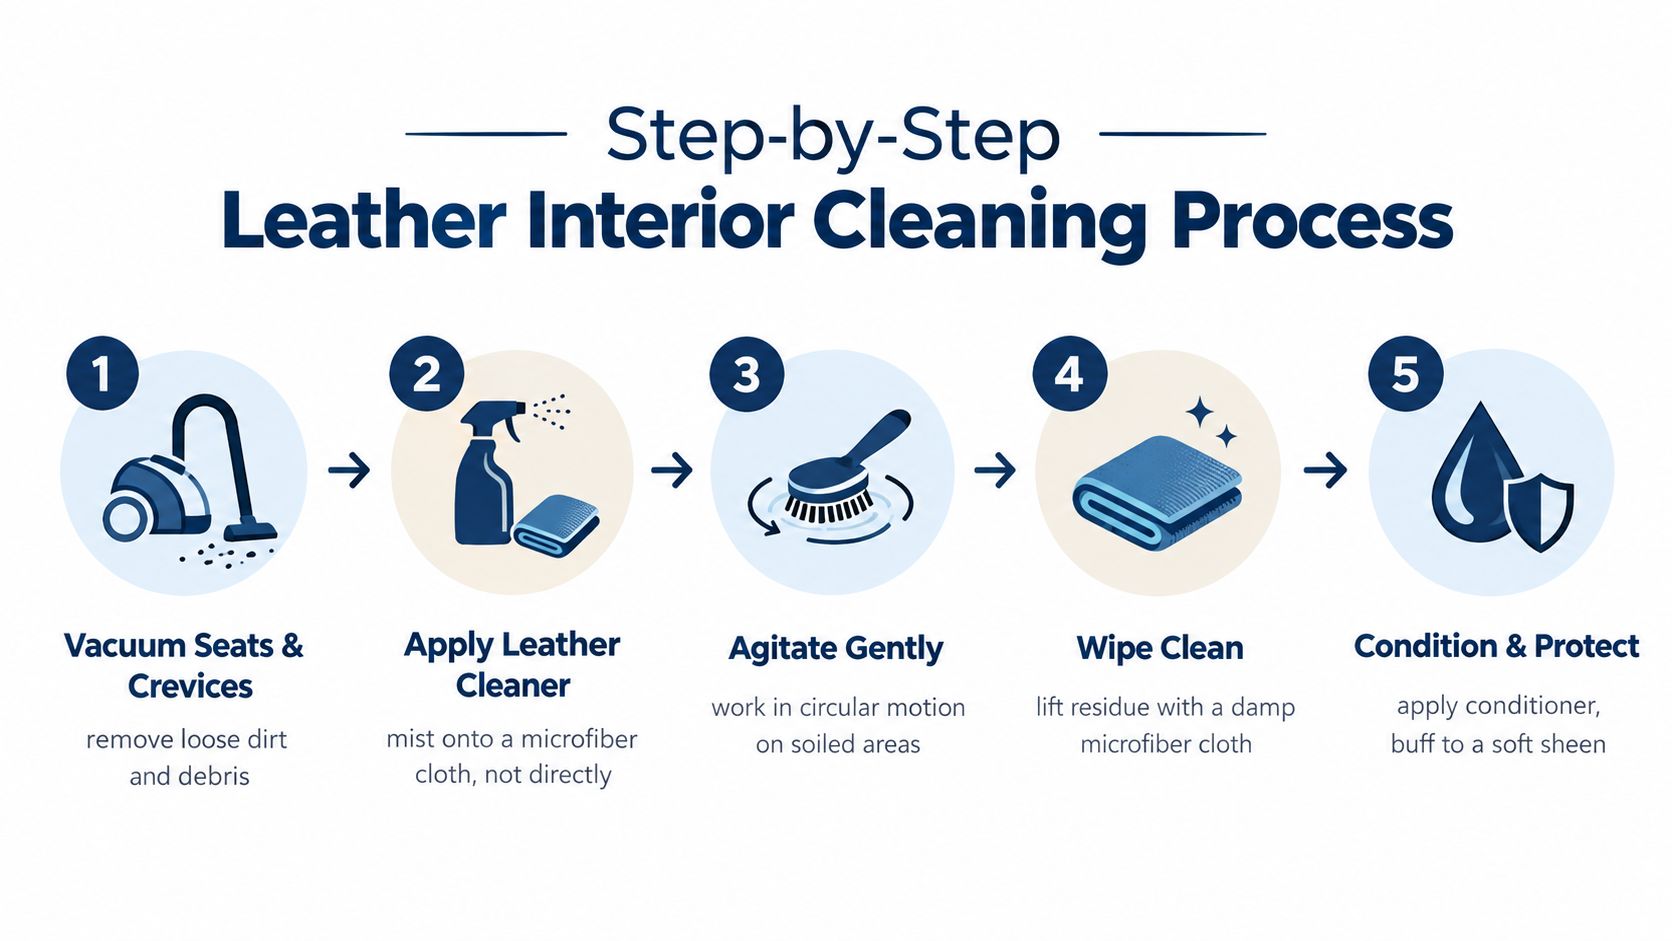
Vacuum the cabin first, including the seams, seat tracks, and the edges where grit hides. The Canadian Conservation Institute recommends removing surface dust and loose grit before anything else, because that particulate can scratch when you start wiping. If the car has heavy winter contamination, don't rush the vacuum step. Repeat the passes until the nozzle is pulling up clean.
Apply product to the cloth, not the seat
Use a pH-balanced cleaner on a microfiber cloth or applicator, then work in small sections. Canadian leather-care guidance recommends this exact approach, along with gentle overlapping passes and controlled drying rather than soaking the material. Keep the liquid away from seams and perforations, because pooled product can leave residue and uneven finish. Canadian leather-seat cleaning guidance
Lift, don't grind
Once the cleaner loosens the dirt, wipe it away with a separate damp microfiber cloth. If a stain won't move, use a dedicated eraser gently, then go back over the area with the vacuum to remove residue. The Canadian Conservation Institute specifically notes a white vinyl eraser or powdered eraser for slightly ground-in dirt, followed by brush-and-vacuum passes to clear the residue.
Leather should feel clean under your hand, not slick. If it feels greasy, too much product stayed behind.
Dry fully before conditioning
After cleaning, dry the seat with a fresh towel and let the surface finish drying naturally. Don't chase the job with heat, and don't condition damp leather. If the seat still feels cool or slightly tacky, it needs more drying time. Conditioning over residual moisture traps whatever is left on the surface, which is how people end up with a dull, uneven finish.
For a more general upholstery context, professional cleaners often treat fabric and leather with the same broad principle, remove soil first, then protect the surface after it's dry. The execution is different, but the logic is the same, and that's why controlled cleaning matters more than force.
Steering wheels and shifters need lighter hands
High-touch parts wear faster because they see hand oils, sunscreen, coffee residue, and winter grime every day. Keep the product amount smaller on a steering wheel or gear shifter than you would on a seat back. Too much cleaner there makes the surface slippery, which is the opposite of what you want in a control area.
Conditioning and Long-Term Protection Strategies
Cleaning gets the dirt off. Conditioning keeps the leather from drying out after that dirt is gone. In Ontario, those are not the same job, and treating them like one is how good interiors age badly.
Conditioning belongs on a seasonal schedule
The strongest local pattern is simple. Deep clean after winter, then condition before winter. Ontario detailing guidance also places interior leather care on a 3- to 6-month rhythm, with conditioning often recommended once or twice a year to keep the material soft and reduce cracking. That fits the climate better than waiting for visible wear, because by the time leather looks obviously dry, it has usually already lost some flexibility. Ontario seasonal detailing guidance and GTA interior detailing guidance
Use the conditioner to restore, not drown
A conditioner should be thin, even, and absorbed, not slathered on. Too much product is a real problem because it can attract dust, leave a greasy feel, and build up in seams or perforations. That's one reason the best results usually come from light application, then buffing off the excess after the leather has had a moment to take in what it needs.
Salt season changes the priority
Winter road salt is the hidden issue most owners underestimate. In Ontario detailing content, deeper interior services often include salt and stain treatment plus leather cleaning and conditioning, which shows that winter residue is treated as a separate problem from ordinary dust. A regular wipe-down helps, but once salt has been tracked in repeatedly, a deeper decontamination is the safer route because the crystals can keep abrading the finish if they're left in place. Ontario winter detailing guidance
Winter salt is a contamination problem, not just a stain problem. If it keeps coming back, the cabin needs deeper cleaning, not more pressure.
Know when to hand it off
DIY care has limits. Deep scratches, heavy staining, embedded salt marks, and leather that has started to crack need more than a home kit and a towel. In that situation, professional detailing makes more sense because the process can include vent and crevice blowout, shampooing, salt removal, and leather deep cleaning in one visit. Nanak Car Wash offers that kind of appointment-based interior detailing alongside wash and rust-protection services, which is useful for drivers trying to keep the car on the same seasonal schedule without splitting it across multiple shops.
For delicate hides and speciality finishes, the nubuck leather maintenance guide is also worth a look, because it shows how much restraint softer leather surfaces demand. The main lesson carries over cleanly: the more delicate the finish, the less product and pressure you should use.
If your leather has already picked up winter film, salt stains, or that dry, stiff feel, bring it in before the damage gets harder to reverse. Nanak Car Wash handles interior cleaning and leather care for GTA drivers who want the cabin cleaned properly, not just wiped over, so book a visit at Nanak Car Wash and get the seats back on a real maintenance cycle.



 6600 Finch Ave W, Etobicoke, ON M9V 3Z6
 647-703-8515
 MON – SUN 8 AM to 7 PM